I have already blogged two different integration pattern between Service Cloud to Eloqua.
This first integration pattern was using Standard Object e.g. Contact object, documented in this blog
The second integration pattern was using Custom Object e.g. Degree Object, documented in this blog.
Now, in this current blog, I am going to cover another integration pattern where bulk data can be imported from Service Cloud to Eloqua using Service Cloud ROQL statement.
In both my previous blogs, data was getting exchanged real time but one transaction at a time, but in this blog data will be transmitted from Service Cloud to Eloqua in bulk for Opportunity Business Object.
Usecase:-
This could be one of useful use case wherein you run some marketing campaign recently, which resulted some of the opportunities in Service Cloud and in Marketing cloud you want to reassess campaign performance by looking opportunities data from Service Cloud. Hence, Opportunities data need to be synch with Eloqua in Bulk.
In this use case we will running scheduler integration which will trigger by its own in 10 minute interval and will first get the lists of all new and updated opportunities from Service cloud and then will create the Opportunity Import job in Eloqua and will upload the data to that particular opportunity import job, as result your Opportunities data form Service Cloud to Eloqua will be synched.
Below are the high level steps need to execute to Sync Opportunities in bulk from Service Cloud to Eloqua-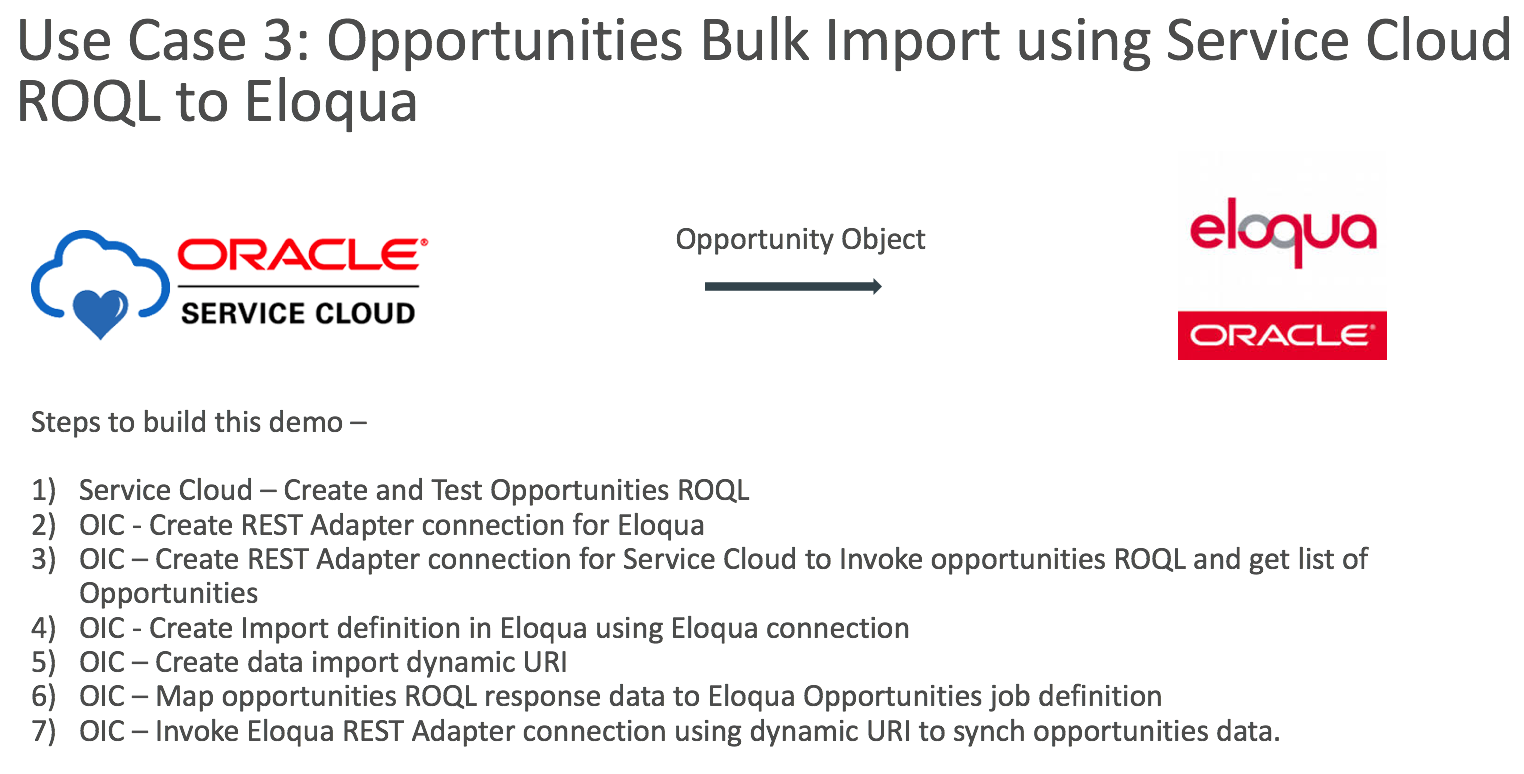
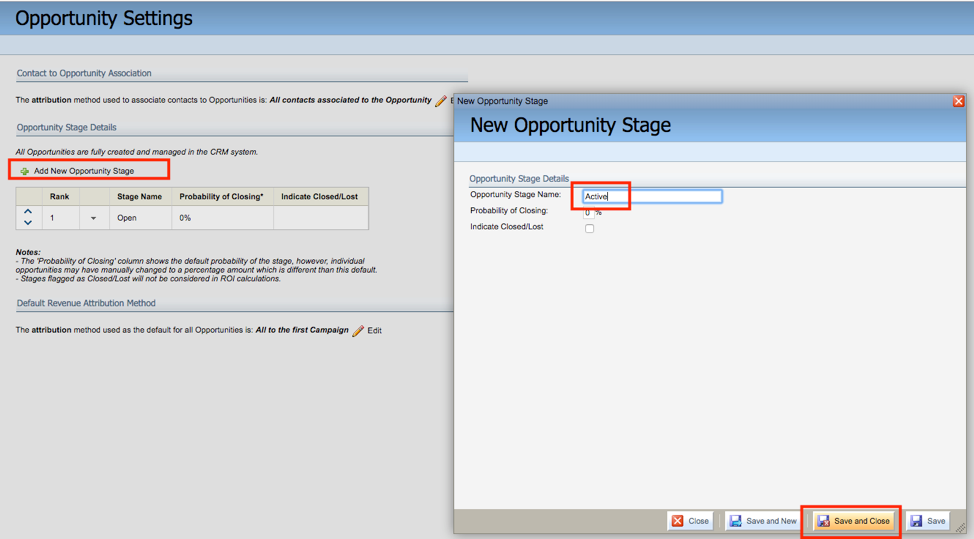
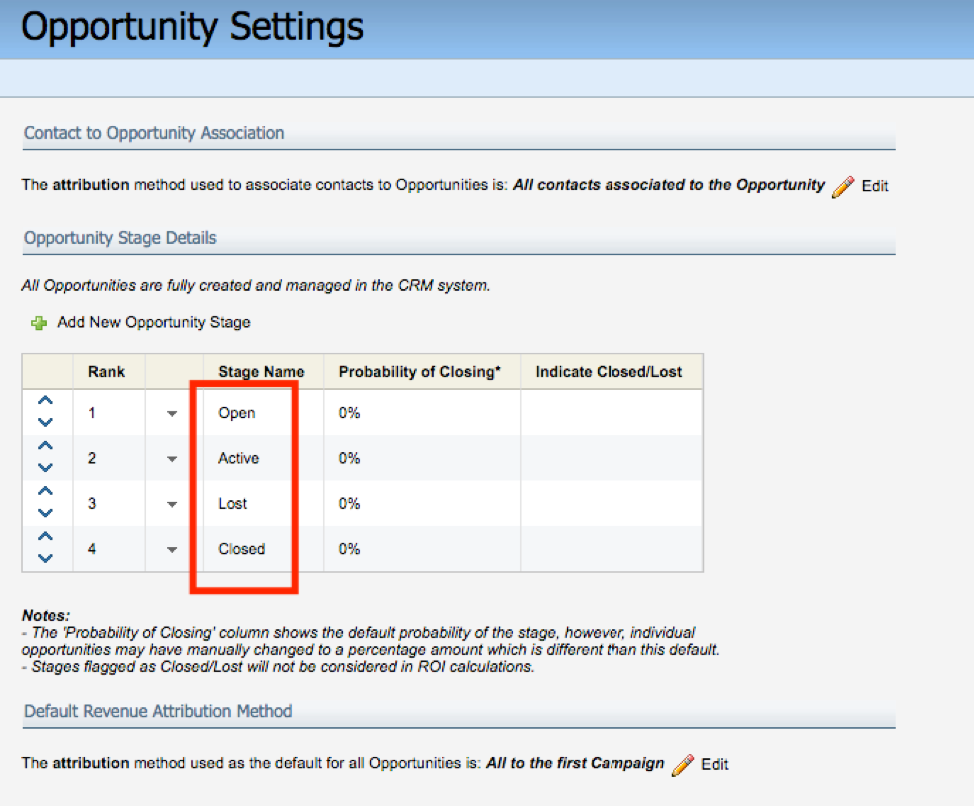
Eloqua Configuration - Opportunity Stage Creation
We have to create similar opportunity stage inside Eloqua what exists inside Service Cloud until unless you want to do cross referring using OIC, to simplified the example I just created same Opportunities stage in Eloqua what exists in Service Cloud, so that no lookup needs to maintain in OIC.
Navigate to Orchestration >> Campaign >> Opportunities setting
Click on Add new Opportunity Stage, add multiple stage e.g. open, active, lost and closed
OIC - Create Eloqua Rest Adapter Connection
We will be invoking Eloqua using its REST API, hence need to Create a REST Adapter connection for Eloqua, where we can specify Opportunities Import and actual data JSON payload.
Chose any relevant name for adapter and specify Eloqua Portal URL e.g. https://secure.p03.eloqua.com
For authentication make sure you are including Company and username together, refer below snap.

Note: Company name need to pre-fixed with user name as per above snap
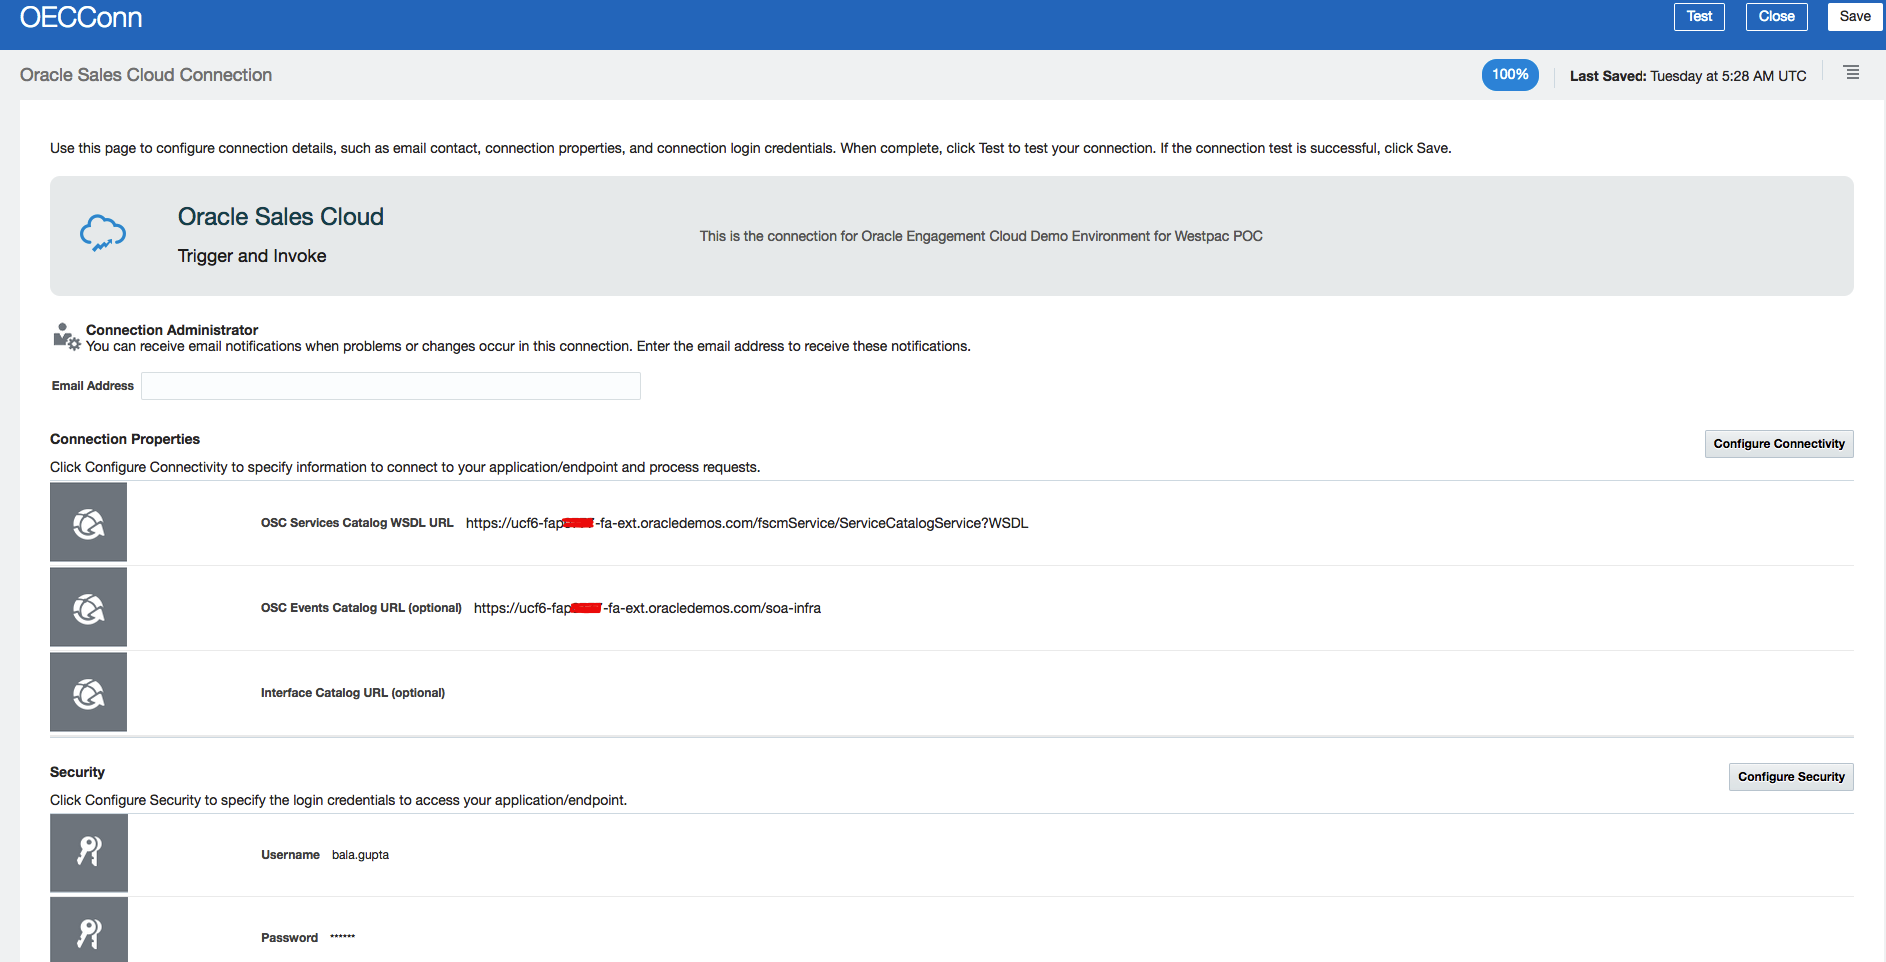
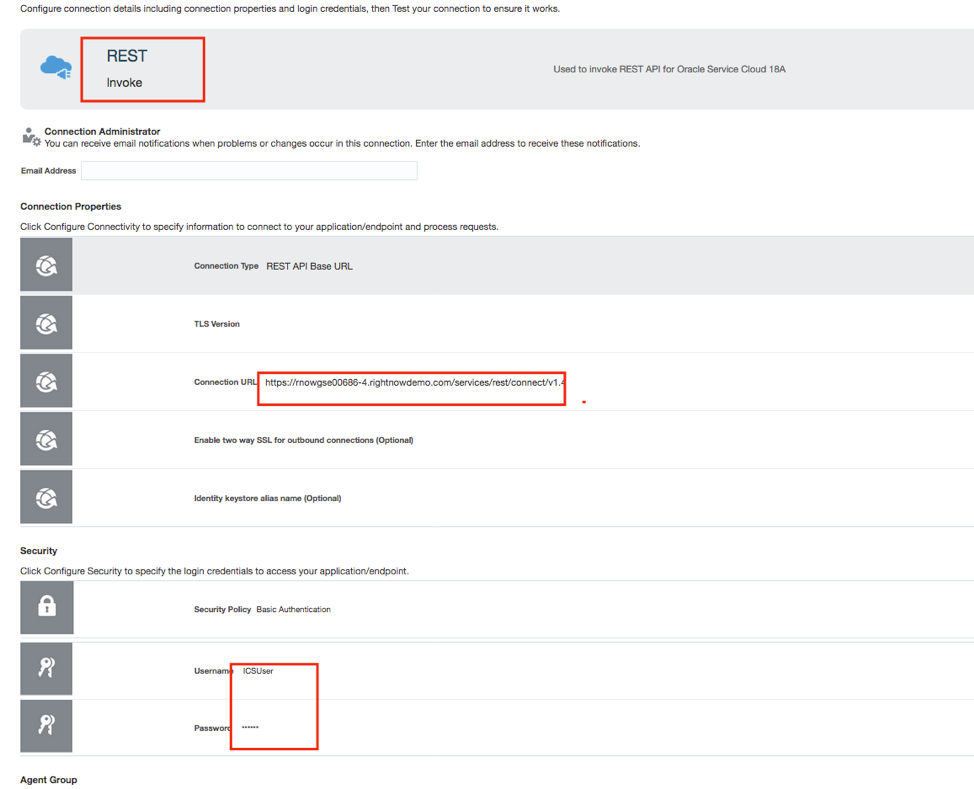
OIC - Service Cloud REST Adapter Connection
Similarly, we need to Invoke Service Cloud using its REST API, hence need a REST Adapter to invoke Service Cloud ROQL statement to get the list of stored opportunities
Note: Service Cloud Adapter also support Rightnow Object Query Language (ROQL) statement but I find easy to deal with REST API, hence used REST Adapter but you can always using Service Cloud Adapter to invoke ROQL statement as well.
Give meaningful name and specify Service Cloud WSLD and Service Cloud credentials.
Rest URL e.g. https://rnowgse00xxx-x.rightnowdemo.com/services/rest/connect/v1.4
Service Cloud - ROQL Creation and Testing
Its good idea to first develop ROQL and test that using postman or any other REST API based tool. For more information about ROQL, refer this link.
Below is the ROQL which I have used in my integration.
https://rnowgse00xxx-x.rightnowdemo.com/services/rest/connect/v1.4/queryResults/?query=select id, name, statusWithType.statusType.lookupName, costOfSale.value from opportunities
Make sure to include authentication and “OSvC-CREST-Application-Context” header key parameter


Now, all the ingredients are ready and we need to start creating integration.
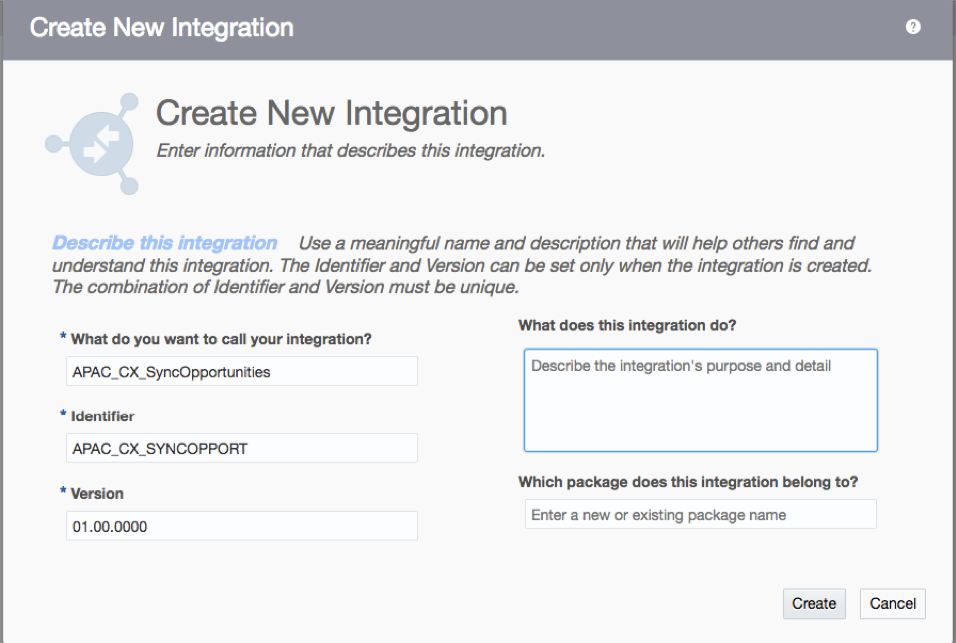
OIC - Create Integration
Create new “Scheduled Orchestration” type of Integration, given some meaningful name.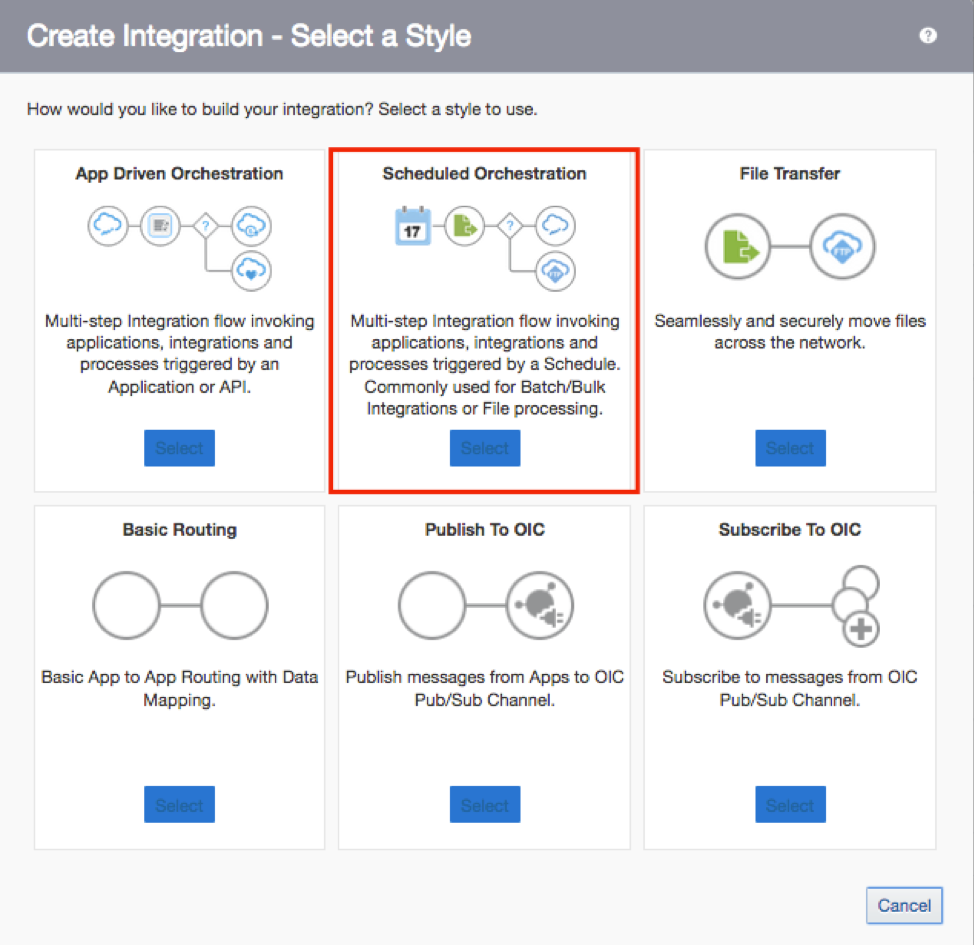
You will get blank canvas something like below –
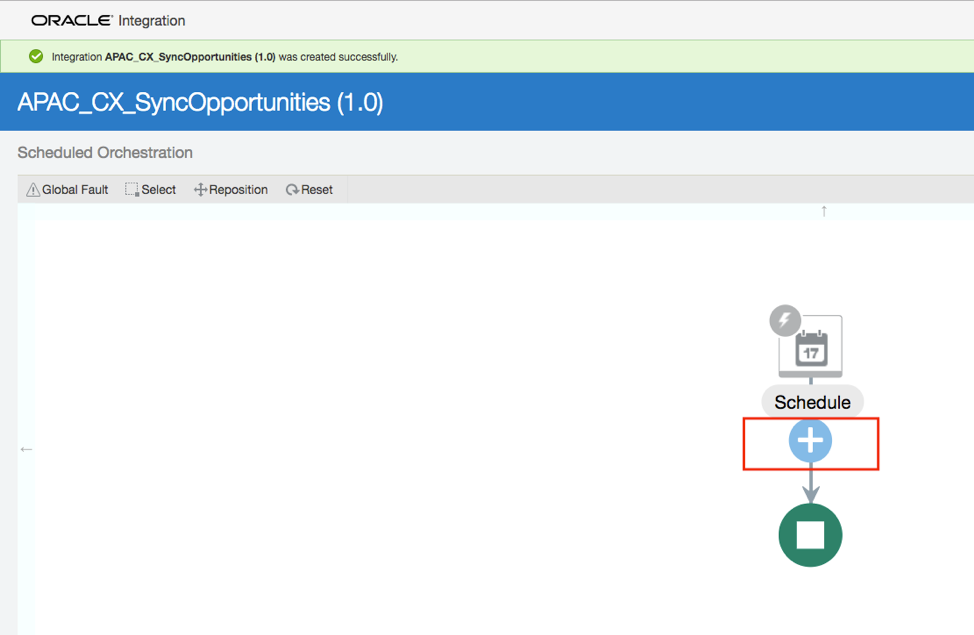
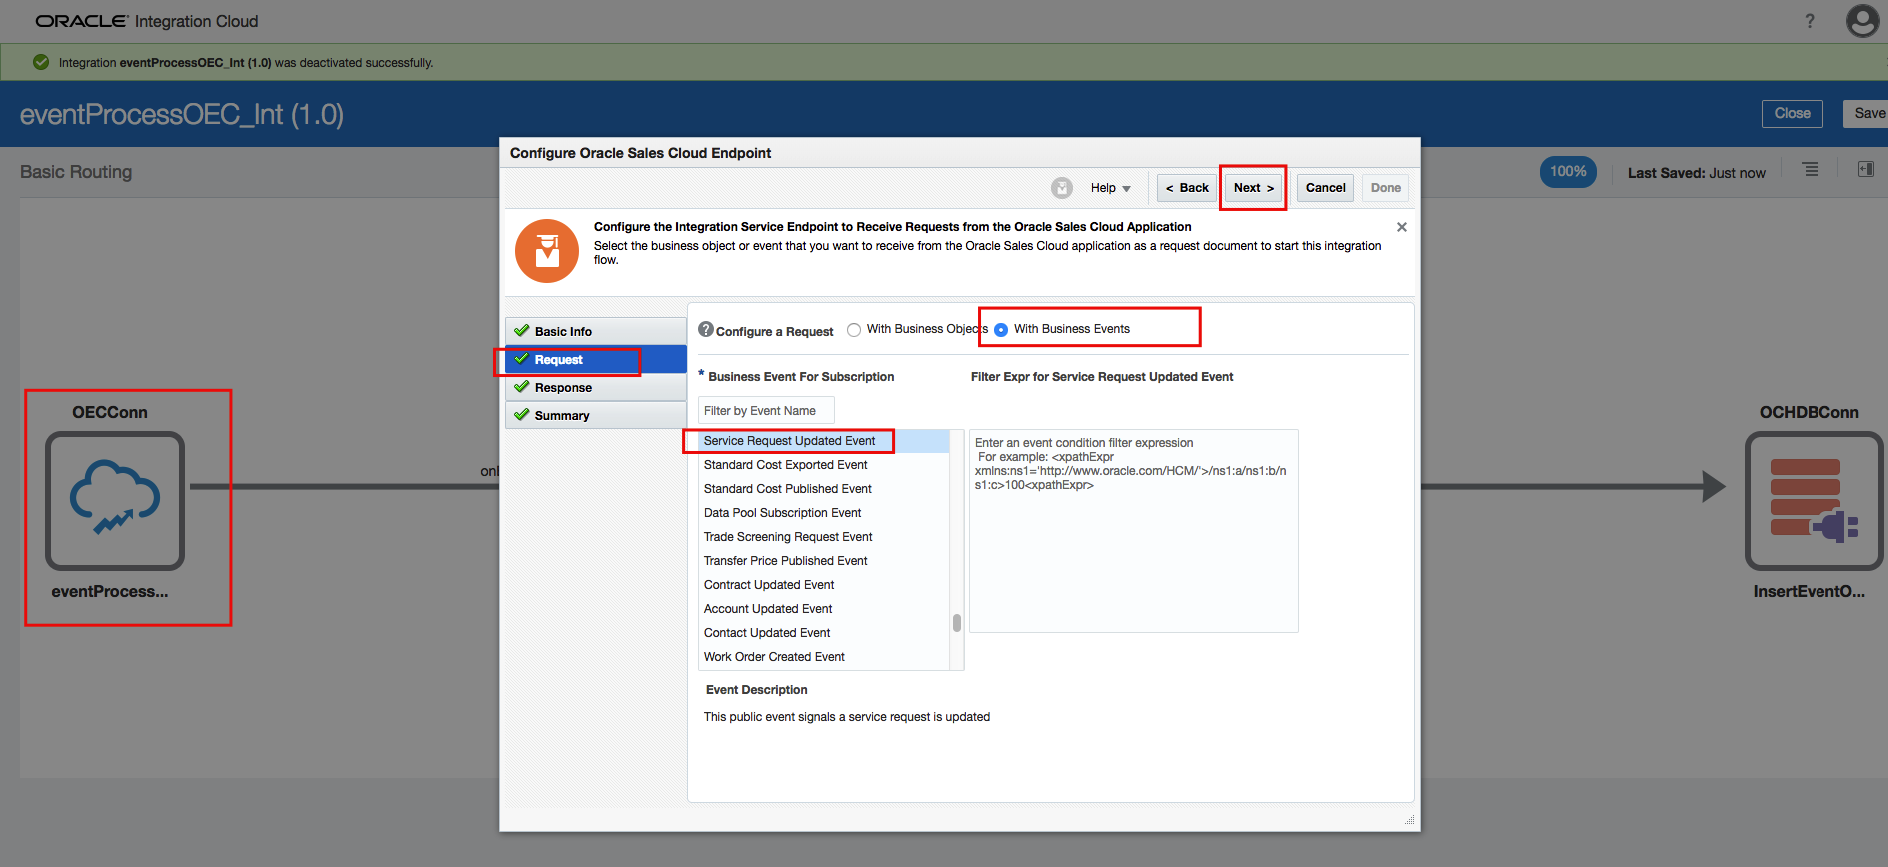
Click on  sign button and use Service Cloud REST Adapter Connection to Invoke Service Cloud and pass the ROQL query and get the response.
Once you drop the Service Cloud REST Adapter, it open-ups Wizard, given some sensible endpoint name, endpoint relative URI name, GET action, tick add and review parameter, tick receive response and custom header.
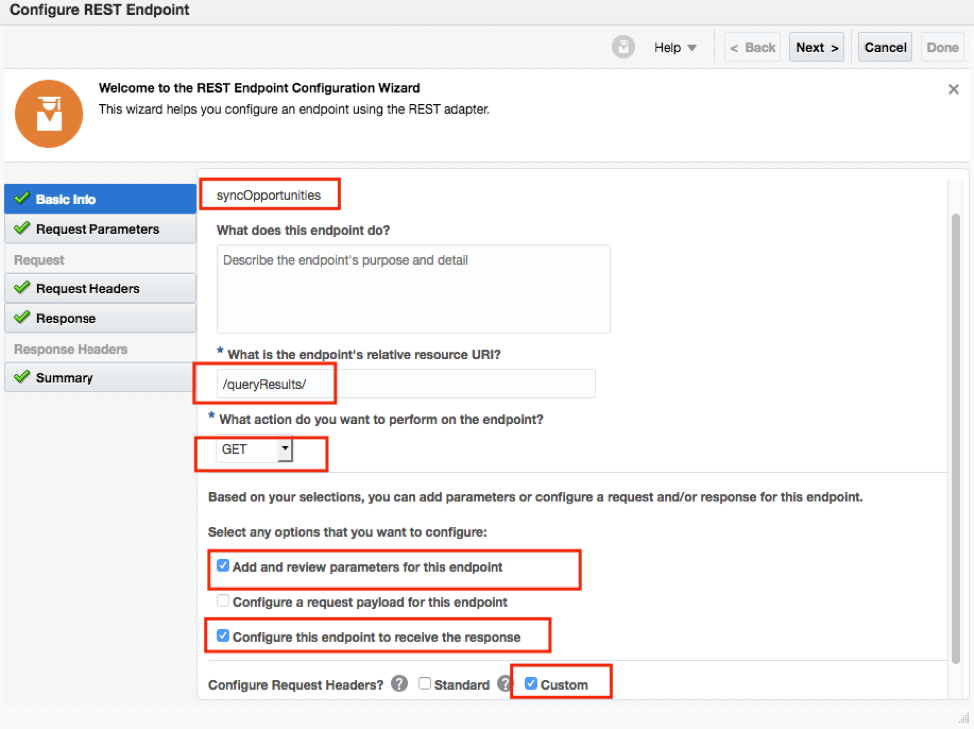
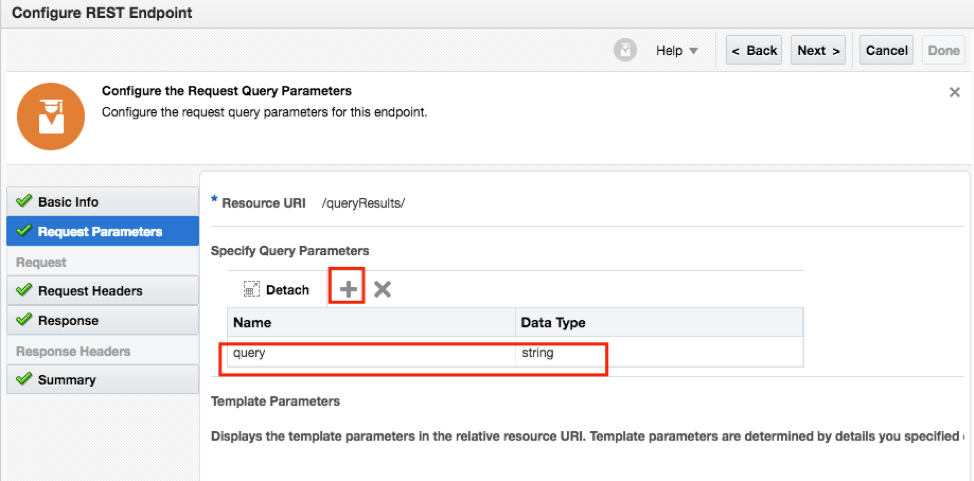
Add a query parameter, the purpose of this query parameter to pass the queryString which contains the ROQL statement
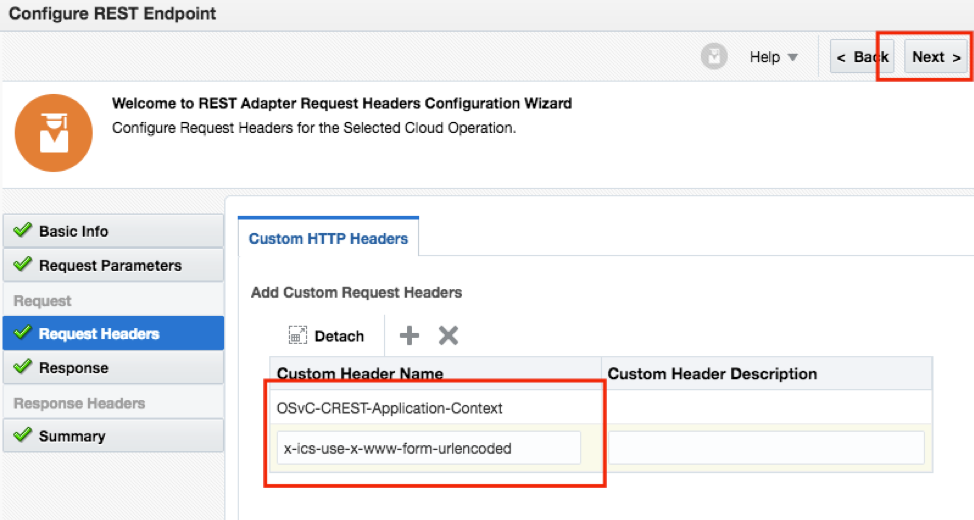
You also need to pass 2 custom header parameters, its pre-requisite to invoke Service Cloud using REST API.
OSvC-CREST-Application-Context
x-ics-use-x-www-form-urlencoded (This one I added later due to error I was facing)
For response provide below JSON payload, which we get once we run the query from Postman tool
{ "items": [ { "tableName": "opportunities", "count": 11, "columnNames": [ "id", "name", "lookupName", "value" ], "rows": [ [ "1", "Insurance coverage for family", "Active", null ] ] } ] }

And finish the wizard.
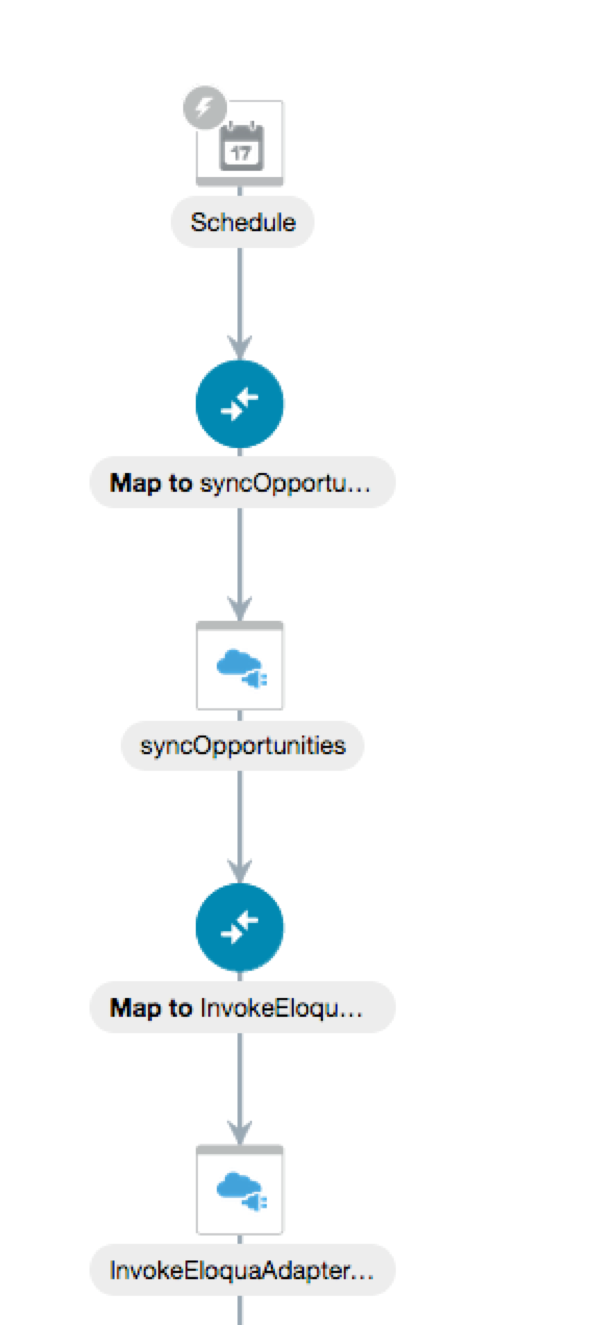
Integration will look like something below, and map option to “synchOpportunities” will also appear.
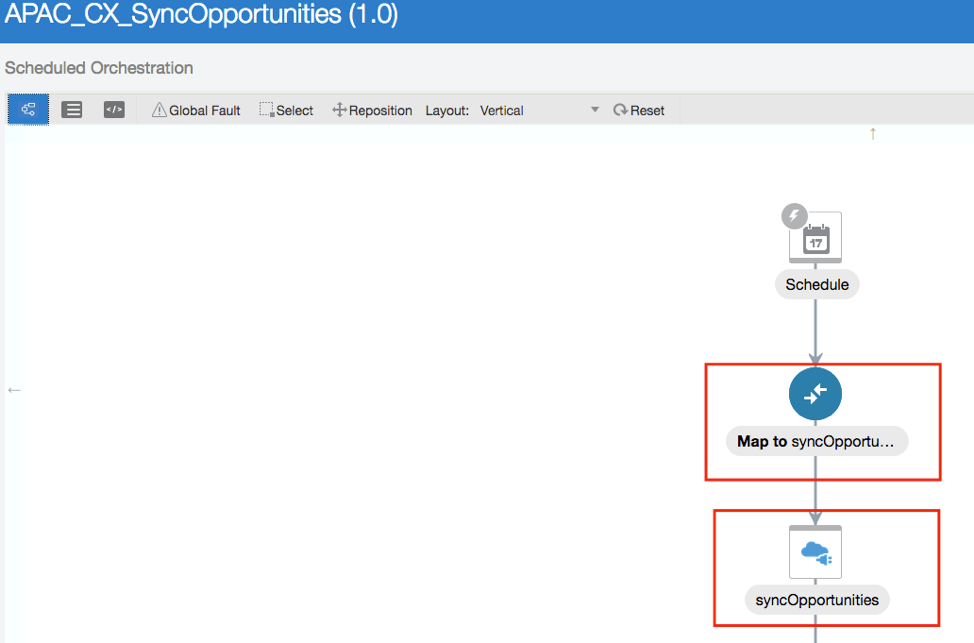
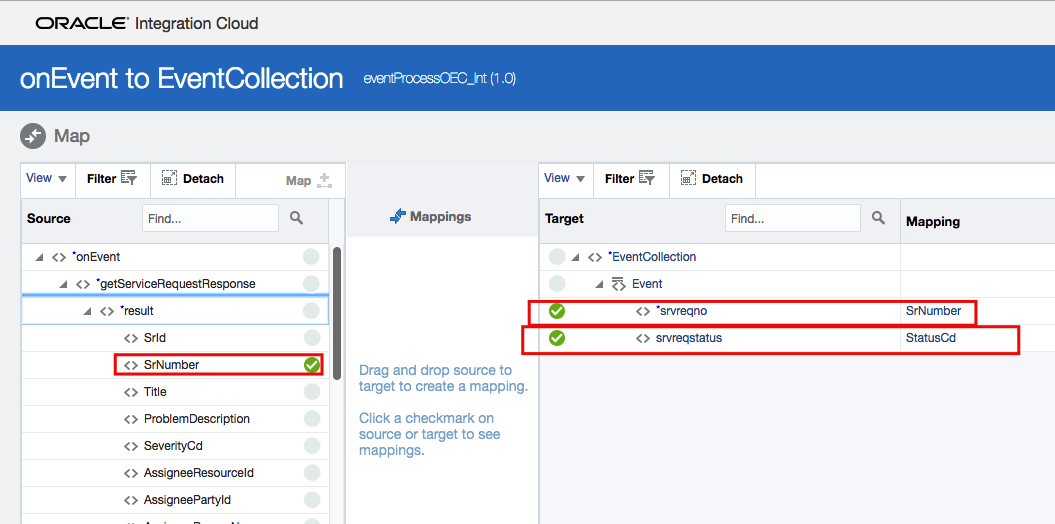
Go inside mapper
 to do the mapping.
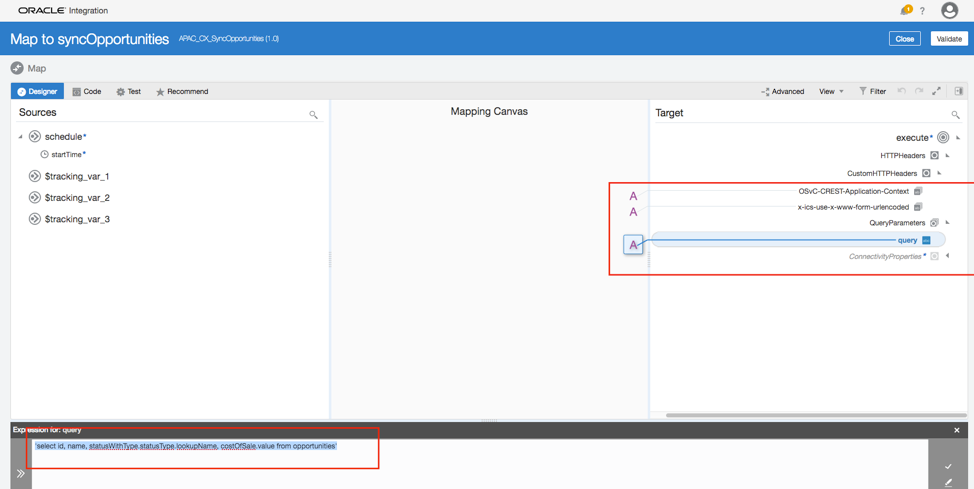
Map the value as per below table-
| Target Element name | Target Element Value |
| OSvC-CREST-Application-Context | “Test” |
| x-ics-use-x-www-form-urlencoded/ | ‘false’ |
| Query | 'select id, name, statusWithType.statusType.lookupName, costOfSale.value from opportunities' |
Once mapping done, validate mapping, save mapping and save integration.
By now we have called Service Cloud with ROQL statement and will get reply from Service Cloud using JSON payload.
Now, we need to invoke Eloqua, but we need to invoke Eloqua twice, 1) creating Import definition and tell Eloqua what the fields are will be include as part of that definition and 2) upload the data into that particular Import JOB.
Again, click onand this time use Eloqua REST Adapter connection and wizard will open-up.
Give some sensible name to endpoint, endpoint relative URL must be same as highlighted, select POST Action and tick request and response configuration.
/api/bulk/2.0/opportunities/imports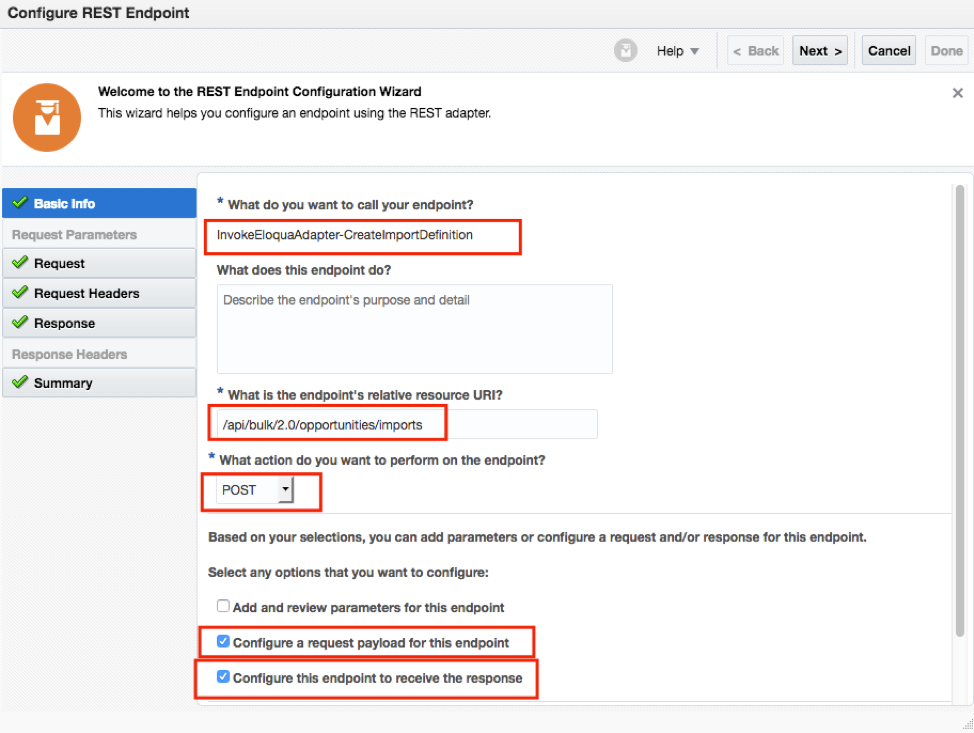
Refer opportunity import REST API documentation for more details.
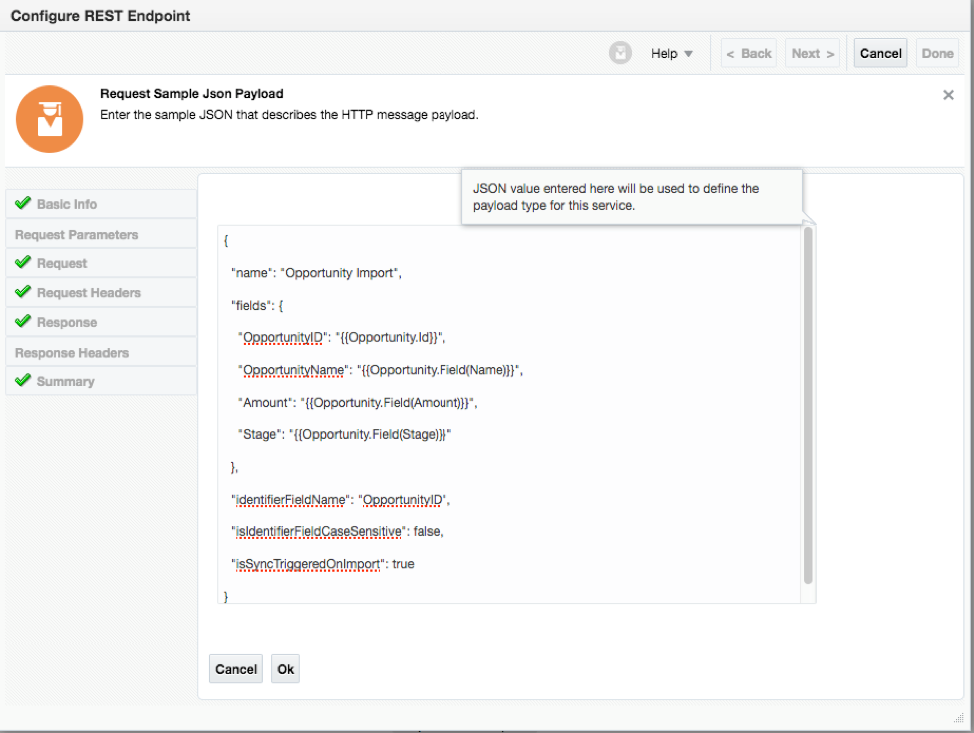
Chose, Inline JSON option, specified this payload
{
"name": "Opportunity Import",
"fields": {
"OpportunityID": "{{Opportunity.Id}}",
"OpportunityName": "{{Opportunity.Field(Name)}}",
"Amount": "{{Opportunity.Field(Amount)}}",
"Stage": "{{Opportunity.Field(Stage)}}"},
"identifierFieldName": "OpportunityID",
"isIdentifierFieldCaseSensitive": false,
"isSyncTriggeredOnImport": true
}
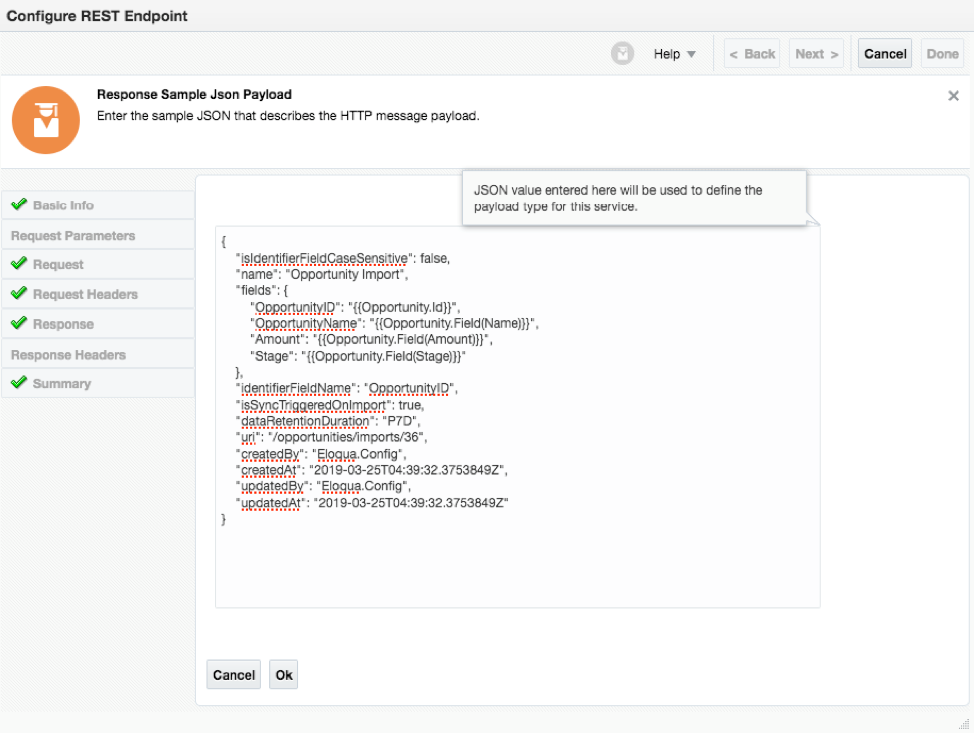
And Inline JSON Response payload.
{
"isIdentifierFieldCaseSensitive": false,
"name": "Opportunity Import",
"fields": {
"OpportunityID": "{{Opportunity.Id}}",
"OpportunityName": "{{Opportunity.Field(Name)}}",
"Amount": "{{Opportunity.Field(Amount)}}",
"Stage": "{{Opportunity.Field(Stage)}}"
},
"identifierFieldName": "OpportunityID",
"isSyncTriggeredOnImport": true,
"dataRetentionDuration": "P7D",
"uri": "/opportunities/imports/36",
"createdBy": "Eloqua.Config",
"createdAt": "2019-03-25T04:39:32.3753849Z",
"updatedBy": "Eloqua.Config",
"updatedAt": "2019-03-25T04:39:32.3753849Z"
}
And finish the adapter connection.
Now, we need to do mapping for Create Import Definition step.
Do the mapping as per below table-
| Target Element/Node Name | Target Element/Node value |
| Content-Type | "application/json" |
| name | "Opportunity Import" |
| fields:OpportunityID/ | "{{Opportunity.Id}}" |
| Fields: OpportunityName/ | "{{Opportunity.Field(Name)}}" |
| Fields:Amout | "{{Opportunity.Field(Amount)}}" |
| Fields:Stage | "{{Opportunity.Field(Stage)}}" |
| identifierFieldName | "OpportunityID" |
| isIdentifierFieldCaseSensitive | ‘false’ |
| sSyncTriggeredOnImport | ‘true’ |
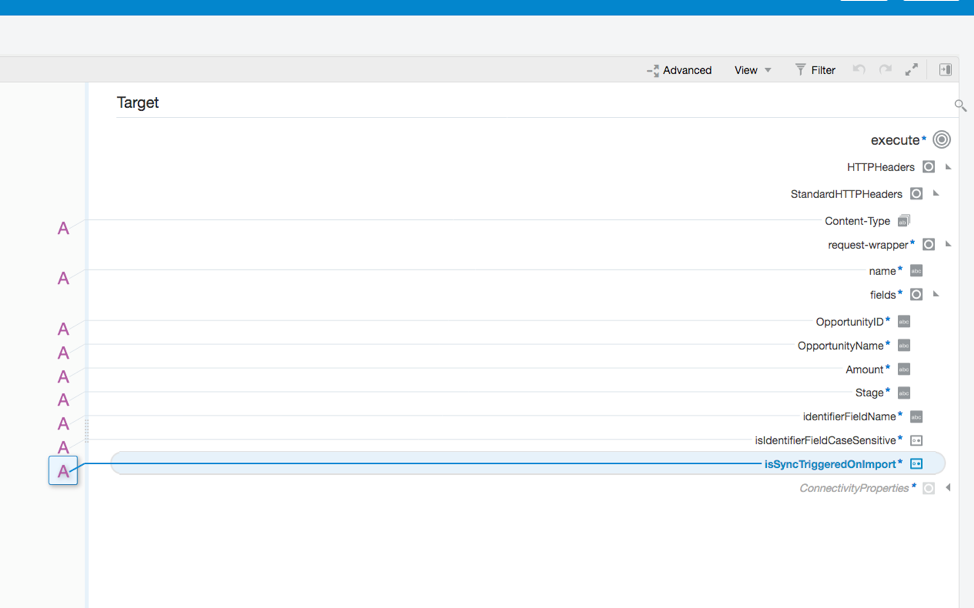
Note: All values in this mapping mapped with static value.
Once you finish with that, your integration will something like this.
Till this stage you have invoked Service Cloud with ROQL, got the reply, you have invoked Eloqua with Opportunity definition and got its reply with opportunity job id.
So far so good. The JSON reply from Eloqua for Opportunity definition should be like this–
{"isIdentifierFieldCaseSensitive": false,
"name": "Opportunity Import",
"fields": {
"OpportunityID": "{{Opportunity.Id}}",
"OpportunityName": "{{Opportunity.Field(Name)}}",
"Amount": "{{Opportunity.Field(Amount)}}",
"Stage": "{{Opportunity.Field(Stage)}}"
},
"identifierFieldName": "OpportunityID",
"isSyncTriggeredOnImport": true,
"dataRetentionDuration": "P7D",
"uri": "/opportunities/imports/36",
"createdBy": "Eloqua.Config",
"createdAt": "2019-03-25T04:39:32.3753849Z",
"updatedBy": "Eloqua.Config",
"updatedAt": "2019-03-25T04:39:32.3753849Z"
}
The highlighted element “uri” value has an important role for next step.
"/opportunities/imports/36", is the number of opportunity job id created in Eloqua system.
In our next step we need to upload the data to this import job id. However, the REST API for upload need to build dynamically by passing this number e.g. 36 in this case.
The REST API for data upload is this-
https://secure.p03.eloqua.com/api/bulk/2.0/opportunities/imports/36/data
Now, how to do that is quite simple if you know, if not then might take a while to workout.
So, let’s have a look how to do that.
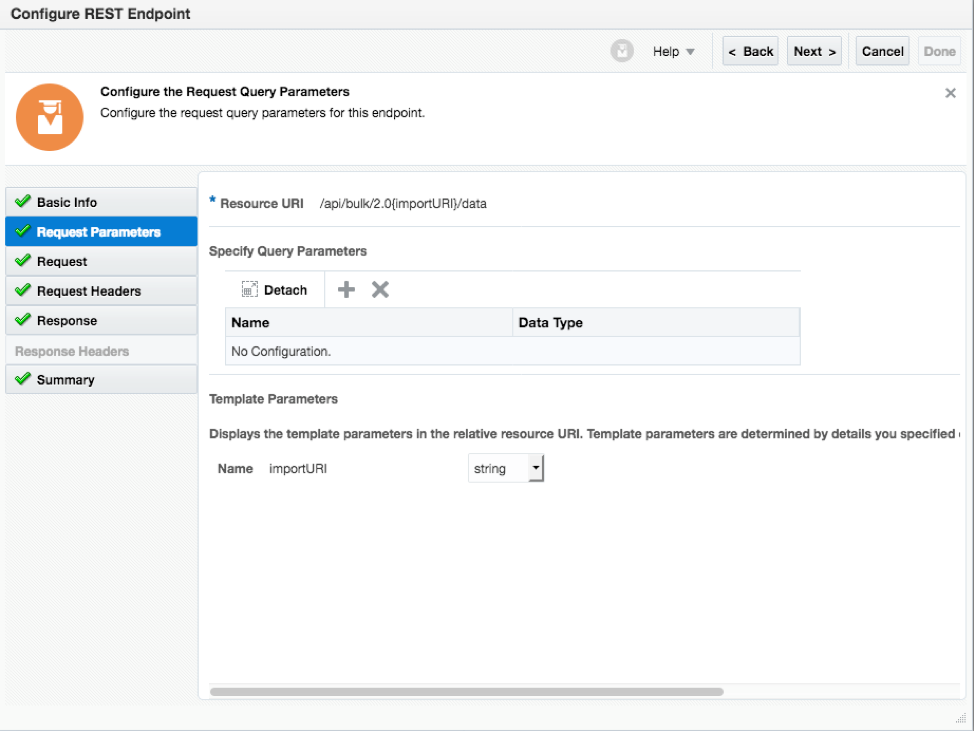
When you drop the Eloqua Adapter connection again, wizard will get open and it will ask endpoint relative URI, what you need to do is pass the relative URI like this –
/api/bulk/2.0{importURI}/data

importURI in this case become a variable which we will map dynamically during mapping for this invoke with the value which we will get back from Import definition “uri” element.
So, let’s move to next step and invoke Eloqua once again using same connection and call data upload REST API and do the mapping.
Click on again sign to add Eloqua Adapter connection and specified things as per below snap and click next –
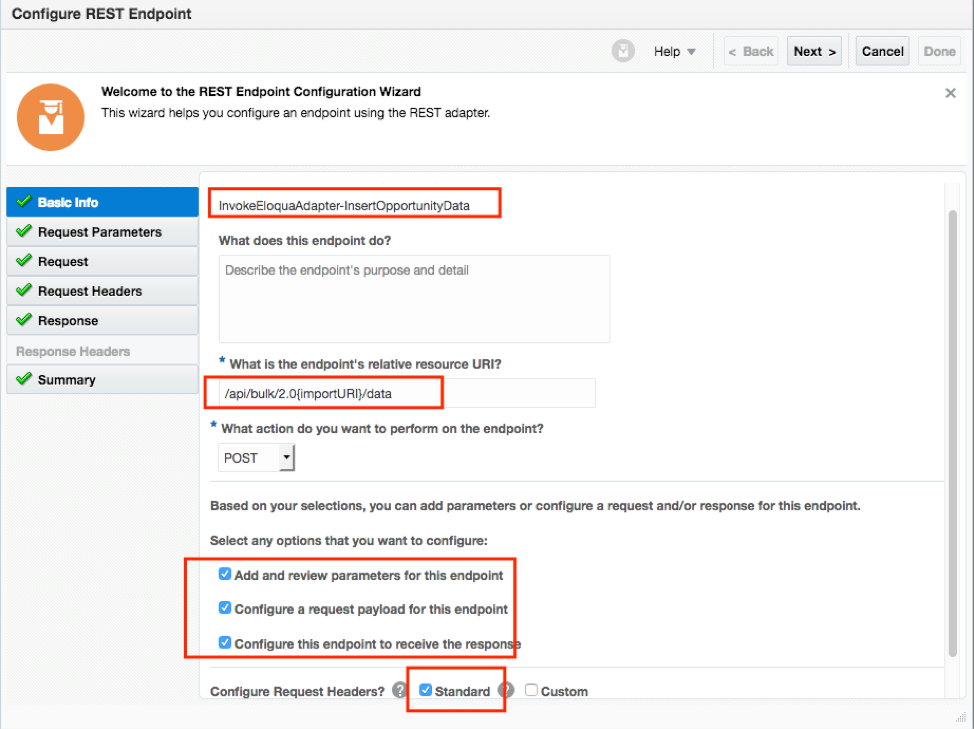
Below screen just accept everything default.
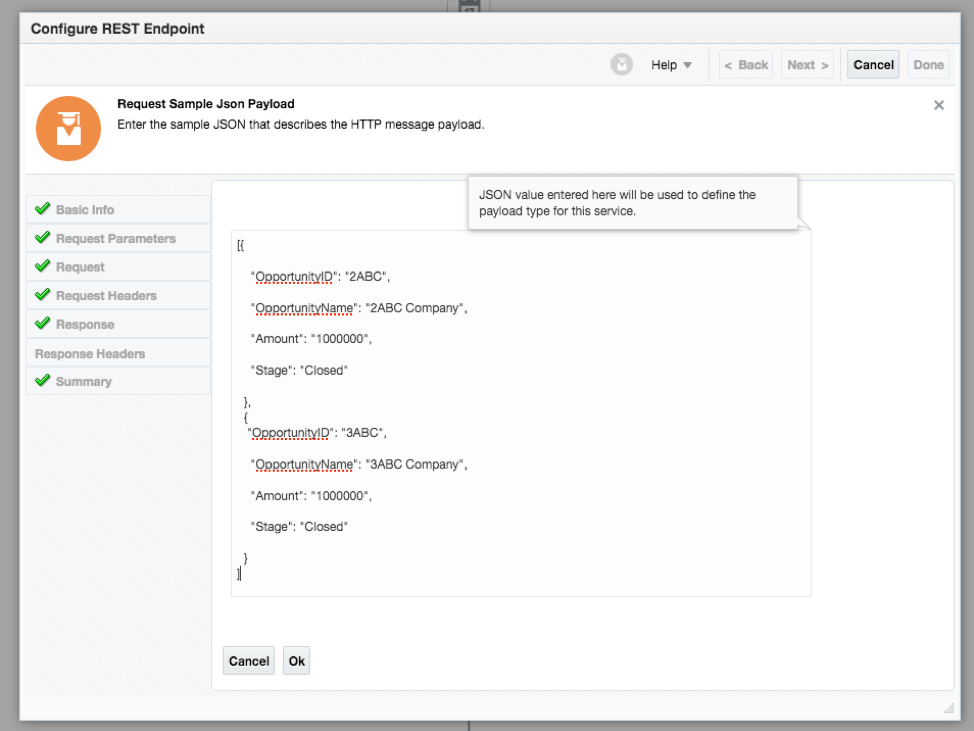
Now, again specified inline JSON payload
[{
"OpportunityID": "2ABC",
"OpportunityName": "2ABC Company",
"Amount": "1000000",
"Stage": "Closed"
},
{
"OpportunityID": "3ABC",
"OpportunityName": "3ABC Company",
"Amount": "1000000",
"Stage": "Closed"
}
]
Response JSON Payload
{
"syncedInstanceUri": "/opportunities/imports/36",
"status": "pending",
"createdAt": "2019-03-25T04:46:14.8249322Z",
"createdBy": "Eloqua.Config",
"uri": "/syncs/1446"
}
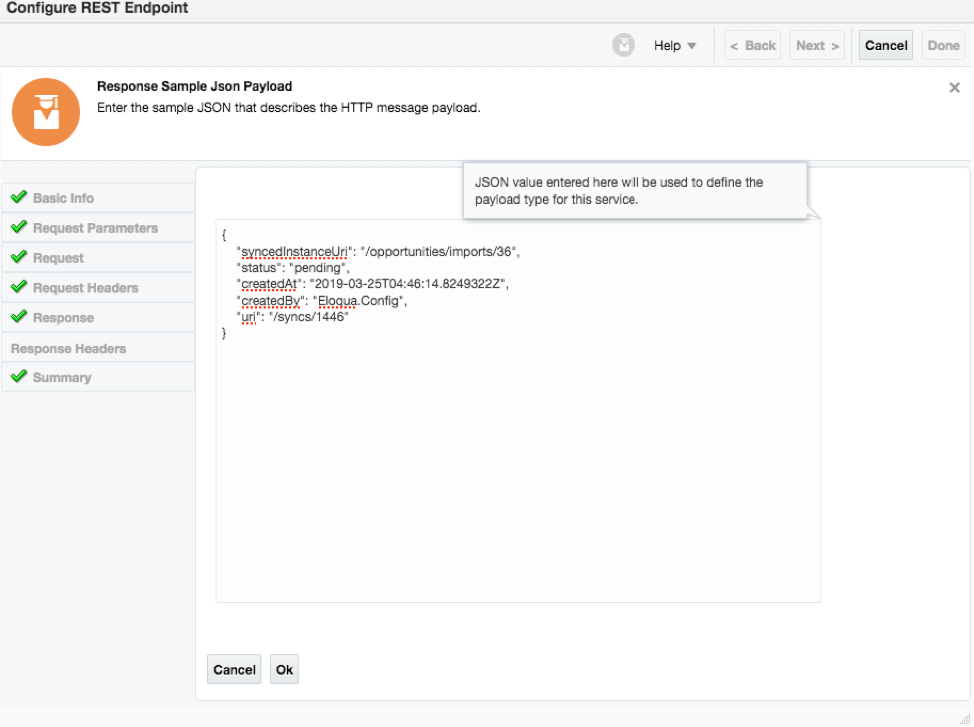
Finish the wizard and start doing mapping for this invoke.
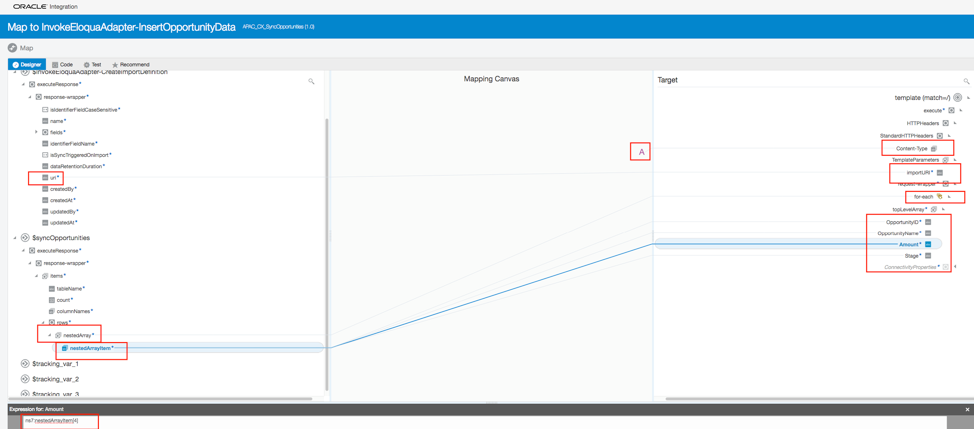
In this mapping we are going to map the Service Cloud ROQL response with Import Definition Data upload into Eloqua. Both side data structure is in different format. This mapping also using for-each function as both side we have reoccurring data coming. Service Cloud also sending data for multiple opportunities in nested array and Eloqua also we need to send multiple opportunity in object array form.
Follow below mapping table to do the mapping
| Source Element | Target Element | Mapping Function | Value |
| Content-Type | Static value mapping | "application/json" | |
| uri | ImportURI | One to one | |
| nestedArrayItem[1] | OpportunityID | One to one (Under for each) | |
| nestedArrayItem[2] | OpportunityName/ | One to one (Under for each) | |
| nestedArrayItem[3] | Stage | One to one (Under for each) | |
| nestedArrayItem[4] | Amount | One to one (Under for each) |
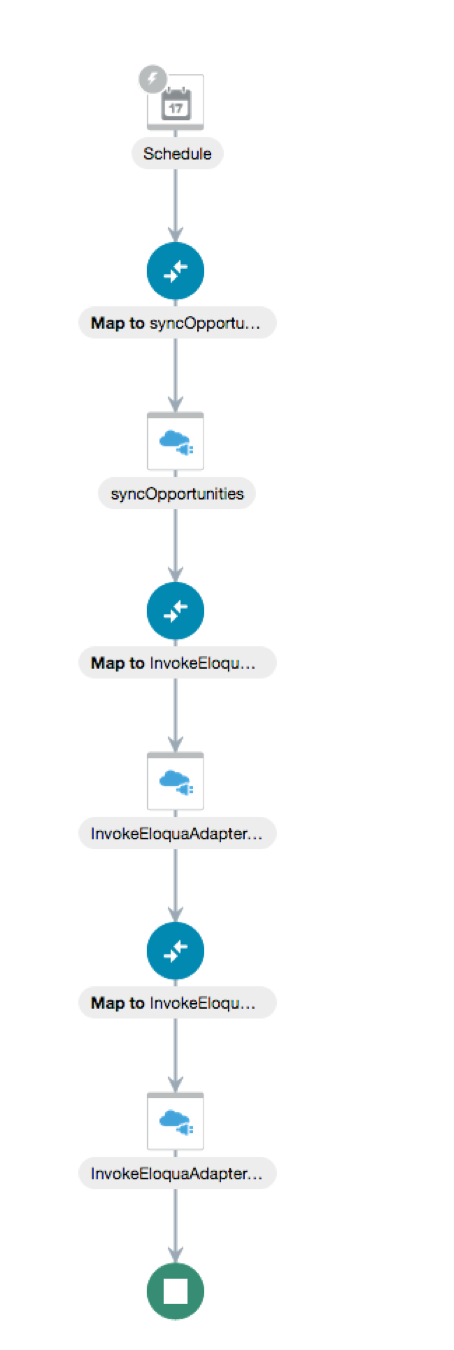
Save your mapping, save your integration, after complete flow, your integration should look like this.
Now, activate this integration and test the same. Since we are using scheduler, you may try to use option just “Active” without auto scheduling or “Activate and Schedule” which will pop-up another window where you can define scheduler setting such as frequency etc
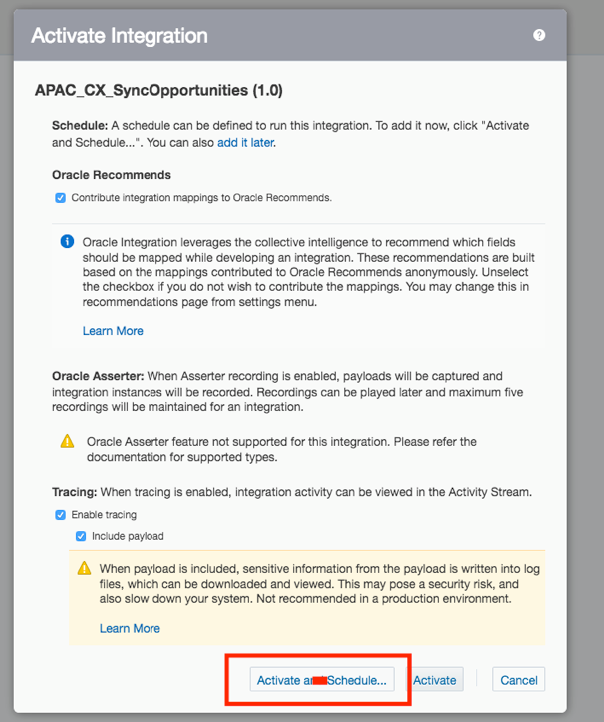
In Scheduler window, select frequency to hourly and define 10 minute which is lowest frequency allowed at this stage.
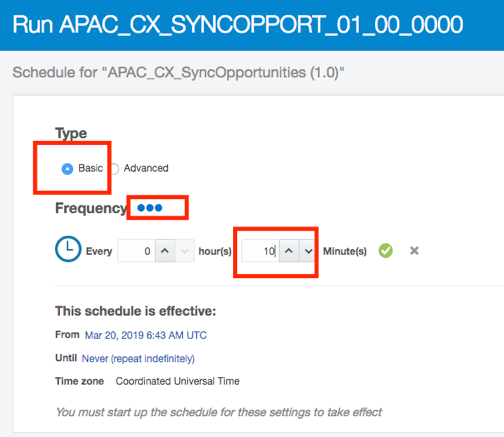
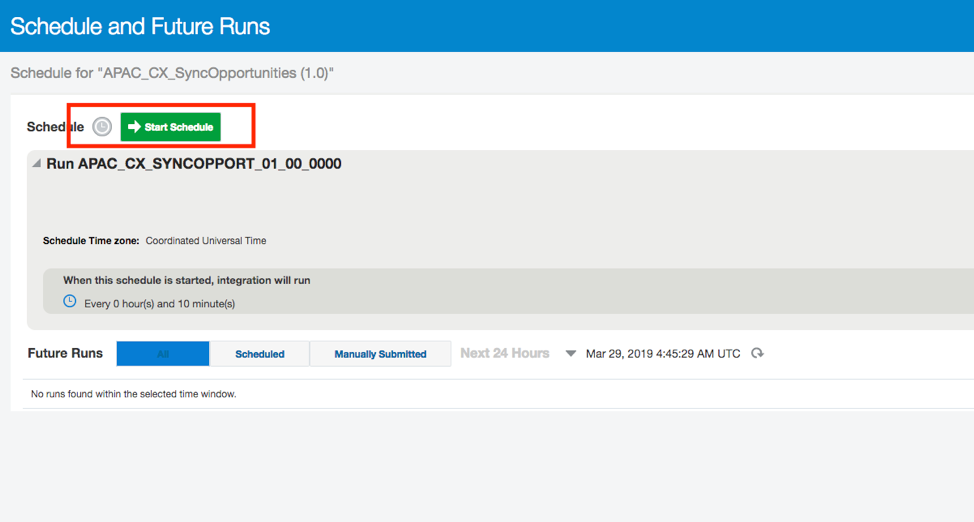
Once you define the frequency, you get another window to start the schedule, as soon as you click “start scheduler” it will start running in every 10 minute of your defined frequency.
Testing
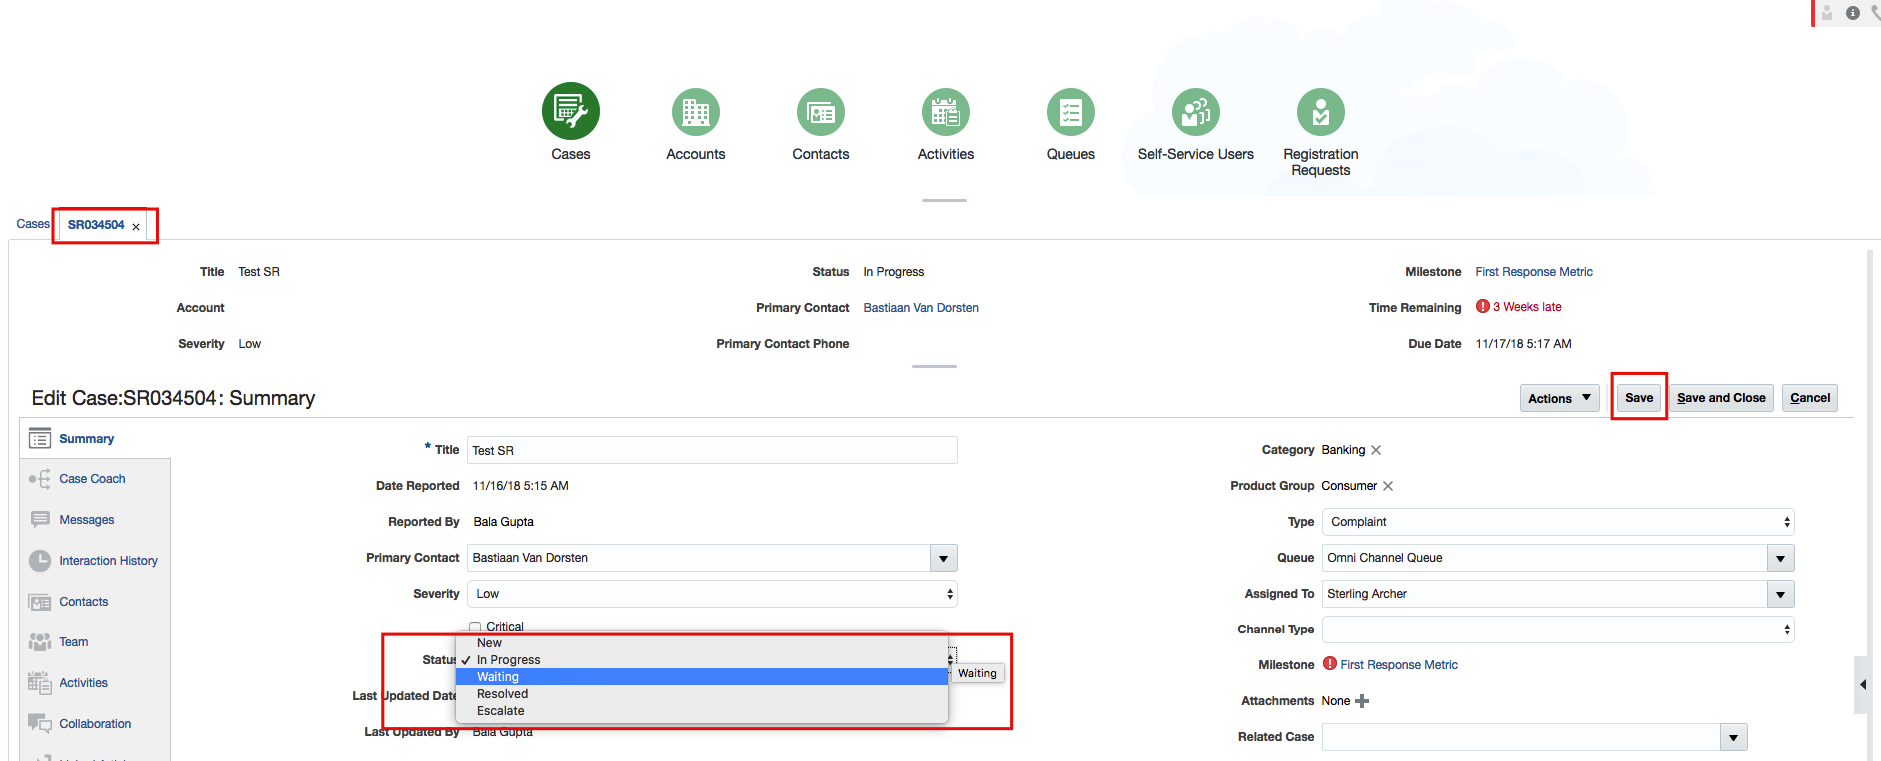
Login to Service Cloud Desktop Application, open the Demo Opportunity page.
Note: The Demo opportunity page is not standard page, it’s been developed for Service Cloud expert and refer Service Cloud document how to create such pages. There is no standard path to access the Demo Opportunity page and create a demo opportunities.

Once Opportunities been created, you can also run ROQL manually using postman to cross verify whether ROQL query picking up newly created opportunities.
https://rnowgse00XXX-X.rightnowdemo.com/services/rest/connect/v1.4/queryResults/?query=select id, name, statusWithType.statusType.lookupName, costOfSale.value from opportunities
header must contain “OSvC-CREST-Application-Context” parameter along with authorization.


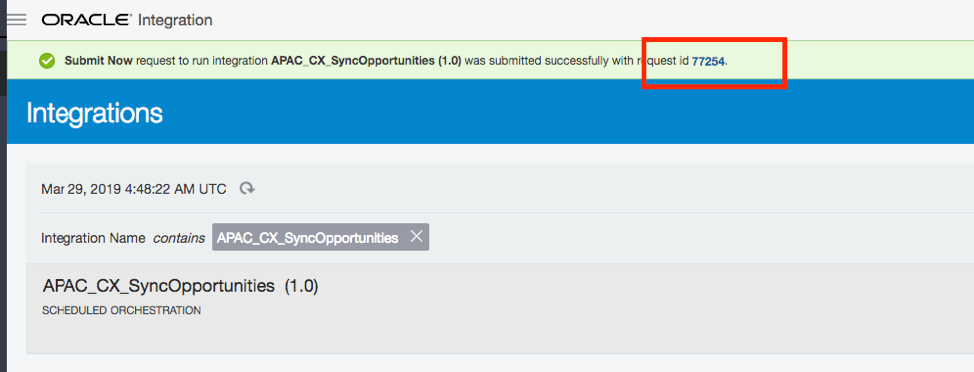
Next, wait for scheduler to pick this newly added opportunity of you can run the scheduler any time by choosing option “Submit now”
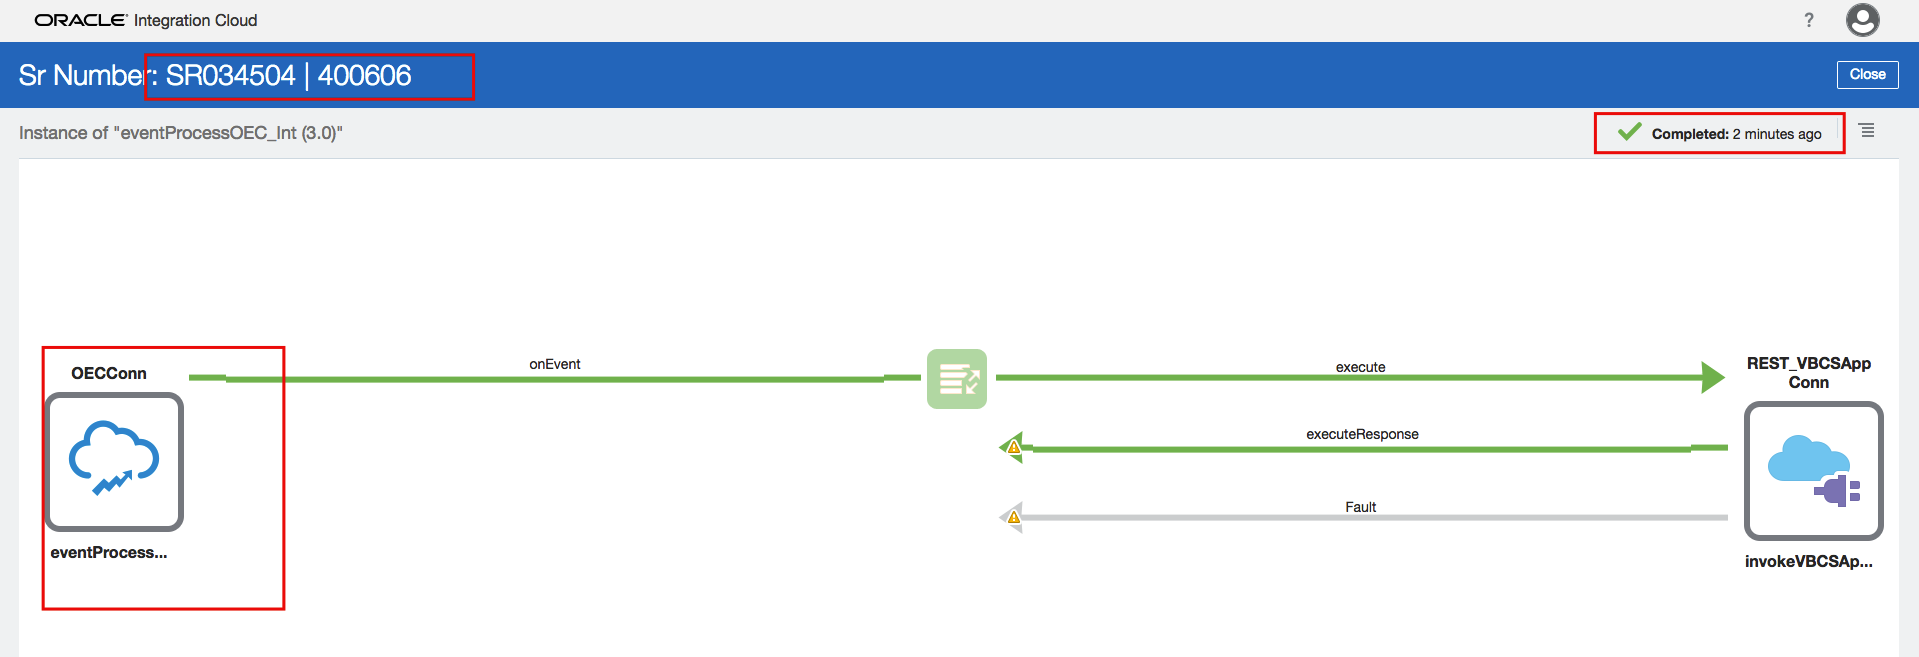
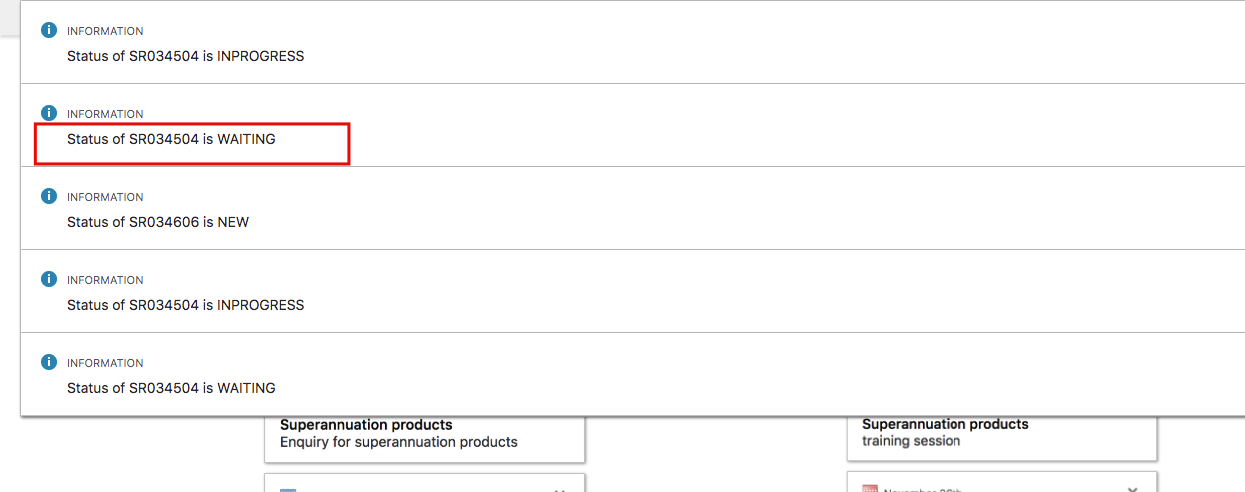
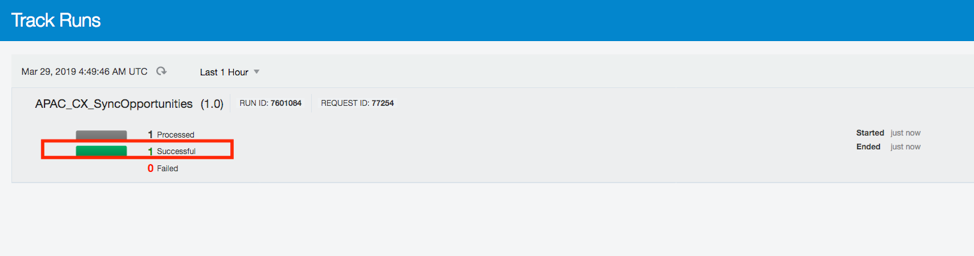
Once you submitted the scheduler job, you get request id, click on that and you will find status of that transactions –
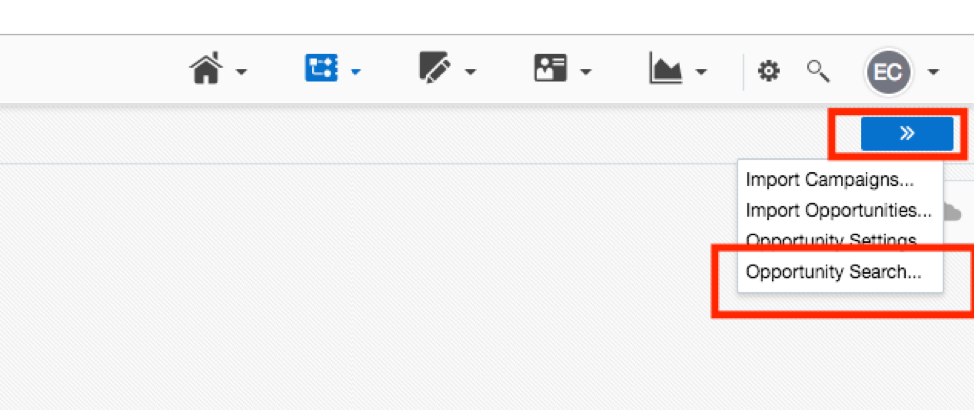
Jump to Eloqua, Navigate to Orchestration >> Campaign >> Opportunity Search

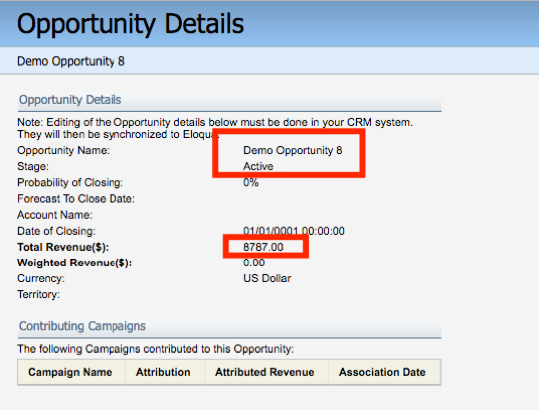
You can further click on Demo Opportunity 8 to see more details e.g. deal amount, stage etc.
With this blog, I am pretty much done with 3 different scenarios / use case/ Integration pattern whatever you want to call out, been completed. I hope the information provided in this blog must help you when you deal integration between Service Cloud to Eloqua.
Enjoy your time :)