Pages

Friday, November 8, 2019

Oracle Integration Cloud Autonomous Transaction Processing Adapter Configuration !!!


Oracle’s two major ground breaking innovation last year were Autonomous Data warehouse (ADW) and Autonomous Database Transaction processing (ATP) both are database offering suitable for different workload and are self-driving, self-securing, and self-repairing in nature. If you want to read more about these services then please go through above links.

ADW/ATP both can be quickly provisioned on Oracle Cloud Infrastructure, it’s take less than 5 minute to spin ADW/ATP instance and database is ready to connect.

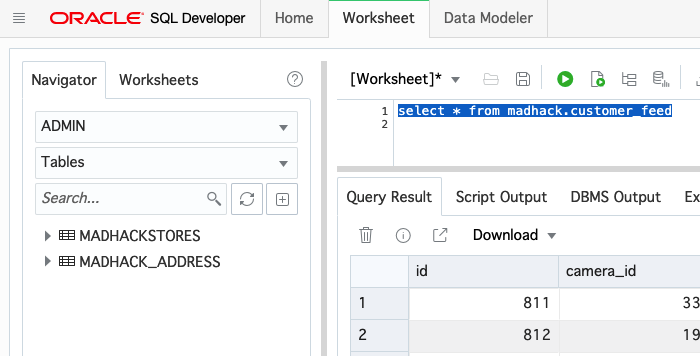
User can use Oracle SQL Developer to connect to ADW/ATP database as long as they are supported version. These DBaaS services also offers out-of-box browser based SQL Developer tool which can be used to run any kind of SQL statements.

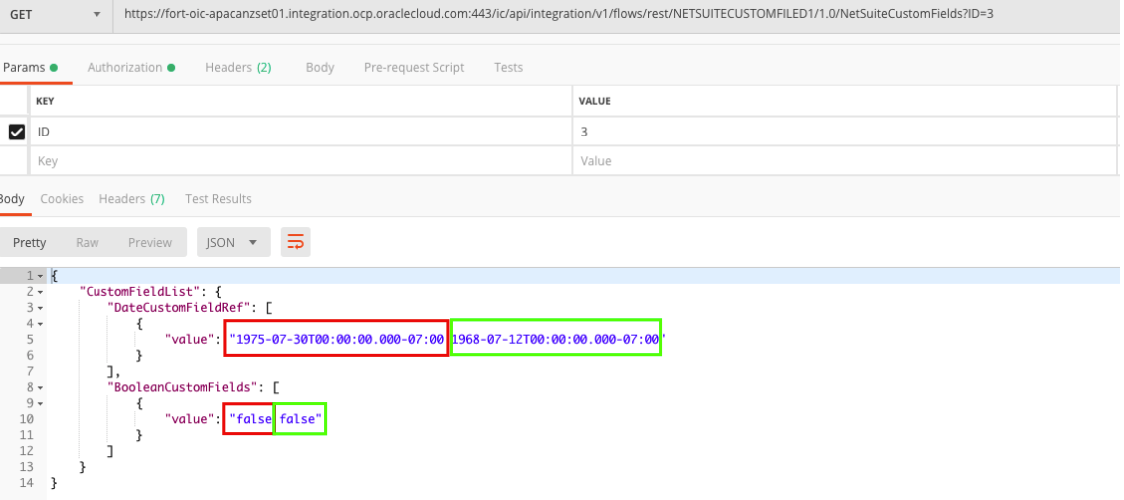
Here is sample snap of browser based SQL Developer capabilities –

8.png

Once user has Database ready, obviously there could be requirement to access data residing inside ADW/ATP instances.

Fortunately, Oracle Integration Cloud provide Adapter for connecting ADW/ATP instance, click here to know more about ATP Adapter capabilities –

In this blog I will be covering simple steps how you can connect to ADW/ATP instances using OIC Autonomous Transaction Processing Adapter (ATP) Adapter.

I made assumption that ADW/ATP instance already exists. if you not sure how to create ADW/ATP instance then refer this blog which was written by my colleague who already explained how to create ADW/ATP database instance and connect from SQL developer.

So, let move forward. Login to your Oracle Integration Cloud (OIC) home page >> Integration >> Connection >> Create >> search for “Oracle ATP” >> select the same

01


Provide a meaningful name to your ATP Adapter connection, select role “Invoke” and click create.
Please Note: Currently only Invoke Role is supported, which means OIC can only invoke ADW/ATP Database. OIC integration won’t be able to trigger itself when there is any changes in ADW/ATP database.

Now, In order to connect ADW/ATP database instance you need following values –

Wallet File:

Read the document about Wallet file here.  This is one of the most important zip files containing private keys, keystore files, tnsname.ora files and many other useful configuration files. Keep it safe and don’t share with anyone until unless you trust him and want to provide access to your ADW/ATP instance.

Oracle client credentials (wallet files) are downloaded from Autonomous Transaction Processing by a service administrator. If you are not an Autonomous Transaction Processing administrator, your administrator should provide you with the client credentials.

To download client credentials, do the following from Oracle Cloud Infrastructure console:
Navigate to the Autonomous Transaction Processing details page.
Wallet.zip can be downloaded from two different location 1) DB Connection and 2) Service Console >> Administration >> Download Client Credentails (Wallet)

3.png

Note: We have seen some connectivity problem using the downloaded files from DB Connection section, which we have already highlighted to Oracle support and they must be fixing while I am writing this blog, So I would recommend to download wallet file from “Service Console>> Administration >> Download Client Credentials (Wallet)”

In the Download Wallet dialog, enter a wallet password in the Password field and confirm the password in the Confirm Password field.

The password must be at least 8 characters long and must include at least 1 letter and either 1 numeric character or 1 special character.


Note:This password protects the downloaded Client Credentials wallet. This wallet is not the same as the Transparent Data Encryption (TDE) wallet for the database; therefore, use a different password to protect the Client Credentials wallet.

Click Download to save the client security credentials zip file.
By default the filename is: Wallet_.zip. You can save this file as any filename you want.

You must protect this file to prevent unauthorized database access.
6.png

Service Name:

The tnsnames.ora file resides inside Wallet_.zip provided with the credentials zip file contains five database service names identifiable as tpurgenttphighmedium, and low. The predefined service names provide different levels of performance and concurrency for Autonomous Transaction Processing. To know more about these predefined service name, refer this document.

Wallet Password:

Provide the password which you have provided while downloading Wallet_.zip file.

Database Service username:

Its schema name or DB username.

Database Service Password:

Password for Schema name or DB username.
Final Config something look like this –


So, your ATP Adapter connection is ready to be used inside Integration.

Just create any type of OIC Integration flow and use this connection inside flow.
Once you drop the ATP connection instance in your OIC flow, its exposes 3 different kinds of operations-
  • Invoke Stored Procedure
  • Run a SQL Statement
  • Perform an operation on Table
Once you select particular operation, it changes the subsequent wizard screens .In below snap I have selected “Perform an Operation on a table” option, hence its showing me Insert, Update, Merge,  Select sub-operation.


To understand more about of each of these operations, please refer this document section.

That’s easy is to connect to an ATP or ADW Database instance using Oracle Integration Cloud Oracle Autonomous Transaction Processing Adapter.
Stay tuned for more useful blog!!!
Happy Blogging ðŸ™‚

Wednesday, October 16, 2019

Simplified OAuth Config for Oracle Integration Cloud REST API using Postman !!!


This blog will be discussing very specific use case requirement which is more developer oriented and providing a quicker and efficient solution to invoke Oracle Integration REST API using OAuth access_token for testing purpose.
As an integration developer time to time you need to invoke Oracle Integration REST API to test API functionality. All the REST API in OIC needs a header parameter called “Authorization” which must needs to hold a valid access_token value in this format “Bearer access_token“.
In above format, “Bearer” is static world, However, access_token is the token value which we get after successfully OAuth Authentication from Oracle Identity Cloud Service.  Getting access_token from IDCS using code credentials flow is multi steps and cumbersome process.
However, developer can leverage Postman environment and variable features to simplify the process of getting access_token. That’s what, I will be covering in this blog.
Before I proceed further, I must redirect you to read my colleague blog which has greater in-depth explanation about what is IDCS, how IDCS govern security aspect of all Oracle PaaS products such as Oracle Integration Cloud, Analytics Cloud, Digital Assistant and so on and OAuth client and token generation process etc. I am recommending you to read his blog because I will be using few artefacts e.g. IDCS URL, Client ID, Client Secret etc which we need to get from IDCS OAuth Client Application as per the process given in his blog.
So, I believe once you go through Callan blog, you already understand the concept of OAuth client application, client id, secret code and scope etc. and either you or Your Identity Administrator already created an OAuth Client Application with proper privilege. Now, either your Identity Administrator will provide you all these artefacts or you can login into IDCS and get those artefacts by yourself assuming OAuth Client Application already been created by your Identity Administrator.
So, here are simple steps to capture IDCS URL, Client Id, Client Secret and Scope for given OAuth Trusted client application.

Getting OAuth Trusted Client Application Artefacts

IDCS URL –

login to your Cloud Account Dashboard >>  Navigate to Account Management >> Users >> Identity
From user management home page, click “Identity Console”
This will take to you IDCS console where you can IDCS URL and also find OAuth Clint trusted application which you administrator has created –
Browser URL will show IDCS URL e.g.
idcs-url = https://idcs-56c3577bb024452b89496a0db95XXXX.identity.oraclecloud.com

Client Id and Client Secret-

Under application find out the OAuth Client application which you administrator has created for you, click on that, further click configuration tab page to get Client ID, Client Secret and Scope value.
e.g. client id = 0650C696C98345D4A07548xxxxxx38D5C_APPID
client-secret = 6b296da5-459d-4fbxxxxxd749a65a53

Scope –

For scope click on resource option. Scope value is the concatenated value of two separate values a) Primary Audience and b) scope
Copy and paste these values in notepad subsequently to make scope value finally.

OIC Artefacts-

In addition to IDCS URL, Client ID, Client Secret. We also need OIC URL, OIC Username and Password which I assume you must be knowing already.

Invoking /oauth2/v1/token” REST API

Once  all the attributes values are ready, jump to postman and create a new environment with all these variable, so that we can refer these variable values programmatically in postman.

19
Now, Invoke the “/oauth2/v1/token” API and pass above parameter as per given snap –
Authorization tab – select basic auth and provide {{clientId}} and {{clientsecret}} for username and password fields.
Under body tab specify all other parameters such as grant_type=password, scope={{scope}}, username={{username}}, password={{password}}
During run time postman will fetch the static values assigned to these environment variables.
Make sure header is properly selected
finally, hit the send button and you will get auth_token back from IDCS
So, now you got the access_token code, its JWT base64 encoded string value, if you want to see decoded value of this encoded string, you may use https://jwt.io/ debugger site to decode that code.
Now, since we already got the access_token, next steps to invoke actual OIC REST API endpoint. It could be any OIC REST API. In my case I was calling Connection REST API, to fetch connection metadata.
In order to call connection REST API, we need to pass the access_token which we have got in previous step, coping access_token manually and passing in header could be error prone steps. Again, Postman is saviour here.
We can leverage “Test” tab page of Postman where we write small java script to hold the access_token value into a variable called “Authorization” and use this variable while invoking any OIC REST API.
Here, is that tiny java script code –
var jsonData = JSON.parse(responseBody);
postman.setEnvironmentVariable("authorization", "Bearer " +jsonData.access_token);

Invoking OIC Connection REST API-

Now, once you hit /oauth2/v1/token API, this java script code will store access_token value into a variable called “Authorization” which you can use while invoking OIC Connection REST API.  Just specify authorization variable (holding access_token value) and hit send button to connection REST API.
That’s it. You should be able to invoke any OIC REST API using above method, its one-time effort but save you lot in future.
I hope, this blog will help you to understand how easily and simply you can invoke OIC REST API.
Stay tuned for more useful blog!!!
Happy Blogging ðŸ™‚

Wednesday, October 9, 2019

Advance XSL Mapping inside Oracle Integration Cloud !!!

Recently, I came across one issue while working with one Customer where they were facing bit of challenges to update existing working Integration with new JSON field input.

So, in this use case, two integration orchestration process flow are involved, Master Integration and Child Integration both working well in production. However, time to time developer gets requirement from business to enrich this working flow by adding more fields into Child Integration which was interacting with Oracle Responsys System. The Master Integration getting data from NetSuite, passing Child Integration same data which was interacting with Responsys and completing business flow.

Here is flow diagram with existing working flow Vs flow with new requirements and highlighted problem area.

1.png


Problem Statement:


Once developer add new fields into Child OIC orchestration flow, saved, activated and tries to refresh the Parent OIC orchestration flow, it breaks existing mapping. Behind the scene obviously since Child Integration orchestration flow input payload got changed it has cascading impact on calling Integration flow and calling Integration flow fails to deduct those changes and breaks existing mapping and wiped out existing mapping. see the relevant snaps -

Adding new JSON field into REST Adapter Configuration -

2

Edit Integration Invoke activity from Parent Integration flow which given warning of major changed deducted and then wipes out previous mapping -

3

Once clicked on update button, it wiped out previous mapping for that child OIC flow-

4

And Customer needs to put mapper activity back and create mapping again which takes 4 to 5 hours as they were having almost 100 fields to map.

Solution


The solution what I have found for this problem is using export/import feature of OIC. Fortunately, OIC offers you export option for Integration, which means all the artefacts of that particular integration will be exported into .iar file, user can unzip that file which will create a folder called "icspackage" and its contains all the important configuration file generated while we designing Integration flow using webUI.

Here is explanation of some of important files and folders -

5.png

To fix this mapping problem we need to find and update relevant .xsl (mapping file) and most importantly relevant .wsdl or .xsd file. In my case I have noticed the xsd definition was inline declared inside .wsdl file itself. 

So, open the relevant .xsl file and add newly extra fields and its associated mapping which you expecting to do using UI based mapper. In my case it was something like this -

6.png

Once update the .xsl file, find out relevant .wsdl file and declare particular JSON field there. In my case it was "newAddress"

7.png

That's it, your mapping (xsl) file as well as xsd definition file both got updated with newly created JSON field.

Now, create an archive out of this folder e.g. "icspackage.zip" then simply rename this zip file to its actual OIC project name. in my case it was CUSTOMER_CONTROL_01.00.0000.iar and import it back into OIC console using import feature.

8.png
You will see newly updated fields inside mapper. 9.png

I hope, this blog will help you to understand how easily and simply we can do advance xsl mapping using exported project artefacts and deploy it back to see the changes.

Stay tuned for more useful blog!!!

Friday, September 6, 2019

Retrieve Custom Fields from NetSuite using Oracle Integration Cloud NetSuite Adapter !!!

This blog is showcasing very specific use case related to NetSuite Custom Field retrieval and how we accomplish that using Oracle Integration Cloud NetSuite Adapter.

In this example we will be retrieving custom fields values e.g. birthDt from NetSuite by passing specific Customer Id. It may sound very easy but it was bit complex to deal with because the way how NetSuite was responding Custom Fields values using NetSuite Adapter.

Here is the use-case diagram -
1.png
In my previous blog I have already shown all the configuration which needs to be done to connect to NetSuite using Oracle Integration Cloud NetSuite Adapter and deal with NetSuite Custom fields. Hence, this blog will just focus on specific mapping challenges which I have faced initially during implementation.

I am assuming  the reader already have hand-on understanding of Oracle Integration Cloud about how create connection, Integration, mapping, activation and test etc. In this blog I will talk very specific XPATH statement which we modified to solve that problem.

In order to retrieve Custom Fields values for NetSuite, user has to configure "Get" operation and select "Customer" object as we are going to retrieve Custom Field associated with Customer object from NetSuite.

2

Once done, above step, next critical steps to do mapping and that's where challenge was existing.

The Oracle NetSuite Adapter does not currently discover and show the custom field directly for you to select. Therefore, you must specify "InternalId" for each custom field before mapping or retrieving its value. In my previous blog, I have highlighted how to get ScriptId and InternalID for a particular Custom Field. 

NetSuite response message shows all custom fields under "CustomFieldList" parent element, which has different child datatype elements e.g. DateCustomFieldRef, DoubleCustomFieldRef, StringCustomFieldRef and BooleanCustomFieldRef etc.


8.png

Each sub category element e.g. DateCustomFieldRef  contains concatenated  values from all the Custom Fields of that kind of data type. E.g. if a Customer Object has 2 date type Custom fields then if we map DateCustomFieldRef to right hand side any element then runtime it will show concatenated values for all date type Custom Fields.

To explain further e.g. Customer "John"  as 2 Date type Custom Fields name respectively  "birthDt" and "marriageDt" which are holding two different date values for two different custom field but the response message from NetSuite will only show one datatype which is DateCustomFieldRef which has concatenated values of "birthDt" and "marriageDt" Custom Fields.
If user do simple mapping between source to target as usually we do in OIC.

4.png

The runtime outcome of above mapping would be something like this.

3

Wherein "value" element will have concatenated values of 2 different dates "birthDt" and "marraigeDt". In in our example we were trying to retrieve only "birthDt" date Custom Field value, that's where we were stuck.

Note: To simplified this blog, I have only talked about 2 date type custom fields. However, for the Customer where we have faced this issue they were having 70+ custom fields, so no other logic e.g. substring, trimming and sequencing etc was working, at the same time Customer informed that some Custom fields can have null values has well, so any logic related to positioning of Custom field in NetSuite response can't work.

So, how to retrieve only one "birthDt" date type Custom Field value.
In order to fix this problem, we need to do same mapping as highlighted in above steps. The only additional steps what we need to do is to modify auto generated XPATH statement and include "InternalId" of "birthDt" CustomField.

How to do that-

Just click on mapped element e.g. click on "value" element after mapping-

5

Above step will take you the XPATH statement which got generated automatically.

6.png

Just copy and paste that XPATH statement in notepad-
Now, add "InternalId" of "birthDt" date custom field which, e.g. InternalId for birthDt=369
[@internalId=369]/nsmpr1:value">
Once modified that XPATH statement, come back to mapper, select the same value element, click edit and select "Input Literal"

7

and paste newly modified XPATH statement and save the mapping.

Activate the integration and now the value element will be having only one date which is the value of birthDt custom field from NetSuite.

I hope, this blog will help you to understand how easily and simply we can retrieve Custom Fields values from NetSuite using Oracle Integration Cloud NetSuite Adapter.

Stay tuned for more useful blog!!!

Happy Blogging ðŸ™‚

Friday, August 9, 2019

Manage Custom Fields in NetSuite using Oracle Integration Cloud NetSuite Adapter


Customization is essential part of any SaaS implementation to capture unique business needs. In NetSuite SaaS application also, there could be several use-cases where user might need to create a new Custom Object or add custom fields into existing Standard Object such as Contact, Account and Organization etc. In this blog I will be showing how can we add Custom fields e.g. Degree name and Passing Year etc. into existing NetSuite Contact object and can update the same field using Oracle Integration Cloud (OIC) NetSuite adapter. 

Please Note: NetSuite Adapter handles the Custom fields in very different way in compare to other adapters. Due to NetSuite API limitation, OIC Adapters not able to discovers Custom fields created in NetSuite which could be concern to many Customers. However, Oracle NetSuite Integration Adapter provide a way to specify manually all those Custom fields using InternalId and ScriptId and assign associated values coming from Source System to those fields and that's the core objective of writing this blog to show to reader how we can manually add and assign values to NetSuite Custom fields using OIC NetSuite Adapter. 
The use case scenarios -


Below are the high level steps user need to perform to achieve outcome.
  • NetSuite - Create Custom Entity fields in NetSuite for Contact object
  • OIC - Create NetSuite Adapter connection as Target System
  • OIC - Create REST Connection as Source System
  • OIC- Workout Request Response Payload for REST Adapter Input
  • OIC - Create Integration, do mapping and Activate Integration
  • OIC - Test Integration using POSTMAN
  • NetSuite - Verify Contact object details

NetSuite - Create Custom Entity fields in NetSuite for Contact object

To simplfied this example we will just creating two Custom fields 1) DegreeName 2) Passingyear
In order to create Custom Fields in NetSuite, navigate to Customization >> Lists, Records and Fields >> Entity Fields >>New >> Specify New Entity Field Name e.g. Degree Name and other parameter as per below snap. 


Similarly, creating another Custom fields "passingyear".
In order to verify newly Created Entity Field for Contact object, Navigate to Contact >> Custom and you will see two newly created field visible there.


Once you create Custom Field, make sure you capture the "InternaId" and "ScriptId" of those fields as we need them while mapping REST Input to NetSuite Contact Object elements. 

However, seeing "IntenralId" and "ScriptId" might not be enable for your NetSuite environment. In order to see those column, two configuration needs to be enabled inside NetSuite. 
Login to NetSuite >> Setup >> Company >> Enable Features >> Find out "Client SuiteScript" and enable this item.


Navigate to Home >> Set Preferences >> General >> Enable "Show Internal Ids"


Once above changes are done. Navigate to Customization >> List, Records and Fields>> Entity Fields  >> Find out newly created Entity Fields e.g. Degree name and Passing year >> ID column represent "Script ID" and Internal ID is InternalID of that Entity field. Note down those values as we need them during mapping time. 


OIC - Create NetSuite Adapter connection as Target System

Login to OIC >> Integration >> Connection >> Create >> Search "NetSuite" adapter >> Select >> Specify some meaningful name for adapter >> ROLE=Invoke >> click on create option.
Note: by the time of writing this document NetSuite adapter doesn't show Trigger role because NetSuite System as such doesn't offer any way to raise event and publish event to external system. If you want NetSuite to trigger something then use OIC generic REST Adatper and Write Custom Code inside NetSuite to trigger OIC REST Adatper Or Initiate a flow and use NetSuite Adapter GET operation to get Customer/Contact Definition etc.
 
NetSuite Adapter needs below inputs -

WSDL URL Sample Value -

https://webservices.netsuite.com/wsdl/v2018_1_0/netsuite.wsdl

Note: In above URL only highlighted version need to be changed for specific NetSuite Environment, rest of the URL stay as it is.

How to get this value -

Login to NetSuite >>Setup >> SuiteTalk UI >> WSDL and XSD >> find out the latest version available for NetSuite WSDL here


Configure Security -

Under the configure security user has to provide quite few attributes values e.g.

Email Address: Enter the email address that serves as the user name.

Account and Role :  Enter the account and role code of the user which using to connect to NetSuite.  To get the Account Name and role. Navigate to Setup>>Integration>>Web Service Preferences and get the Account ID from Top and role code from bottom right corner, refer below snap -


Password & Confirm Password: Enter the password and confirm the password.

Application Id:  Enter the application ID received from NetSuite. This is a mandatory field starting with the 2015_02 version of the NetSuite WSDL. To get this info from NetSuite, navigate to >> Setup >> Integration >> Manage Integration >> Either create new application code or take any existing one from here which been created for OIC


Test Connection:


All good, NetSuite connectivity from OIC been sorted now, let move to next step.

OIC - Create REST Connection as Source System

Creating rest connection is fairly easy in OIC. Navigate to OIC Home >> Integration >> Connection >> Rest Adapter >> define rest connection name

Specify your OIC Environment base URL as Connection URL and select basis Authentication.


Save and test connection. Till now NetSuite Adapter (Target) Connection and REST Adapter (Source) connection been created.

Next, steps to workout input and output payload for Contact object.

OIC- Workout Request Response Payload for REST Adapter Input

In order to create contact using NetSuite API, the important things to work out mandatory parameters because until we supply required mandatory parameter, integration will be keep failing.
In order to do that, refer the NetSuite Schema Brower Online –


Find out Business object e.g. Contact and see what the field are are mandatory fields under record browser


Once all the mandatory values workout then designs the JSON payload for request and response which we will be passing to NetSuite Contact creation request and will get response as well.

Request Payload
e.g.
{
"firstname":"Stan",
"middlename":"kumar",
"lastname":"tanev",
"subsidiaryname":"Honeycomb Holdings Inc.",
"subsidiaryinternalId":"3",
"subsidiaryexternalId":"3",
"subsidiarytype":"contact",
"degreeName":"MCA",
"passingYear":"2000"
}

Response payload
{
"status": "true",
"code": "",
"message": ""
}

OIC - Create Integration, do mapping and Activate Integration

Login to OIC Home >> Integration >> Designer >> Integration >> Click Create >> Select "App Driven Orchestration" >> Give an Integration name as per your choice and click create.
Drag and Drop Rest connection as starting point in blank canvas and configure the REST Adapter request, response parameters etc.


Once REST Adapter gets configured as starting point. Drag and drop NetSuite Adapter and configure for Add Contact Operation.


Perform mapping between REST JSON Input to NetSuite Contact Object for Custom Fields. This is critical and challenging steps in whole flow as The Oracle NetSuite Adapter does not currently discover and show the custom field directly for you to select. Therefore, you must specify scriptId and internalId for each custom field before mapping its value. To get bit details understanding how Custom Field mapping works refer this https://docs.oracle.com/en/cloud/paas/integration-cloud/netsuite-adapter/use-custom-fields-mapper.html

Based on the type of custom field invoked, in our case its String type,  you can provide the details (internalId and scriptId) of the custom field being mapped and the value to map to that custom field.  For example, DegreeName from the source schema is being mapped to a custom field defined by the internalId of 4624 and scriptId of "custentitydegreename_"

Please note: Use appropriate data type e.g. for String based Custom Field use "StringCustomFieldRef", for Boolean use "BooleanCustomFieldRef" and so on.


Use the repeat element functionality in the mapper to map two or more fields of the same type (for example, Boolean).


Once you click "Repeat Element", another "StringCustomFieldRef" will be added and you can assign another Custom Field.


Map all others elements e.g. firstname and lastName etc and complete your mapping.


Similarly, map response from NetSuite to REST JSON, Save the mapping.
Your flow will look like this.


Add tracking field and activate the flow. 


Once Integration activated, if will generate Integration URL which can be used inside postman to trigger the Integration flow with required input payload and authentication.


OIC - Test Integration using POSTMAN


Net-suite - Verify Contact object details


That’s it, as you can witness that the newly created Contact has newly created Custom Fields visible inside Netsuite.

I hope, this blog will help you to understand how easily and simply we can add new  Custom Fields into NetSuite and can perform create Contact operation using Oracle Integration NetSuite Adapter.

So, stay tuned for more useful blog!!!

Happy Blogging ðŸ™‚