This blog will be discussing very specific use case requirement which is more developer oriented and providing a quicker and efficient solution to invoke Oracle Integration REST API using OAuth access_token for testing purpose.
As an integration developer time to time you need to invoke Oracle Integration REST API to test API functionality. All the REST API in OIC needs a header parameter called “Authorization” which must needs to hold a valid access_token value in this format “Bearer access_token“.
In above format, “Bearer” is static world, However, access_token is the token value which we get after successfully OAuth Authentication from Oracle Identity Cloud Service. Getting access_token from IDCS using code credentials flow is multi steps and cumbersome process.
However, developer can leverage Postman environment and variable features to simplify the process of getting access_token. That’s what, I will be covering in this blog.
Before I proceed further, I must redirect you to read my colleague blog which has greater in-depth explanation about what is IDCS, how IDCS govern security aspect of all Oracle PaaS products such as Oracle Integration Cloud, Analytics Cloud, Digital Assistant and so on and OAuth client and token generation process etc. I am recommending you to read his blog because I will be using few artefacts e.g. IDCS URL, Client ID, Client Secret etc which we need to get from IDCS OAuth Client Application as per the process given in his blog.
So, I believe once you go through Callan blog, you already understand the concept of OAuth client application, client id, secret code and scope etc. and either you or Your Identity Administrator already created an OAuth Client Application with proper privilege. Now, either your Identity Administrator will provide you all these artefacts or you can login into IDCS and get those artefacts by yourself assuming OAuth Client Application already been created by your Identity Administrator.
So, here are simple steps to capture IDCS URL, Client Id, Client Secret and Scope for given OAuth Trusted client application.
Getting OAuth Trusted Client Application Artefacts
IDCS URL –
login to your Cloud Account Dashboard >> Navigate to Account Management >> Users >> Identity

From user management home page, click “Identity Console”

This will take to you IDCS console where you can IDCS URL and also find OAuth Clint trusted application which you administrator has created –

Browser URL will show IDCS URL e.g.
idcs-url = https://idcs-56c3577bb024452b89496a0db95XXXX.identity.oraclecloud.com
idcs-url = https://idcs-56c3577bb024452b89496a0db95XXXX.identity.oraclecloud.com
Client Id and Client Secret-
Under application find out the OAuth Client application which you administrator has created for you, click on that, further click configuration tab page to get Client ID, Client Secret and Scope value.
e.g. client id = 0650C696C98345D4A07548xxxxxx38D5C_APPID
client-secret = 6b296da5-459d-4fbxxxxxd749a65a53

Scope –
For scope click on resource option. Scope value is the concatenated value of two separate values a) Primary Audience and b) scope
Copy and paste these values in notepad subsequently to make scope value finally.

OIC Artefacts-
In addition to IDCS URL, Client ID, Client Secret. We also need OIC URL, OIC Username and Password which I assume you must be knowing already.
Invoking /oauth2/v1/token” REST API
Once all the attributes values are ready, jump to postman and create a new environment with all these variable, so that we can refer these variable values programmatically in postman.


Now, Invoke the “/oauth2/v1/token” API and pass above parameter as per given snap –
Authorization tab – select basic auth and provide {{clientId}} and {{clientsecret}} for username and password fields.
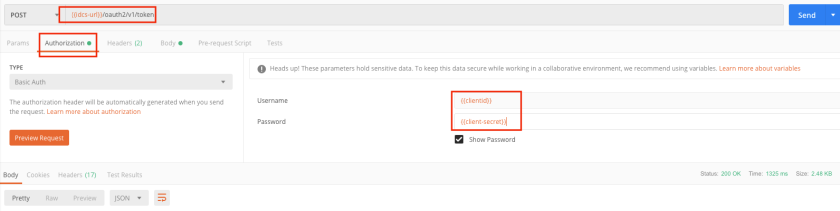
Under body tab specify all other parameters such as grant_type=password, scope={{scope}}, username={{username}}, password={{password}}
During run time postman will fetch the static values assigned to these environment variables.

Make sure header is properly selected

finally, hit the send button and you will get auth_token back from IDCS

So, now you got the access_token code, its JWT base64 encoded string value, if you want to see decoded value of this encoded string, you may use https://jwt.io/ debugger site to decode that code.
Now, since we already got the access_token, next steps to invoke actual OIC REST API endpoint. It could be any OIC REST API. In my case I was calling Connection REST API, to fetch connection metadata.
In order to call connection REST API, we need to pass the access_token which we have got in previous step, coping access_token manually and passing in header could be error prone steps. Again, Postman is saviour here.
We can leverage “Test” tab page of Postman where we write small java script to hold the access_token value into a variable called “Authorization” and use this variable while invoking any OIC REST API.
Here, is that tiny java script code –
var jsonData = JSON.parse(responseBody);
postman.setEnvironmentVariable("authorization", "Bearer " +jsonData.access_token);

Invoking OIC Connection REST API-
Now, once you hit /oauth2/v1/token API, this java script code will store access_token value into a variable called “Authorization” which you can use while invoking OIC Connection REST API. Just specify authorization variable (holding access_token value) and hit send button to connection REST API.

That’s it. You should be able to invoke any OIC REST API using above method, its one-time effort but save you lot in future.
I hope, this blog will help you to understand how easily and simply you can invoke OIC REST API.
Stay tuned for more useful blog!!!
Happy Blogging