Recently came across interesting use case, so thought to cover blog on that topic. One of my Customer was having issue to connect OIC to Oracle Autonomous Database (ADB) which is sitting in private subnet via Oracle Integration Cloud connectivity agent. So, I did some debugging and fix the issue and that learning I am going to cover here. I will explain here how we can setup an ATP Database in private subnet, setup all required security/firewall rules, setup OIC connectivity agent, bastion compute in public subnet and then connecting OIC to ATP DB sitting in private subnet via Connectivity agent.
In this fictitious scenario, customer HR division representative sending employee code to OIC REST endpoint to retrieve detailed information for an employee record which is been stored in Oracle ADB instance located in private subnet. Since, ADB is in private subnet it’s not accessible to outside world even app tier, and that’s where OIC Connectivity agent comes into picture to provide connectivity between OIC which is public internet and ADB database which is in private subnet.
Please refer below network architecture diagram –

Some assumptions considered –
Readers should have fair understanding about Oracle Cloud Infrastructure components such as Compartment, VCN, Public/Private Subnet, Security rules, ADB offering, IDCS/IAM, Oracle Integration Cloud etc. I will be covering solution at high level only.
High-level steps to perform this setup -
- Create compartment, Setup VCN, Private and Public Subnet
- Install ADB Database
- Setup Linux Bastion Compute in Public Subnet
- Setup Linux Compute for OIC Connectivity Agent
- Install OIC Connectivity agent on Linux compute
- Setup Security Rule
- Creation Connection & Integration in OIC
- Test Integration
Setup Virtual Cloud Network, Private and Public Subnet
Before you create any OCI resource, your IDCS user should have required policies and access. Talk to your OCI Administrator for that. For me all required privilege were already there, so I haven’t configured any specific policies for this setup as such. Now, create compartment and Virtual Cloud network (VCN). VCN has public subnet (all Internet accessible resources) and private subnet (restricted resources only accessible with proper security/firewall rule). Read more here for OCI networking construct.
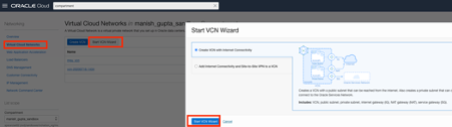
Creating VCN and associated artefact such as Public subnet, private subnet, internet gateway, NAT gateway, Service gate etc. fairly easy. OCI has given VCN Wizard utility which does create all networking component within few minutes for you.
Navigate to OCI home page >> Networking >> Virtual Cloud Network >> Start VCN Wizard
To know more about VCN & Subnet, refer this doc.
Just provide VCN name e.g. mgu_vcn etc and rest this wizard will take care, it will give auto assigned CIDR range for Public Subnet, Private Subnet, will also create public subnet, private subnet, internet gateway (IG), NAT gateway (NAT), service gateway (SG).
Once VCN creation done, note down CIDR range for Public Subnet and Private Subnet. It would something like below-
Private CIDR Range - 10.x.x.0/24
Public CIDR Range - 10.x.x.0/24
Once VCN setup done, next steps to create ATP Database in Private subnet
Install Oracle ADB Database
About Autonomous Database - Oracle Autonomous Database provides an easy-to-use, fully autonomous database that scales elastically and delivers fast query performance. As a service, Autonomous Database does not require database administration.
With Autonomous Database you do not need to configure or manage any hardware or install any software. Autonomous Database handles provisioning the database, backing up the database, patching and upgrading the database, and growing or shrinking the database. Autonomous Database is a completely elastic service. Read more here for Oracle Autonomous Database.
Navigate to OCI home page >> Oracle Database >> Autonomous Database >> Create Autonomous Database

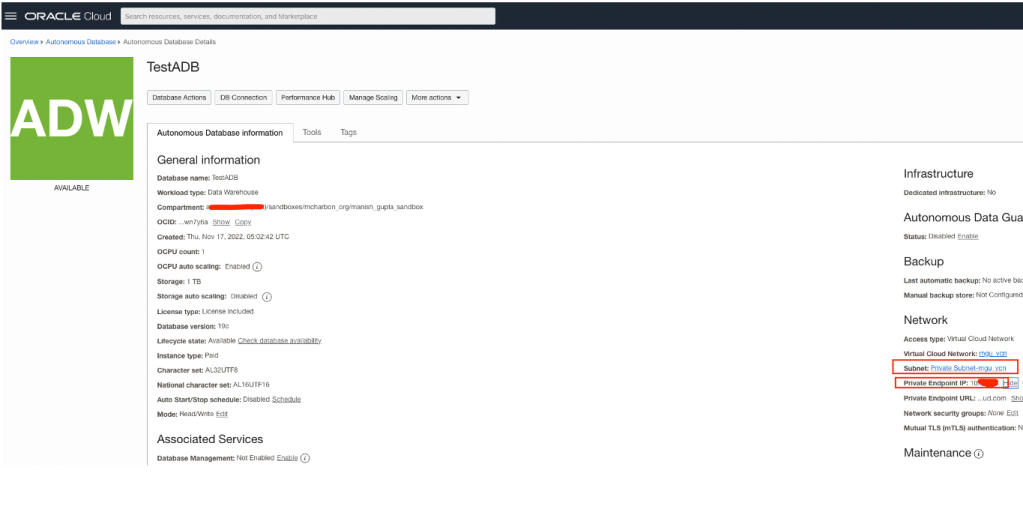
Specify all the mandatory parameters such as Compartment name, database name, workload type, database version, ocpu, storage, db user, password, vcn and subnet and hit “Create Autonomous Database” button. Read more here for provisioning Oracle Autonomous Database
Once ADB gets created you will see similar screenshot. Note down the IP address of service and make sure you have installed this in private subnet.
Setup Linux Bastion Compute in Public Subnet
Since, OIC connectivity agent compute going to sit in private subnet, user don’t have direct access that compute. In order to access OIC Connectivity agent compute we need to have another Bastion/Jump Host in public subnet which an end user can connect from their laptop/notebook and then further access OIC Connectivity agent compute from there using SSH protocol on port 22. Bastion/Jump could be Linux or Windows based compute, choice is yours. In my case I used Linux compute as its much safer than Window compute.
Note: In case on Window based Bastion/Jump host, make sure you don’t allow 0.0.0.0/0 CIDR block from internet because this will allow anyone to access that compute. For safe side you should be using your ISP provider IP in security rule for RDP 3389 port.
Refer this doc for more info. How to launch a Linux compute in OCI.
Navigate to OCI Console >> Compute >> Compute >> Instance >> Create Instance
Provide all required parameters, select AD, select shape & image, networking components, boot volume etc and finish the wizards. It will take couple of minute and compute will be ready to be accessible from internet.

Once Bastion/Jump host ready, make sure port 22 allowed in security list from Public Internet or your ISP provider.
Navigate to OCI Console >> Networking >> Virtual Cloud Network >> $Select your VCN >> $Select Public Subnet Security list >>Add Ingress Rule
Source Type- CIDR, Source CIDR – Your ISP Provider IP e.g.192.19.39.xx/32 or 0.0.0.0/0, IP Protocol – TCP, Source Port Range – ALL, Destination Port Range 22, Description – Allow traffic from internet to Bastion/Jump Host compute over SSH port 22.

Test SSH login to Bastion Host form your local machine.

Install & Configure Connectivity agent
Using the connectivity agent, you can create hybrid integrations and exchange messages between applications in private or on-premises networks and Oracle Integration. In our case Oracle ADB is sitting inside private subnet, so we need to use Connectivity agent to communicate with ADB via OIC. To know more about connectivity agent, please read this doc.
There are multiple steps to install and configure connectivity agent as listed below-
- Setup compute for connectivity agent
- Enable SSH port on this compute from Bastion/Jump Host compute for port 22
- Download and Install compatible JAVA version
- Download and Configure Connectivity agent Binary and Config file
- Start Connectivity agent and Monitor
Setup Compute for Connectivity agent
Next step to spin up a compute in private subnet, same subnet where ADB been installed. Choose the compute shape as per System Specification requirement document. To know more about compute shape, refer OCI Compute documentation.
Refer this doc for more info. How to launch a Linux compute in OCI.
Navigate to OCI Console >> Compute >> Compute >> Instance >> Create Instance
Provide all required parameters, select AD, select shape & image, networking components, boot volume etc and finish the wizards. It will take couple of minute and compute will be ready to be accessible from internet.
Enable SSH port on this compute from Bastion/Jump Host compute for port 22
Please note that the connectivity agent compute is in private subnet, so you won’t be able to SSH on this until you allow ingress security rule for port 22 from Public subnet Bastion/Jump host Compute.
Navigate to OCI Console >> Networking >> Virtual Cloud Network >> $Select your VCN >> $Select Private Subnet Security list >>Add Ingress Rule
Source Type- CIDR, Source CIDR – Your public subnet range e.g. 10.x.x.0/24, IP Protocol – TCP, Source Port Range – ALL, Destination Port Range 22, Description – Allow traffic from Bastion/Jump Host server to OIC Connectivity agent compute over SSH port 22.

Now, try to access your connectivity agent compute from Bastion/Jump Host compute over ssh by providing private key etc.
First ssh to Bastion/Jump host server from your local machine using opc user and private key which you used during provisioning of Bastion/Jump Host server.

Now, you are inside Bastion/Jump Server host. Further you need to connect to Connectivity agent compute for that you again n
So, move Connectivity agent compute .ppk file from your local to Bastion host any preferred location and use that .ppk file to login to OIC Connectivity agent compute.
You can use any choice of tool to move .ppk file from your local to Bastion/Jump host server.
Make sure you give right permission to private key file e.g.
chmod 600 privateKey.ppkthen try to access OIC connectivity agent compute
ssh -i ./privateKey.ppk opc@10.0.x.x
That’s it you are inside OIC Connectivity agent compute and now you can perform all configuration which need to setup OIC Connectivity agent
Install JAVA on OIC Agent Compute
You need JDK 11 for OIC agent. Refer the System Requirement document for more details.
https://www.oracle.com/au/java/technologies/javase/jdk11-archive-downloads.html

Once you downloaded JAVA binary, you need to move java file to Bastion/Jump host server using any tools e.g FileZila or Winscp etc.
Once file landed into Bastion/Jump Host server, you need to further move file to Connectivity agent compute using scp command. I used SCP there may be more utility like SCP.
scp -i ~/.ssh/privateKey.ppk -rp /home/opc/jdk-11.0.16.1_linux-x64_bin.tar.gz opc@10.x.x.x:/home/opc
Now, ssh again from Bastion/Jump Host to OIC Connectivity agent compute and install Java by extracting java archive
Now, ssh again from Bastion/Jump Host to OIC Connectivity agent compute and install Java by extracting java archive

Now, ssh again from Bastion/Jump Host to OIC Connectivity agent compute and install Java by extracting java archive
Download OIC Agent Binary
Login to OIC 3 console >> Design >> Agents >> Create an agent group

Once agent group gets created, you will see agent download option on right most top. Click on that to download agent binary
Once agent group gets created, you will see agent download option on right most top. Click on that to download agent binary


Download OIC Agent configuration file
This configuration file has your OIC environment specific configuration, which you just need to replace inside OIC Agent binaries once unarchived


Replace InstallerProfile.cfg which you have download from OIC console with InstallerProfile.cfg which was already present inside agent unarchived directory. The downloaded InstallerProfile.cfg has already your IDCS URL, Scope, Client ID and Client Secret configured. So, you don’t need to do any configuration as such.

Run “java -jar connectivityagent.jar”
Start OIC Agent in background
cd /home/opc/oic_conn_agent_installer
nohup java -jar connectivityagent.jar &
Note: Make sure OIC instance associated with this agent must be up and running


Monitor OIC Agent Status
OIC Home Page >> Observability >> Agent

Allow Security Rule/Firewall between OIC Connectivity agent compute and ADB port
Although both ADB and OIC Connectivity agent compute sitting in same private subnet but still port 1522 where ADB running is blocked. So, we need to open that port in order to allow OIC connectivity agent compute to talk to ADB database
Source Type- CIDR, Source CIDR – Your private subnet range e.g. 10.x.x.0/24, IP Protocol – TCP, Source Port Range – ALL, Destination Port Range 1522, Description – Allow traffic from OIC Connectivity agent compute to Oracle ADB Database over port 1522.
Download sqlPlus client, connect to ADB and create employee table
SqlPlus client is going to help in two ways for this scenario. The first it will help to you check connectivity between OIC Connectivity agent compute to Oracle ADB database. Secondly, In this scenario what I build, OIC expected to retrieve employee records from Oracle ADB, so employee details tables should exist inside ADB database. So, let's install sqlplus client on OIC Connectivity agent compute.
It’s quite generic process, there are so many blogs already available for this topic. Please refer this particular one which I used to install sqlplus client in my case.
Note: you have to follow the same pattern for file transfer, first download the required files from internet to your local machine, then transfer the files to Bastion/Jump Host server, then further transfer from Bastion/Jump Host to OIC Connectivity agent compute and continue the installation


export LD_LIBRARY_PATH=/home/opc/sqlPlusClient/instantclient_21_8:$LD_LIBRARY_PATH
export PATH=$LD_LIBRARY_PATH:$PATH
source ~/.bashrc
sqlplus -v 
Now, connecting to Oracle ADB is very slightly difference than traditional
Oracle Database as its more secured. Please refer this blog
which has demonstrated how we can connect sqlplus client to Oracle ADB
In order to connect ADB from sqlplus client, we need wallet.zip file which we can download from OCI console by navigating
OCI Console >> Oracle Database >> Autonomous Database >>
Select your ADB instance Details >> Database connection >> download
Wallet.
This Wallet.zip has all important files such as tnsname.ora and sqlnet.ora etc which needed to connect to this DB.
Now, copy Wallet.zip file from your local to Bastion/Jump Host server using Filezilla or winscp then further copy from there to Connectivity agent compute using scp command

Make a directory of choice, move Wallet.zip to that location and unzip it

Edit the sqlnet.ora and specify the correct wallet location
In my case Wallet unzipped location is : /home/opc/ATP_WalletFiles
From This-
WALLET_LOCATION = (SOURCE = (METHOD = file) (METHOD_DATA = (DIRECTORY="?/network/admin")))
SSL_SERVER_DN_MATCH=yes
To This –
WALLET_LOCATION = (SOURCE = (METHOD = file) (METHOD_DATA = (DIRECTORY="/home/opc/ATP_WalletFiles")))
SSL_SERVER_DN_MATCH=yes
export TNSADMIN=/home/opc/ATP_WalletFile sqlplus admin@testadb_high
Once you connected to ADB successfully via Sqlplus client then you have to create a employee_details table. Use the below DDL statement to do that
CREATE TABLE "ADMIN"."EMPLOYEE_DETAILS"
   (    "EMPCODE" VARCHAR2(100) COLLATE "USING_NLS_COMP" NOT NULL ENABLE,
        "EMPNAME" VARCHAR2(200) COLLATE "USING_NLS_COMP",
        "EMPDEPT" VARCHAR2(100) COLLATE "USING_NLS_COMP",
        "EMPROLE" VARCHAR2(100) COLLATE "USING_NLS_COMP",
        "EMPJOINDATE" DATE,
        "EMPCONTACTNUMBER" NUMBER(20,0),
        "EMPSALARY" NUMBER(20,0),
        "EMPADDRESS" VARCHAR2(100) COLLATE "USING_NLS_COMP",
        "EMPPHOTO" VARCHAR2(1000) COLLATE "USING_NLS_COMP"
   )  DEFAULT COLLATION "USING_NLS_COMP" SEGMENT CREATION IMMEDIATE
  PCTFREE 10 PCTUSED 40 INITRANS 10 MAXTRANS 255
 COLUMN STORE COMPRESS FOR QUERY HIGH ROW LEVEL LOCKING LOGGING
  STORAGE(INITIAL 65536 NEXT 1048576 MINEXTENTS 1 MAXEXTENTS 2147483645
  PCTINCREASE 0 FREELISTS 1 FREELIST GROUPS 1
  BUFFER_POOL DEFAULT FLASH_CACHE DEFAULT CELL_FLASH_CACHE DEFAULT)
  TABLESPACE "DATA"
That's all, setup for Database perspective are completed. Now, we will continue to create Integration flow and connection to complete this E2E flow.
Integration
I have used OIC 3 for this development and testing.
Create Connection to Oracle ATP via Agent
OIC Home >> Design >> Connection >> Create >> specify name and description as per your choice

Specify all the parameters as needed e.g. Private IP for ADB host, port number, db service name, wallet password, username and password etc.

Once ADB connection tested successfully, I have also crated generic REST connection as entry point for my integration using below JSON payload.
{
  "EMPCODE" : "1000",
  "EMPNAME" : "Manish",
  "EMPDEPT" : "IT",
  "EMPROLE" : "Engineer",
  "EMPCONTACTNUMBER" : "6149999999",
  "EMPJOINDATE" : "11/11/2011",
  "EMPSALARY" : "100000",
  "EMPADDRESS" : "Sydney Australia",
  "EMPPHOTO" : "https://specials-images.forbesimg.com/imageserve/5b44fcab4bbe6f1becf1e0d2/416x416.jpg",
  "Status" : "Record Found"
}

Create Integration Flow
And then further created an integration flow where REST connection receive input employee ID from end user and get employee details from ADB and return all employee details back to end user.
If you need OIC project .iar file, drop a comment with your email id I will share with you, but its very basic integration, just receiving empcode and retrieving data from Oracle ADB based up empcode value passed in parameters.

Below is the mapping if emp. Code found in ADB then it will return rest employee details,

Deploy and activate the integration and test the integration
Test the Integration
Get the Integration REST URL from OIC console for this integration flow. Use postman to post the request to this URL.
e.g.
https://se-oic3-xxxxxxxx-sy.integration.ap-sydney-1.ocp.oraclecloud.com/ic/api/integration/v1/flows/rest/MKG_GETEMPRECFROMTES/1.0/getEmpRecords?empCode=1001
Inside the postman, set basic auth to your OIC credentials and pass empCode as query parameter and test the result

Cool. finally we can see the result in postman which is coming from data sitting in Oracle ADB which is located inside private subnet and getting accessible through OIC Connectivity agent.
If you want write further wrapper on top of this Integration you can publish this integration using API Gateway

Test the API Gateway URL using postman, you will get same result.

Happy blogging !!!