Fusion ERP Configuration
Navigate to Configuration >> application composer

Custom object are disable. This functionality needs a sand box to access the custom object
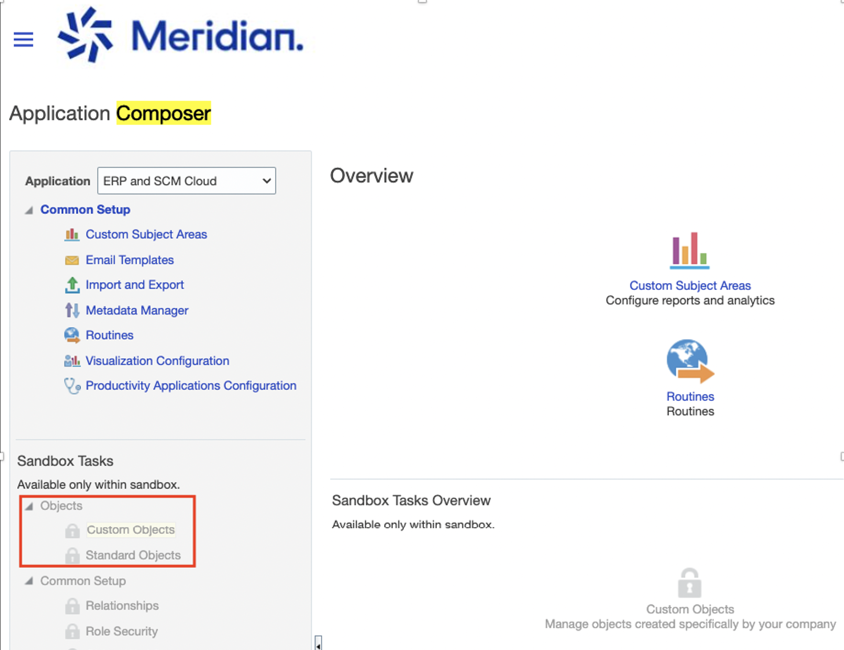
Setup Sandbox
So, let’s create a sandbox. Navigate to Configuration >> sandbox >> create sandbox

Enter the name of the sandbox, description, Publishable=Yes, and select all the tools on this page and hit create button
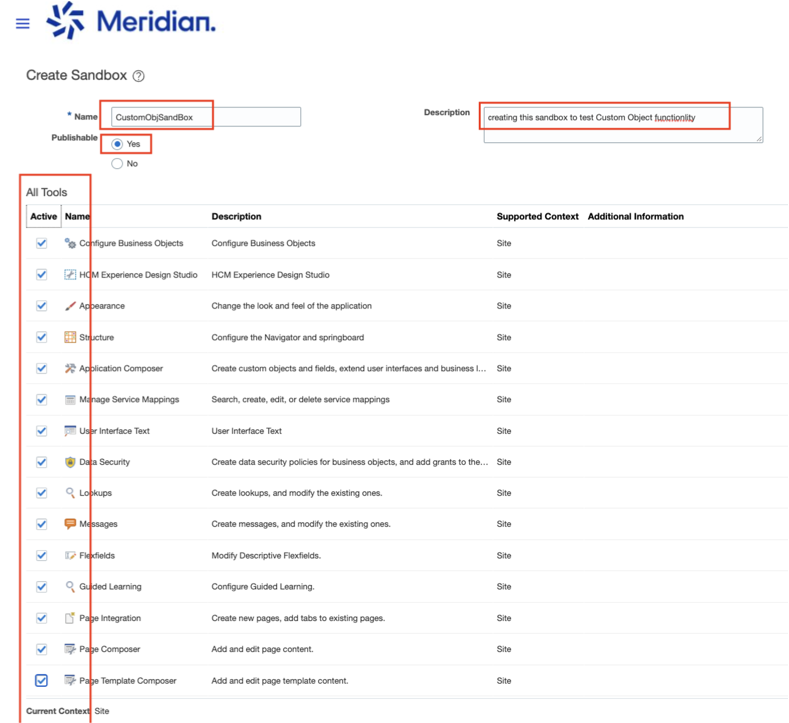
Once created, by clicking on newly created sand box you can enter that sandbox

Once you enter into Sandbox, you will see on top ribbon your Sandbox name. It exactly provides same navigation experience like main fusion ERP instance
Create Custom Object
Now, from top menu, navigate to Configuration >> Application Composer again and you will “Custom Object” highlighted now
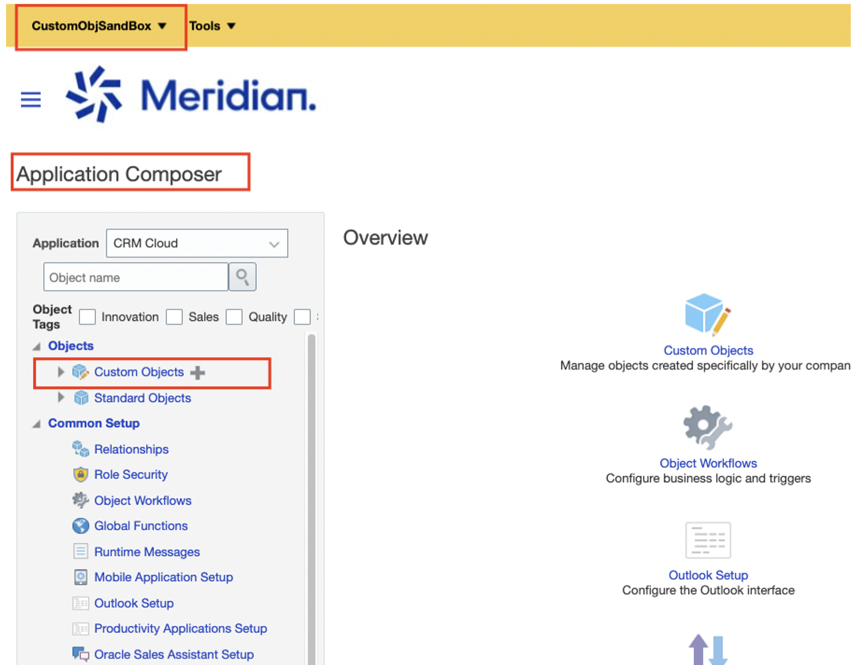
Now, we are ready to create Custom Object, click on Custom object + button

It can take 1-2 minute to create Custom Object. Once its gets completed, you can see on left side CustomPO Custom Object got created –

Now, we ready to create fields inside Custom Object what we just created. I have used below structure but feel free to choose structure whatever you need.
| FiledName | Filed Type | Sample Value | Required/Searchable |
| Accountname | Text | Blackmore | No/No |
| AccountNumber | Number | 1000 | Yes/Yes |
| Address | Text | 4 Julis Ave, North Ryde | No/No |
| ContactName | Text | manish | No/No |
| ContactNumber | Number | 0499999999 | No/No |
| ItemQuantity | Number | 2 | No/No |
| ItemPrice | Number | 100 | No/No |
| ItemTotalValue | Number | 200 | No/No |
| ApprovedStatus | Text | AWAITING | No/No |
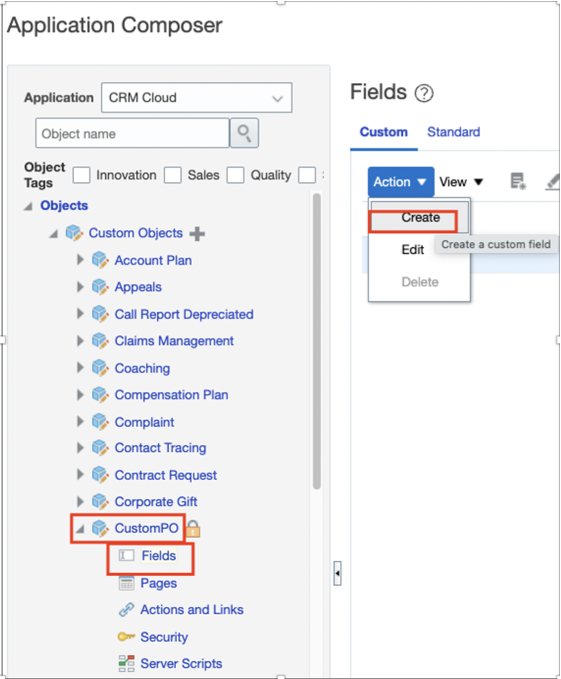
For first Field e.g. accountName, select the data type as per your choice

Define all the properties and hit Save and Close button
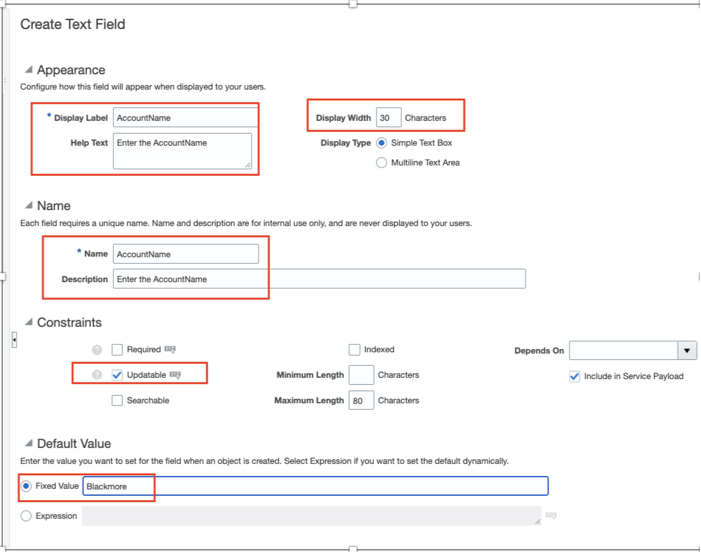
Similar, create all field as per above tables. Once all fields get created its look something like this –

Edit Landing and Creation Pages
Once fields are created, next step to create pages, by default it creates 4 types of pages(landing page layout, creation page layout, details page layout and reusable region page layout) once you hit create “create default pages” option

This will few second and will create all default page which you can customize as per your needs –

Next step to modify default page layouts. So, first choose “Landing Page Layouts” by clicking on that It will take you to next screen where you can add more fields etc. click edit button

Move all the required filed as per your needs and click save and close–
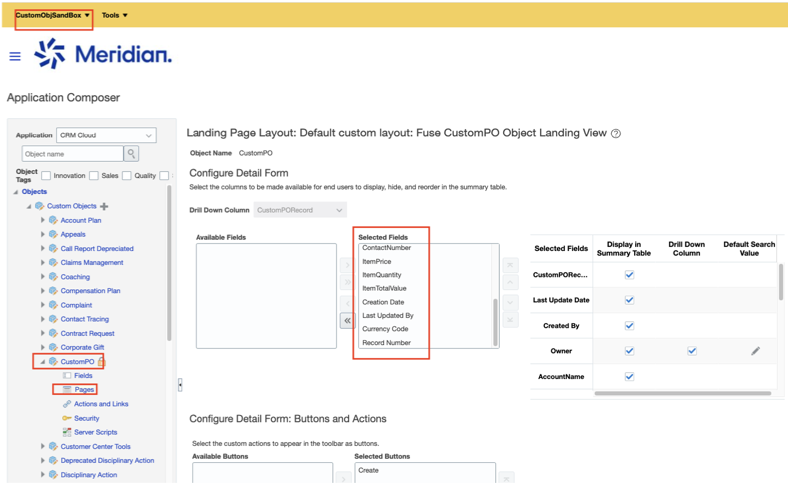
Similarly move all the field for “Creation Layout”

Details page layout for adding line-item details etc, not using for this POC
Reusable page layout for header etc. which you want to keep in all pages, so nothing to change for this POC.
Enable ZCX_CUSTOM_OBJECT_EVENTS Profile option
Refer this MOS for more info – Document 2535444.1
Whenever you create or update a custom object, you must regenerate and republish the object. To regenerate and republish custom objects.
You must also set the profile option, ZCX_CUSTOM_OBJECT_EVENTS, which is used to enable and register custom object events. The profile option is disabled by default. If the profile option is not enabled then the Generate Integration Event function is not present under the Common setup in Application Composer.
When the profile option is enabled, custom object events are published and registered in CustomEventCatalog.xml. After custom objects are published and registered, users in Oracle Integration Cloud (OIC) can subscribe to the custom object events.
If the profile option is turned set to No, then OIC users will see nothing, even though they’ve subscribed the events.
Navigate to Setup and Maintenance

Offering: Sales > Functional Area = Sales Foundation > Task = Manage Administrator Profile Values.
Add the required application and set the profile option to Yes.
Save your changes.
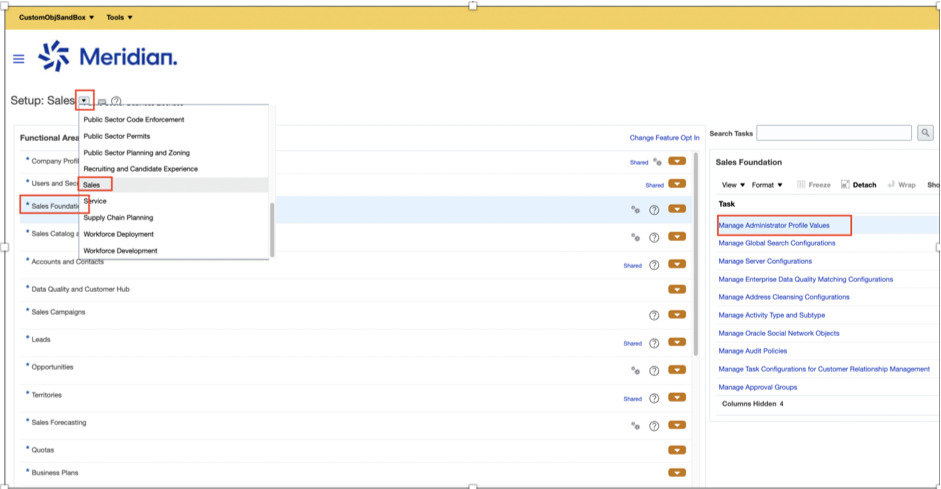
Enter the “ZCX_CUSTOM_OBJECT_EVENTS” as Profile option code And hit search button

Next, step to publish to publish all the sandbox for all changes to get implemented


Generate Integration Events
Navigate to Application composer, select application=ERP and SCM Cloud >> and right click to get the option “Generate Integration Event”


Test the Event Catalog to verify Custom Object
Just replace your Fusoin ERP environment hostname in below URL and run the GET operation from POSTMAN after providing basic authentication-
https://fa-xxxx-xxxxx-saasfademo1.ds-fa.oraclepdemos.com/soa-infra/PublicEvent/customCatalog
Once you get output, search your Custom Business Object in result you should see the result.

OIC Integration Flow 1
Subscribe the Custom Object event in OIC, create OIC connection for Fusion ERP, then further create Integration flow with “App Driver Orchestration” flow and drag and drop Fusion ERP connection Instance as trigger option inside Integration flow and configure Business Event section


Add logger activity to log incoming Custom Object event. This will help us to identity what kind of payload is getting received at OIC level, and map the incoming result to logging variable

After logging, you can further call any REST API to pass incoming Custom Object Business event. In my case I was calling VBCS Business Object REST API to update VBCS BO with incoming event. So, my complete flow looks something like this –

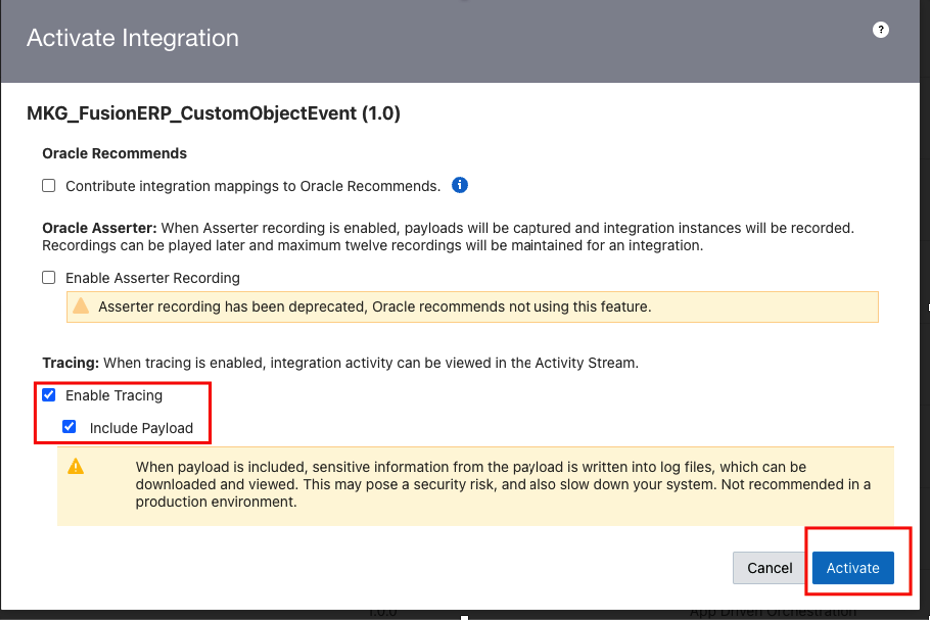
Once, we activate this integration flow and create a new Custom Object inside Fusion ERP, OIC is expected to receive the event and update VBCS Business Object which has same definition as Fusion ERP Custom Object.
Test Custom Object Event
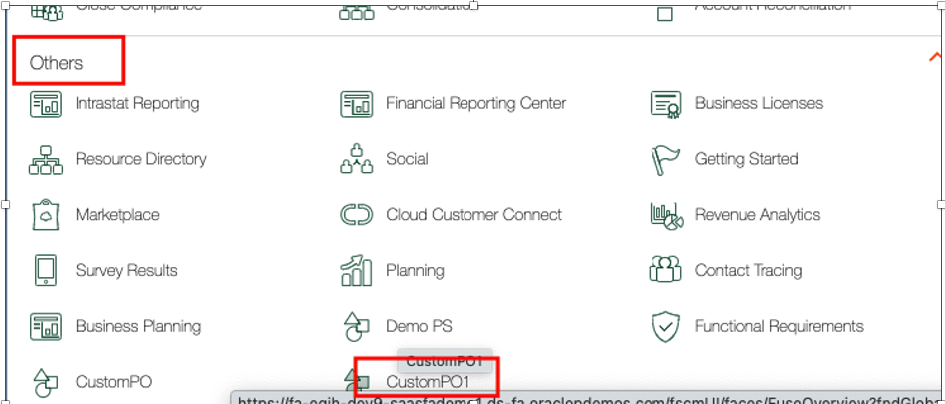
Login into Fusion ERP instance, Navigate to Others >> CustomPO1 option
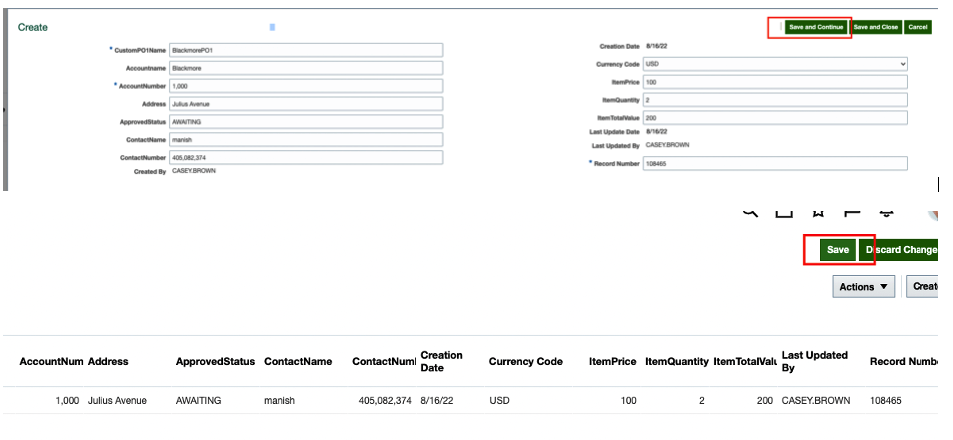
Enter all the required details for all the mandatory/non-mandatory fields and hit save button. As soon as record gets saved, it should trigger event for OIC to consume.
Now, you can see event has been received in OIC

Click on header part of Message to see what’s came inside Event.

Activity stream

I hope this will give fair idea about how a developer can create Custom Object inside Fusion ERP and how the Custom Object Event can be trigger from Fusion ERP which can be digested by Oracle Integration Cloud Fusion ERP Adapter. Happy blogging
No comments:
Post a Comment