In this blog I am going to document the Oracle API Platform Gateway Node (Version : 18.1.3) Installation steps which is one of the critical components of API Platform Cloud Service.
Oracle provides API Platform Cloud Service as a foundation product for API Management that comprises the Full API Lifecycle, encompassing the complete API Design & Documentation, API Security, Discovery & Consumption, Monetization, and Analysis etc.
Oracle API Platform comprises 3 major components as stated below to serve specific purpose-
Management Portal – This is used to create and manage APIs, deploy APIs to gateways, and manage gateways, and create and manage applications. You can also manage and Deploy APIs and manage gateways with the REST API.
Developer Portal – Application developers subscribe to APIs and get the necessary information to invoke them from this portal.
Gateway Node – This is the security and access control run-time layer for APIs. Each API is deployed to a gateway node from the Management Portal or via the REST API.
In addition to above, Oracle also offer Oracle Apiary to quickly design, prototype, document and test APIs.
Below is the high level architecture diagram of API Platform.
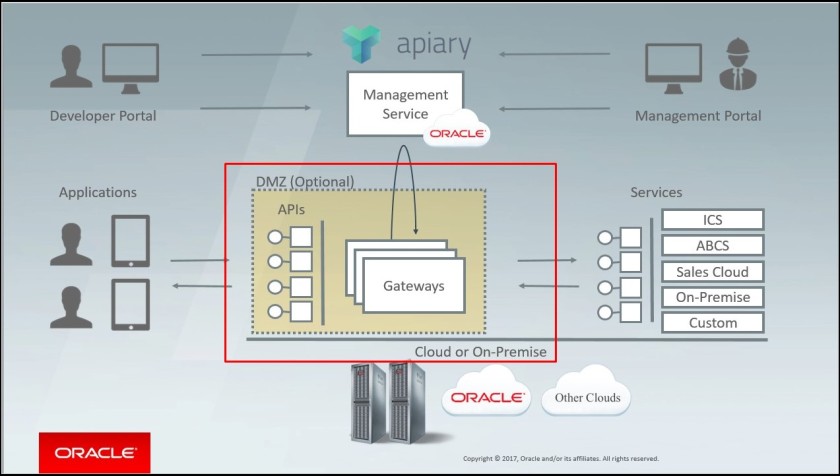
Further down in this blog we will be discussing only one highlighted component API Gateway installation steps as it’s very critical component to process run-time load of APIs. To know more about API Platform CS and Gateway node please refer this link
Below the high level steps Involve to setup the Gateway node
- Create a logical Gateway
- Download Gateway Node Installer
- Modify gateway-props.json file
- Validate system requirement of Gateway node installer
- Create Gateway Manager and Gateway Runtime users
- Install JDK and Setup JAVA_HOME, PATH environment variable
- Understanding of Log file and location
- Execute APIGateway script with Install action
- Execute APIGateway script with Install configure
- Execute APIGateway script with Install start
- Execute APIGateway script with Install join
- Approve the join request
- Conclusion
Create a logical gateway-
A Logical Gateway (called a Gateway in the Management Portal user interface) is a JSON object that defines what its registered Gateway Nodes should look like. A gateway node is the physical gateway run-time installation. Gateway nodes can be installed on-premises or in the cloud. Logical gateways and gateway nodes have a one to many relationship: many gateway nodes can register to one logical gateway, but a gateway node can register to only one logical gateway. Each gateway node polls the management service at configurable intervals to retrieve the logical gateway definition it registers to. The gateway node is updated to match the logical gateway definition. Because you deploy APIs to logical gateways, and not to gateway nodes, all nodes registered to a gateway have the same APIs deployed with the same policies applied.
Login to your management portal instance e.g. https://hostname:port/apiplatform/public/login.jsp, click on left hand side menu bar >> Gateway >> Create Gateway
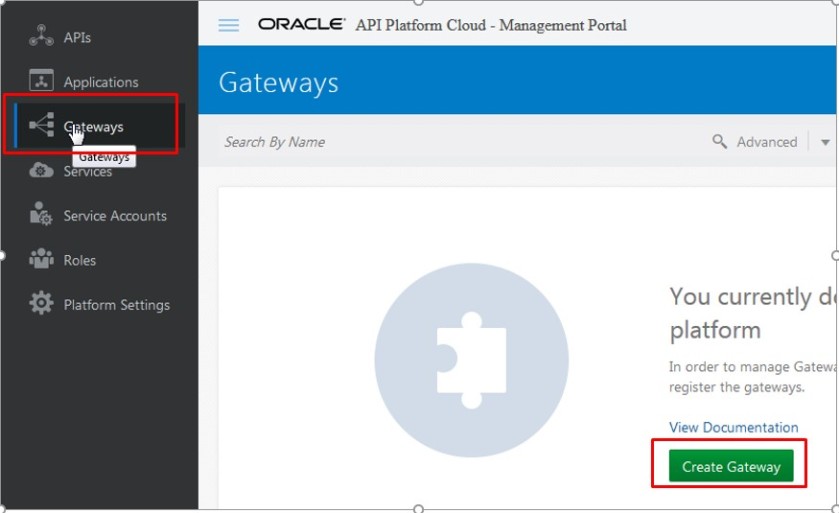
Provide Gateway Name and Description and click on create

Download Gateway Node Installer-
Once gateway created, click on node option and click further on “Download Gateway Installer” option

A ApicsGatewayInstaller.zip file will of 1.1 GB will be downloaded

Once installer downloaded, we need to move this installer to either on-premise server or spin a machine in cloud and then unzip it there. In my case I have created VM in Oracle cloud and also created a directory path called /u01/apics and 4 sub directories beneath that e.g. Java, install, archive, archive1 containing jdk1.8, gateway domain, unzip version of installer, and zip version of installer respectively.
Once installer unziped there are two important files we will be using in rest of steps as highlighted below. APIGateway is the script file which will perform the installation, configuration, start/stop/status and join action and this script needs gateway-props.json file as an input which contains various parameters values.

Modify gateway-props.json file:
The default JSON file structure will look like this.
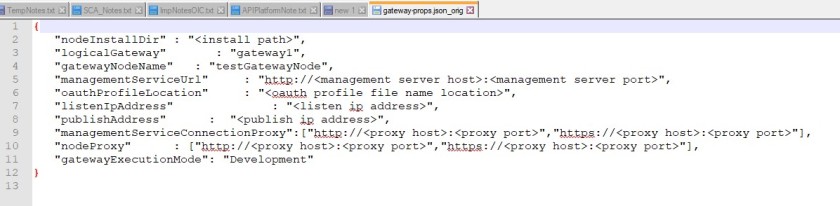
Gateway node installation does not need all these elements, few of them mandatory and many of them are optionals. The installation which I have done I have used below elements-

Specifying values for these parameters are fairly simple and detail definition about each parameter, sample value and optional/mandatory has given in this link
Note: Make sure you assign right values against each properties such as “logicalGatewayId” would be the ID of Logical Gateway which we have created at very first step, “managementServiceURL” would be your OTD instance URL fronting the management portal, “gatewayNodeName” would be any open string name and will be assigned to gateway node which can be seen at management portal while approving join request, “listenIPAddress” and “publishAddress” would be private IP and public IP of the VM where gateway node is going to be install, “nodeInstallDir” would be the location of directory path where gateway node domain is going to be created.
Actually, each installer action such as install, configure, start/stop/status and join etc needs their specific parameters but we can design gateway-props.json file in advance for all the actions what we expected to run. In our case we were expected to run Install, Configure, Start and Join, So I created relevant parameters in one time.
Details of each action and associated parameters can be find here
Validate System requirement of Gateway node installer-
| Component | Requirement |
|---|---|
| Operating Systems | Oracle Linux and Red Hat Enterprise Linux 7.2, 6.7, and 6.4. |
| Dual core, 2 GHz or more per CPU | |
| Disk Space | 30 GB |
| Memory | 6 GB |
| JDK version | Oracle-Certified Java SE JDK 8. OpenJDK is not supported. |
Create Gateway Manager and Gateway Runtime users-
Before we commence the gateway node installation we need to create two users with any name but need to assign specific grants “APIGatewayRuntimeUsers” and “APIGatewayManager”. These users will be required while executing “Join” action.
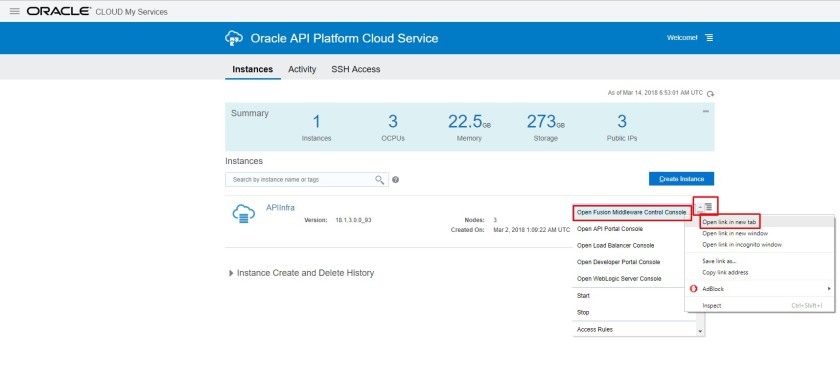
Login to cloud account, select API Platform Instance and open “Oracle Fusion Middleware Control Console”
You must use the WebLogic Administrator account, created when you provisioned your API Platform Cloud Service instance, to add users in the Fusion Middleware Control console.
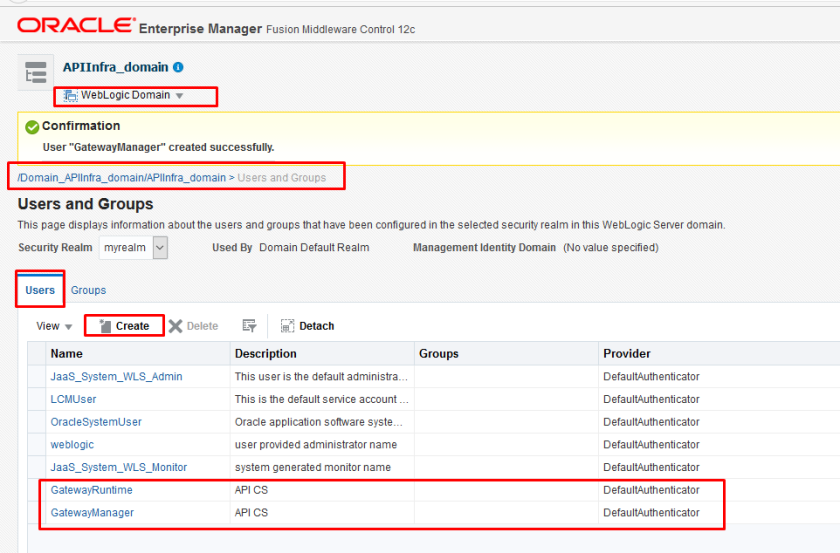
Once user created, assign them appropriate grant as per below snap –

Install JDK and Setup JAVA_HOME, PATH environment variable-
Downloading JDK1.8+ version and installing is pretty standard stuff, so I am not covering in details here. However, the important point was how we setup the JAVA_HOME and PATH variable, because if we won’t setup the JAVA_HOME properly, installer won’t behave properly.
Make sure JAVA_HOME variable shouldn’t include path up to \bin, update the users bash_profile file with JAVA_HOME and Environment variable as per below snap

Understanding of Log file and location-
Before we start actual installation, lets understand where logs files resides which will show you the progress of installation, below snap will give fair idea about logs, their description and location. keep checking these logs to know what’s going behind the screen.
 Execute APIGateway script with Install action-
Now, lets start actual work, so far whatever we have done its some ground work before we start actual installation process.
So, gateway node can be install using single command
./APIGateway -f gateway-props.json -a install-configure-start-join
which does four actions such as install, configure, start and join in sequence. However, In my installation I have adopted different approach. All these action e.g. install, configure, start and join can be run in isolation as well but must be in sequence. So I ran them individually to get more visibility what’s going behind the scene using logs and standard out on terminal screen.
So, first action what I have ran is this –
./APIGateway -f gateway-props.json -a install
Make sure gateway-props.json been updated with required parameters explained in above sections.

Above steps will just install the gateway node product under /u01/apics/install directory. In your environment path could be something else depending up on what directory path you have specified in gateway-props.json file
Also, check the gatewayInstall.log to get details steps performed.
Now, gateway nodes software part been installed, next steps to configure the domain using configure action.
Execute APIGateway script with Install configure-
Configure action can be performed using below command
./APIGateway -f gateway-props.json -a configure

Above steps will create a domain with name “gateway1” which will have one admin server and 1 managed server, along with node manger process.
It also generate a separate log file “gatewayDomainCreation.log” at this location /u01/apics/install/logs/ which will give much more visibility about all executed steps.
So, far we executed install and configuration action as result weblogic server binary, gateway binary been installed and wls domain been created.
Now, in next steps we will be starting this environment which will make gateway node up and running.
Execute APIGateway script with Install start-
Run below command to start the node manger, admin server and managed server
./APIGateway -f gateway-props.json -a start
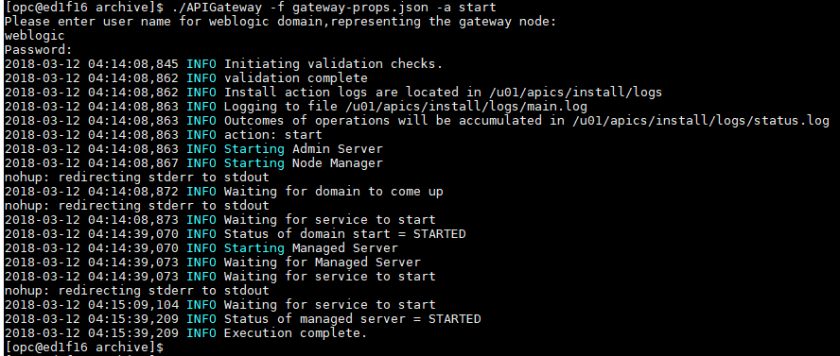
You can run “ps -ef | grep java” command to see all started process.
Now, the last step in gateway node installation is to join the Logical gateway which we have created in earlier steps.
Execute APIGateway script with Install join-
Run this command to join the logical gateway created at Management Portal
./APIGateway -f gateway-props.json -a join
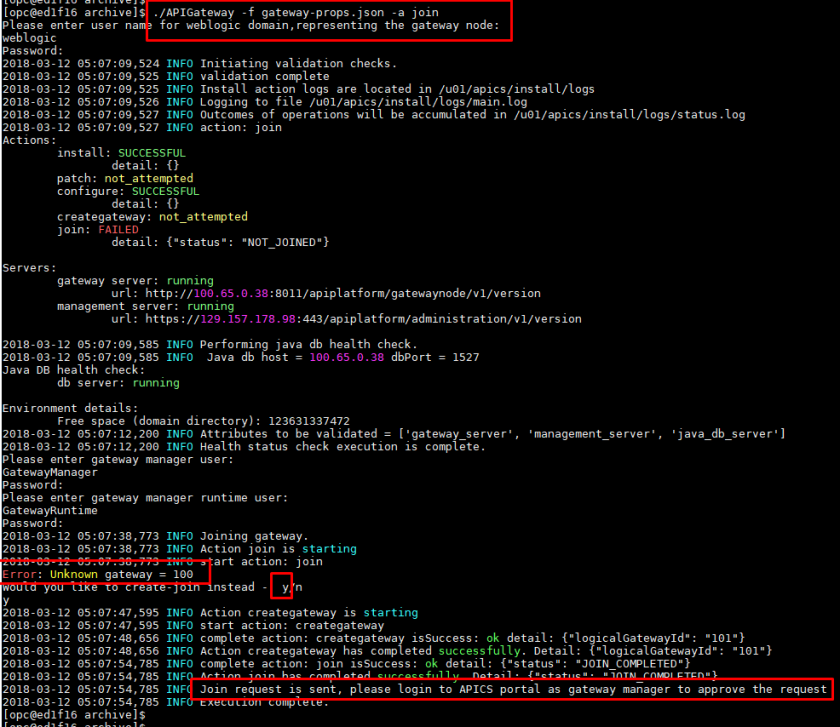
Note:
When I have executed join command, my gateway-props.json was already having a valid “logicalGatewayId=100” which was created before I started executing APIGateway script. but somehow while joining process, APIGateway script didn’t recognized this existing logical gateway and gave option to create a new logical gateway as you can see in above snap. I clicked “y” and it has created a new gateway called “Test” and also used “publishAddress:129.156.112.XX” element value and http (8011) and https defaults ports (9022) to co-relelate Logical gateway mapping to actual gateway node.
So, now gateway node has sent request to join logical gateway and user has to approve this request from API Management Portal.
So, jump into API management portal and approve the same.
Approve the join request-
Login to API Management portal using URL https://129.157.XX.XX/apiplatform/gateways and Navigate to this path – Gateway>>Test>> Nodes>>Requesting tab page and approve the join request
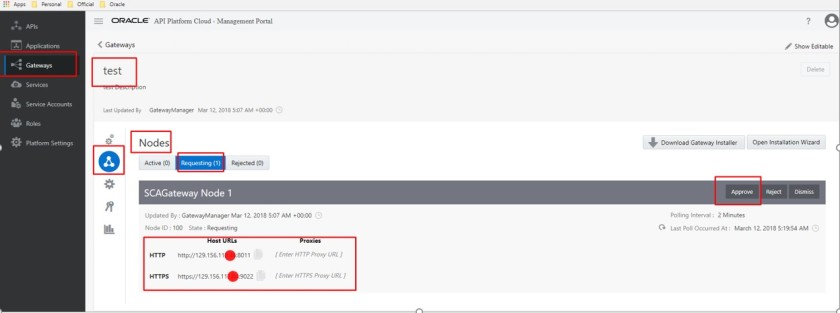
Once approved request will move from “Requesting” to “Active” tab page.
 That’s it, Now Logical gateway aks Gateway been installed and also mapped the gateway node which will process the runtime transactions.
Now, when we create a new API in API Management portal we will be getting option to select this gateway node and deploy this API there.
This gateway nodes will be keep synchronized with API Management portal to get any new API definition etc. and will make changes straight away. The synchronization duration user can change as per their desire. In my environment I have kept 2 seconds, so gateway nodes can keep polling any new API changes from Management portal and will make it active at Gateway node level.
Conclusion-
Just to summarized, we have installed the Gateway nodes on a particular VM, it could be on-premise server or cloud VM, without this installation there will no runtime components exists where APIs can be deployed. This steps is one of the critical steps during API CS provisioning hence I have documented in details here.
I hope this blog will help you during API Gateway node installation for your environment. Please free to share and comments. I will try to reply best in my capacity
No comments:
Post a Comment