Pages

Friday, September 6, 2019

Retrieve Custom Fields from NetSuite using Oracle Integration Cloud NetSuite Adapter !!!

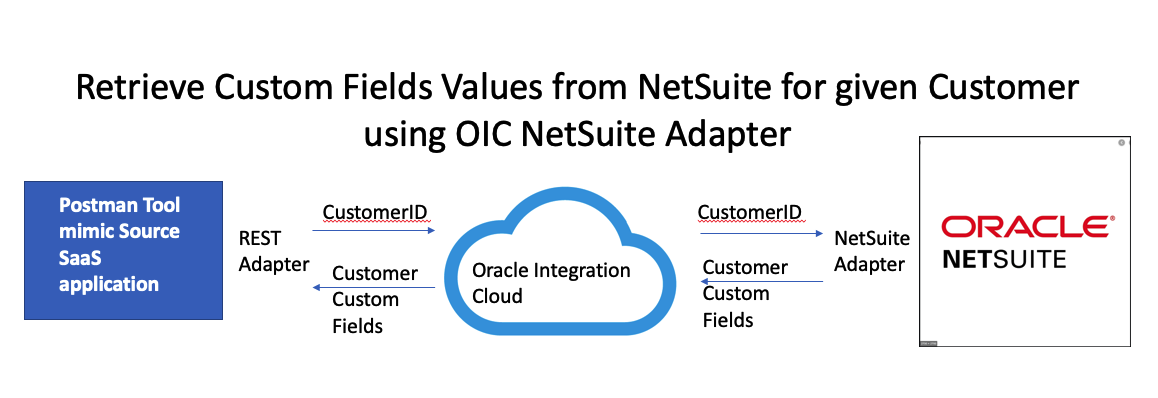
This blog is showcasing very specific use case related to NetSuite Custom Field retrieval and how we accomplish that using Oracle Integration Cloud NetSuite Adapter.

In this example we will be retrieving custom fields values e.g. birthDt from NetSuite by passing specific Customer Id. It may sound very easy but it was bit complex to deal with because the way how NetSuite was responding Custom Fields values using NetSuite Adapter.

Here is the use-case diagram -
1.png
In my previous blog I have already shown all the configuration which needs to be done to connect to NetSuite using Oracle Integration Cloud NetSuite Adapter and deal with NetSuite Custom fields. Hence, this blog will just focus on specific mapping challenges which I have faced initially during implementation.

I am assuming  the reader already have hand-on understanding of Oracle Integration Cloud about how create connection, Integration, mapping, activation and test etc. In this blog I will talk very specific XPATH statement which we modified to solve that problem.

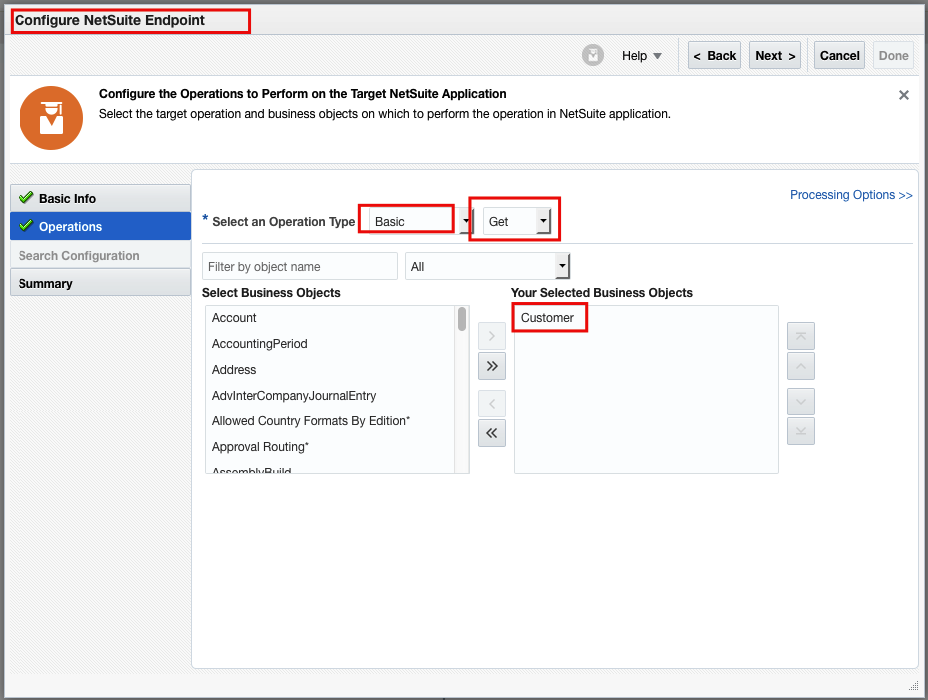
In order to retrieve Custom Fields values for NetSuite, user has to configure "Get" operation and select "Customer" object as we are going to retrieve Custom Field associated with Customer object from NetSuite.
2

Once done, above step, next critical steps to do mapping and that's where challenge was existing.

The Oracle NetSuite Adapter does not currently discover and show the custom field directly for you to select. Therefore, you must specify "InternalId" for each custom field before mapping or retrieving its value. In my previous blog, I have highlighted how to get ScriptId and InternalID for a particular Custom Field. 

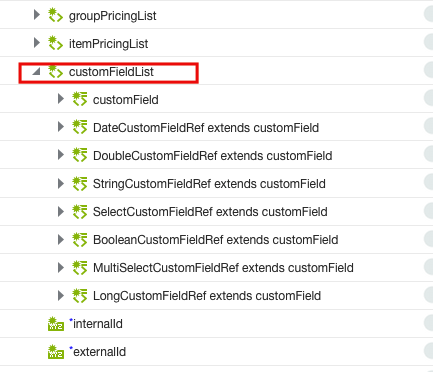
NetSuite response message shows all custom fields under "CustomFieldList" parent element, which has different child datatype elements e.g. DateCustomFieldRef, DoubleCustomFieldRef, StringCustomFieldRef and BooleanCustomFieldRef etc.

8.png

Each sub category element e.g. DateCustomFieldRef  contains concatenated  values from all the Custom Fields of that kind of data type. E.g. if a Customer Object has 2 date type Custom fields then if we map DateCustomFieldRef to right hand side any element then runtime it will show concatenated values for all date type Custom Fields.

To explain further e.g. Customer "John"  as 2 Date type Custom Fields name respectively  "birthDt" and "marriageDt" which are holding two different date values for two different custom field but the response message from NetSuite will only show one datatype which is DateCustomFieldRef which has concatenated values of "birthDt" and "marriageDt" Custom Fields.
If user do simple mapping between source to target as usually we do in OIC.
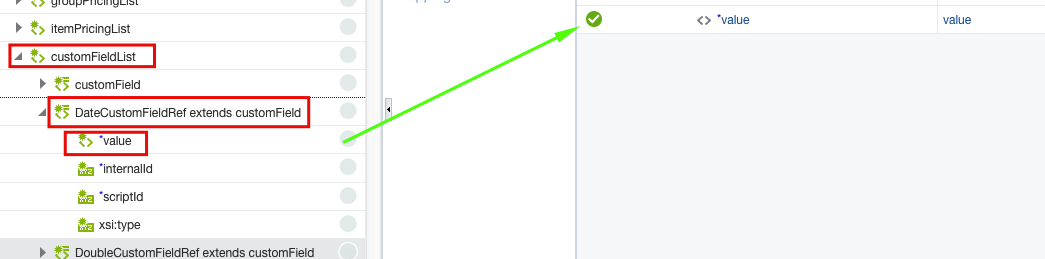
4.png

The runtime outcome of above mapping would be something like this.
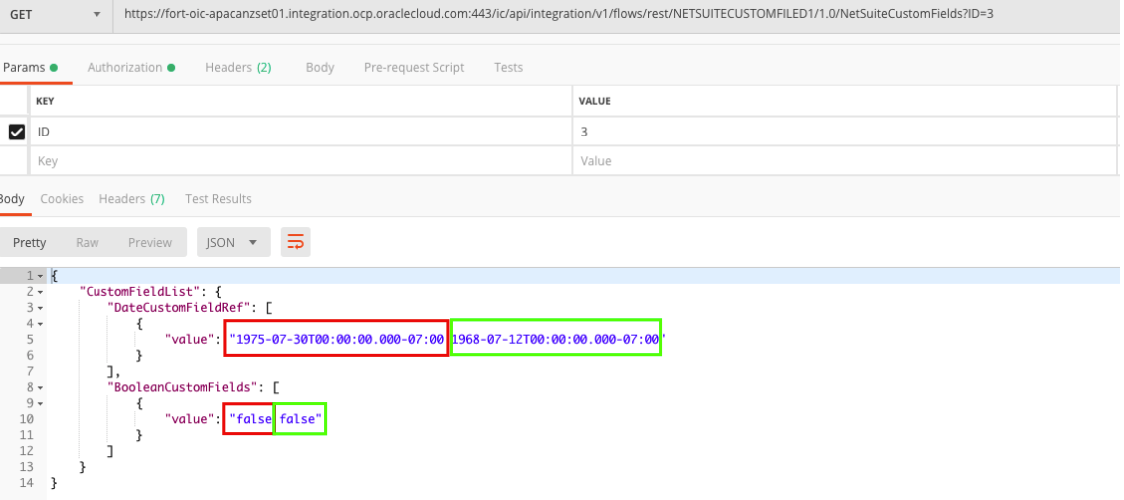
3

Wherein "value" element will have concatenated values of 2 different dates "birthDt" and "marraigeDt". In in our example we were trying to retrieve only "birthDt" date Custom Field value, that's where we were stuck.

Note: To simplified this blog, I have only talked about 2 date type custom fields. However, for the Customer where we have faced this issue they were having 70+ custom fields, so no other logic e.g. substring, trimming and sequencing etc was working, at the same time Customer informed that some Custom fields can have null values has well, so any logic related to positioning of Custom field in NetSuite response can't work.

So, how to retrieve only one "birthDt" date type Custom Field value.
In order to fix this problem, we need to do same mapping as highlighted in above steps. The only additional steps what we need to do is to modify auto generated XPATH statement and include "InternalId" of "birthDt" CustomField.

How to do that-

Just click on mapped element e.g. click on "value" element after mapping-
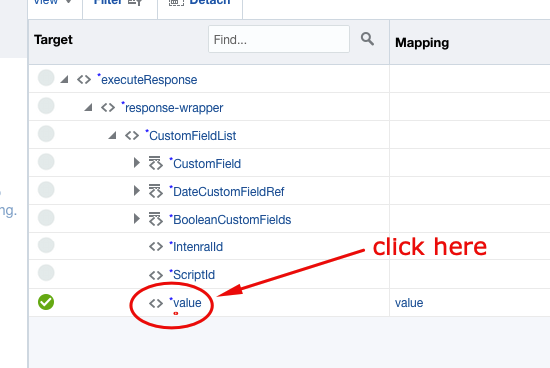
5

Above step will take you the XPATH statement which got generated automatically.
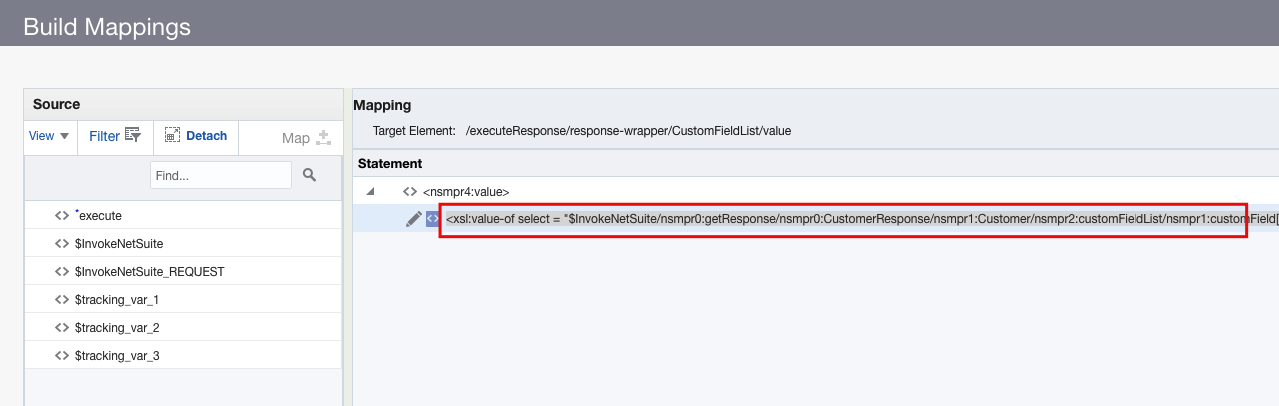
6.png

Just copy and paste that XPATH statement in notepad-
Now, add "InternalId" of "birthDt" date custom field which, e.g. InternalId for birthDt=369
[@internalId=369]/nsmpr1:value">
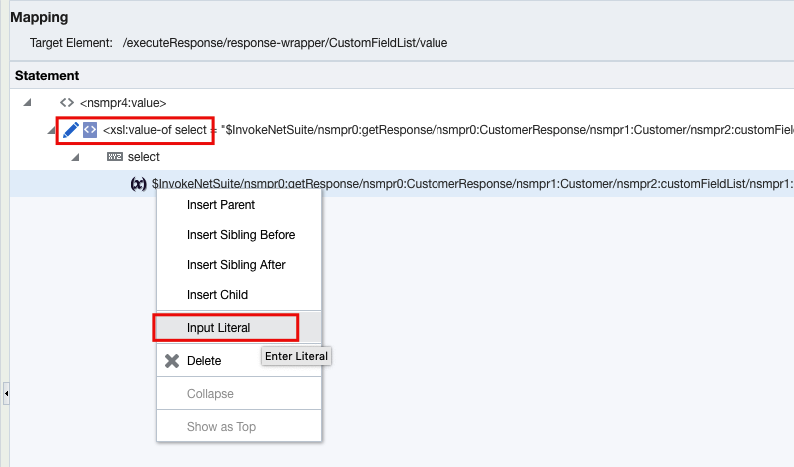
Once modified that XPATH statement, come back to mapper, select the same value element, click edit and select "Input Literal"

7

and paste newly modified XPATH statement and save the mapping.

Activate the integration and now the value element will be having only one date which is the value of birthDt custom field from NetSuite.

I hope, this blog will help you to understand how easily and simply we can retrieve Custom Fields values from NetSuite using Oracle Integration Cloud NetSuite Adapter.

Stay tuned for more useful blog!!!

Happy Blogging ðŸ™‚

Friday, August 9, 2019

Manage Custom Fields in NetSuite using Oracle Integration Cloud NetSuite Adapter


Customization is essential part of any SaaS implementation to capture unique business needs. In NetSuite SaaS application also, there could be several use-cases where user might need to create a new Custom Object or add custom fields into existing Standard Object such as Contact, Account and Organization etc. In this blog I will be showing how can we add Custom fields e.g. Degree name and Passing Year etc. into existing NetSuite Contact object and can update the same field using Oracle Integration Cloud (OIC) NetSuite adapter. 

Please Note: NetSuite Adapter handles the Custom fields in very different way in compare to other adapters. Due to NetSuite API limitation, OIC Adapters not able to discovers Custom fields created in NetSuite which could be concern to many Customers. However, Oracle NetSuite Integration Adapter provide a way to specify manually all those Custom fields using InternalId and ScriptId and assign associated values coming from Source System to those fields and that's the core objective of writing this blog to show to reader how we can manually add and assign values to NetSuite Custom fields using OIC NetSuite Adapter. 
The use case scenarios -


Below are the high level steps user need to perform to achieve outcome.
  • NetSuite - Create Custom Entity fields in NetSuite for Contact object
  • OIC - Create NetSuite Adapter connection as Target System
  • OIC - Create REST Connection as Source System
  • OIC- Workout Request Response Payload for REST Adapter Input
  • OIC - Create Integration, do mapping and Activate Integration
  • OIC - Test Integration using POSTMAN
  • NetSuite - Verify Contact object details

NetSuite - Create Custom Entity fields in NetSuite for Contact object

To simplfied this example we will just creating two Custom fields 1) DegreeName 2) Passingyear
In order to create Custom Fields in NetSuite, navigate to Customization >> Lists, Records and Fields >> Entity Fields >>New >> Specify New Entity Field Name e.g. Degree Name and other parameter as per below snap. 


Similarly, creating another Custom fields "passingyear".
In order to verify newly Created Entity Field for Contact object, Navigate to Contact >> Custom and you will see two newly created field visible there.


Once you create Custom Field, make sure you capture the "InternaId" and "ScriptId" of those fields as we need them while mapping REST Input to NetSuite Contact Object elements. 

However, seeing "IntenralId" and "ScriptId" might not be enable for your NetSuite environment. In order to see those column, two configuration needs to be enabled inside NetSuite. 
Login to NetSuite >> Setup >> Company >> Enable Features >> Find out "Client SuiteScript" and enable this item.


Navigate to Home >> Set Preferences >> General >> Enable "Show Internal Ids"


Once above changes are done. Navigate to Customization >> List, Records and Fields>> Entity Fields  >> Find out newly created Entity Fields e.g. Degree name and Passing year >> ID column represent "Script ID" and Internal ID is InternalID of that Entity field. Note down those values as we need them during mapping time. 


OIC - Create NetSuite Adapter connection as Target System

Login to OIC >> Integration >> Connection >> Create >> Search "NetSuite" adapter >> Select >> Specify some meaningful name for adapter >> ROLE=Invoke >> click on create option.
Note: by the time of writing this document NetSuite adapter doesn't show Trigger role because NetSuite System as such doesn't offer any way to raise event and publish event to external system. If you want NetSuite to trigger something then use OIC generic REST Adatper and Write Custom Code inside NetSuite to trigger OIC REST Adatper Or Initiate a flow and use NetSuite Adapter GET operation to get Customer/Contact Definition etc.
 
NetSuite Adapter needs below inputs -

WSDL URL Sample Value -

https://webservices.netsuite.com/wsdl/v2018_1_0/netsuite.wsdl

Note: In above URL only highlighted version need to be changed for specific NetSuite Environment, rest of the URL stay as it is.

How to get this value -

Login to NetSuite >>Setup >> SuiteTalk UI >> WSDL and XSD >> find out the latest version available for NetSuite WSDL here


Configure Security -

Under the configure security user has to provide quite few attributes values e.g.

Email Address: Enter the email address that serves as the user name.

Account and Role :  Enter the account and role code of the user which using to connect to NetSuite.  To get the Account Name and role. Navigate to Setup>>Integration>>Web Service Preferences and get the Account ID from Top and role code from bottom right corner, refer below snap -


Password & Confirm Password: Enter the password and confirm the password.

Application Id:  Enter the application ID received from NetSuite. This is a mandatory field starting with the 2015_02 version of the NetSuite WSDL. To get this info from NetSuite, navigate to >> Setup >> Integration >> Manage Integration >> Either create new application code or take any existing one from here which been created for OIC


Test Connection:


All good, NetSuite connectivity from OIC been sorted now, let move to next step.

OIC - Create REST Connection as Source System

Creating rest connection is fairly easy in OIC. Navigate to OIC Home >> Integration >> Connection >> Rest Adapter >> define rest connection name

Specify your OIC Environment base URL as Connection URL and select basis Authentication.


Save and test connection. Till now NetSuite Adapter (Target) Connection and REST Adapter (Source) connection been created.

Next, steps to workout input and output payload for Contact object.

OIC- Workout Request Response Payload for REST Adapter Input

In order to create contact using NetSuite API, the important things to work out mandatory parameters because until we supply required mandatory parameter, integration will be keep failing.
In order to do that, refer the NetSuite Schema Brower Online –


Find out Business object e.g. Contact and see what the field are are mandatory fields under record browser


Once all the mandatory values workout then designs the JSON payload for request and response which we will be passing to NetSuite Contact creation request and will get response as well.

Request Payload
e.g.
{
"firstname":"Stan",
"middlename":"kumar",
"lastname":"tanev",
"subsidiaryname":"Honeycomb Holdings Inc.",
"subsidiaryinternalId":"3",
"subsidiaryexternalId":"3",
"subsidiarytype":"contact",
"degreeName":"MCA",
"passingYear":"2000"
}

Response payload
{
"status": "true",
"code": "",
"message": ""
}

OIC - Create Integration, do mapping and Activate Integration

Login to OIC Home >> Integration >> Designer >> Integration >> Click Create >> Select "App Driven Orchestration" >> Give an Integration name as per your choice and click create.
Drag and Drop Rest connection as starting point in blank canvas and configure the REST Adapter request, response parameters etc.


Once REST Adapter gets configured as starting point. Drag and drop NetSuite Adapter and configure for Add Contact Operation.


Perform mapping between REST JSON Input to NetSuite Contact Object for Custom Fields. This is critical and challenging steps in whole flow as The Oracle NetSuite Adapter does not currently discover and show the custom field directly for you to select. Therefore, you must specify scriptId and internalId for each custom field before mapping its value. To get bit details understanding how Custom Field mapping works refer this https://docs.oracle.com/en/cloud/paas/integration-cloud/netsuite-adapter/use-custom-fields-mapper.html

Based on the type of custom field invoked, in our case its String type,  you can provide the details (internalId and scriptId) of the custom field being mapped and the value to map to that custom field.  For example, DegreeName from the source schema is being mapped to a custom field defined by the internalId of 4624 and scriptId of "custentitydegreename_"

Please note: Use appropriate data type e.g. for String based Custom Field use "StringCustomFieldRef", for Boolean use "BooleanCustomFieldRef" and so on.


Use the repeat element functionality in the mapper to map two or more fields of the same type (for example, Boolean).


Once you click "Repeat Element", another "StringCustomFieldRef" will be added and you can assign another Custom Field.


Map all others elements e.g. firstname and lastName etc and complete your mapping.


Similarly, map response from NetSuite to REST JSON, Save the mapping.
Your flow will look like this.


Add tracking field and activate the flow. 


Once Integration activated, if will generate Integration URL which can be used inside postman to trigger the Integration flow with required input payload and authentication.


OIC - Test Integration using POSTMAN


Net-suite - Verify Contact object details


That’s it, as you can witness that the newly created Contact has newly created Custom Fields visible inside Netsuite.

I hope, this blog will help you to understand how easily and simply we can add new  Custom Fields into NetSuite and can perform create Contact operation using Oracle Integration NetSuite Adapter.

So, stay tuned for more useful blog!!!

Happy Blogging ðŸ™‚

Monday, June 24, 2019

Manage Custom Fields in Salesforce using Oracle Integration Salesforce Adapter !!!


Customisation is essential part of any SaaS implementation to capture unique business needs. In Salesforce SaaS application also, there could be several use-cases where user might need to create a new Custom Object or add custom fields into existing Standard Object such as Contact, Account and Organisation etc. In this blog I will be showing how can we add Custom fields e.g. Degree name, Passing Year etc. into existing Salesforce Contact object and can update the same field using Oracle Integration Cloud (OIC) Salesforce adapter. I will write another separate blog later where I can show how a completely new Custom Object can be created in Salesforce and updated through Oracle Integration Salesforce Adapter.

Before, I go into deep drive, just want to highlight the core objective of this blog to show Salesforce configuration and OIC Salesforce adapter configuration, I am assuming reader has already basis understanding of OIC product features such as Connection, Integration, mapping and deployment. 
My colleague had already covered Salesforce Inbound and Outbound integration using Oracle Integration Cloud Salesforce Adapter. So, I might not be repeating few steps which already been covered in this blog. if you doing Salesforce Integration first time, then its recommended to review these blogs as well.

So let's do deep dive now. Below are the high levels flow and steps which needs to be performed to achieve desired result.
01.png
  • Create custom fields e.g. Degree Name and Passing year into Salesforce existing Contact Object
  • Create/Update Salesforce Connection in OIC
  • Create REST Adapter in OIC
  • Create Integration which maps Contact Object Custom Fields from Postman to Salesforce
  • Activate Integration
  • Trigger Integration using Postman
  • Verify Result In Salesforce

Create custom fields e.g. Degree Name and Passing year into Salesforce existing Contact Object


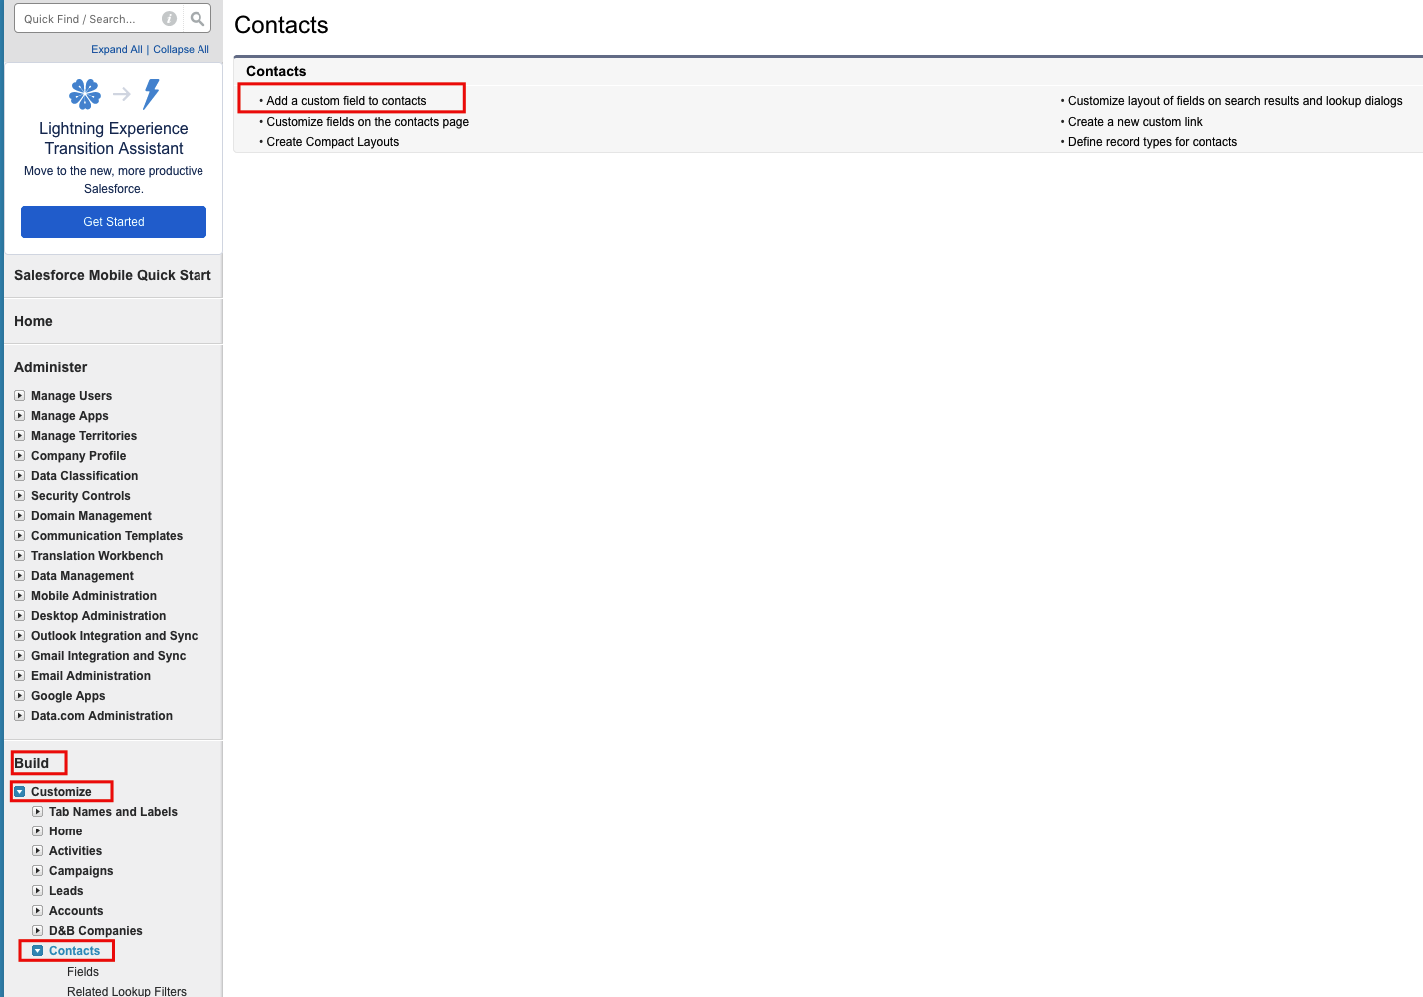
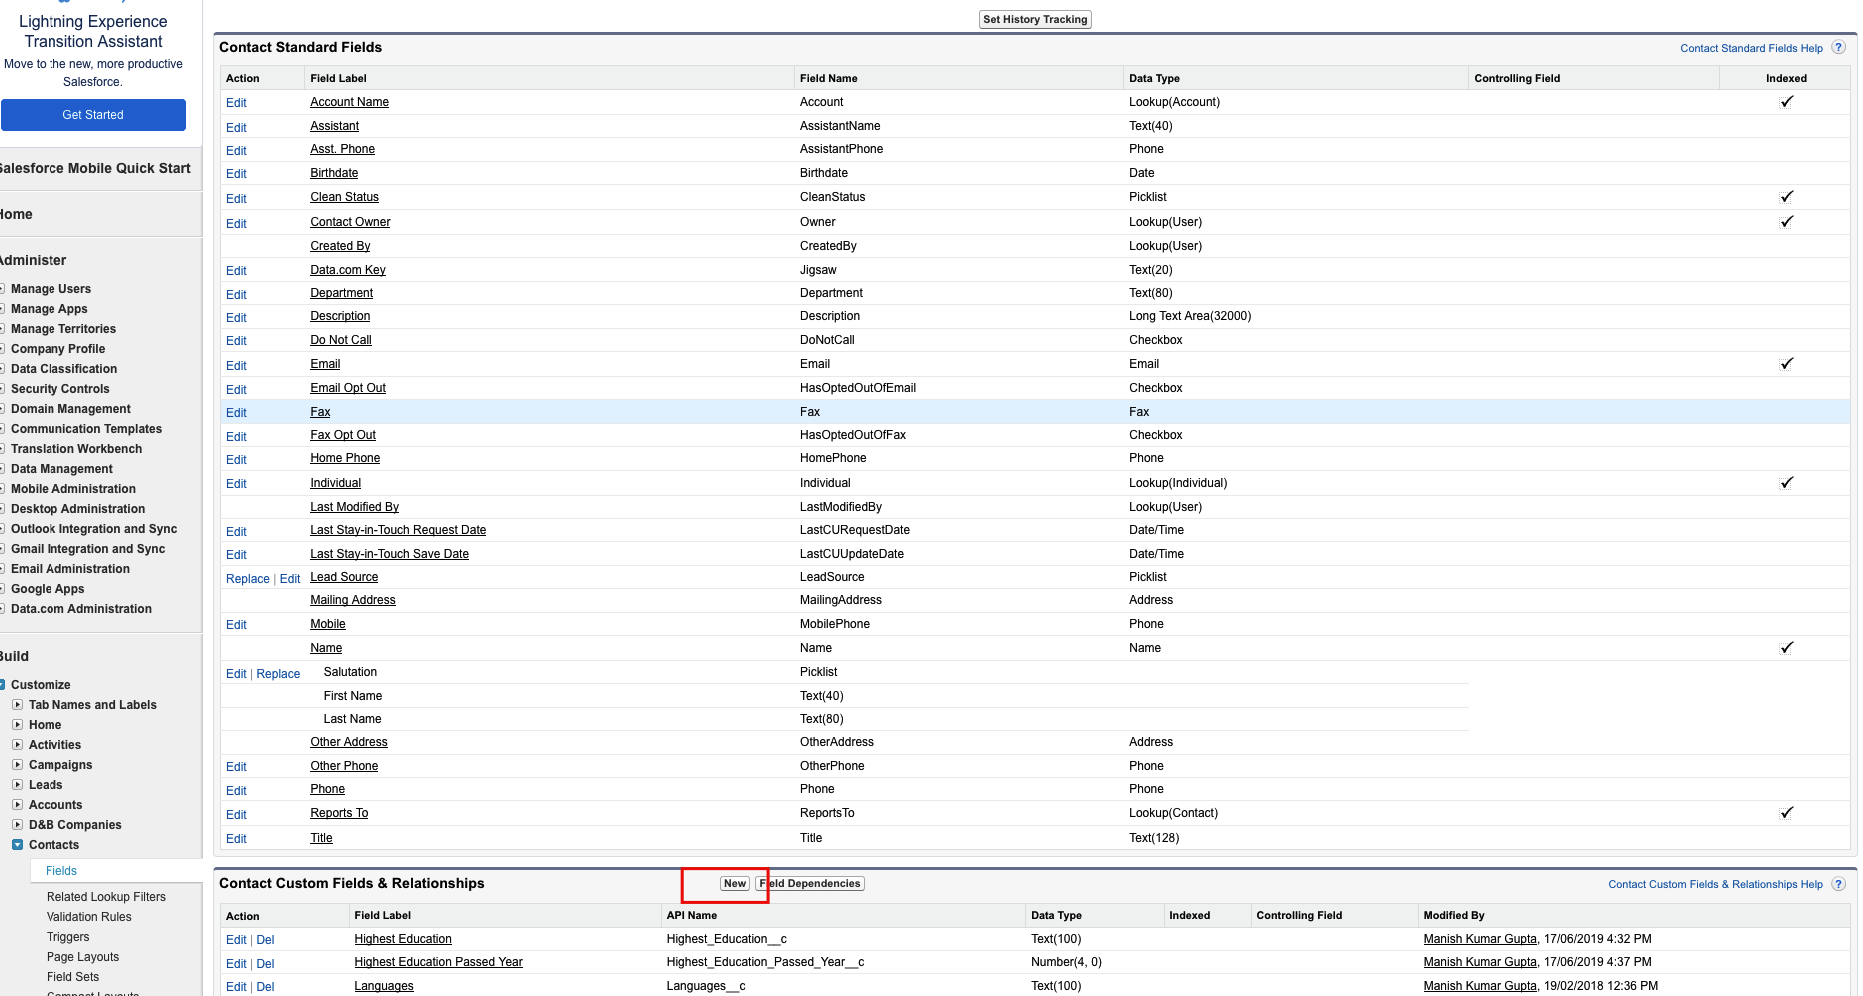
Login into SF using your credentials and navigate to this path Setup >> Build >> Customize >> Contact >> Create Custom Fields to Contact >> New

2
3
4

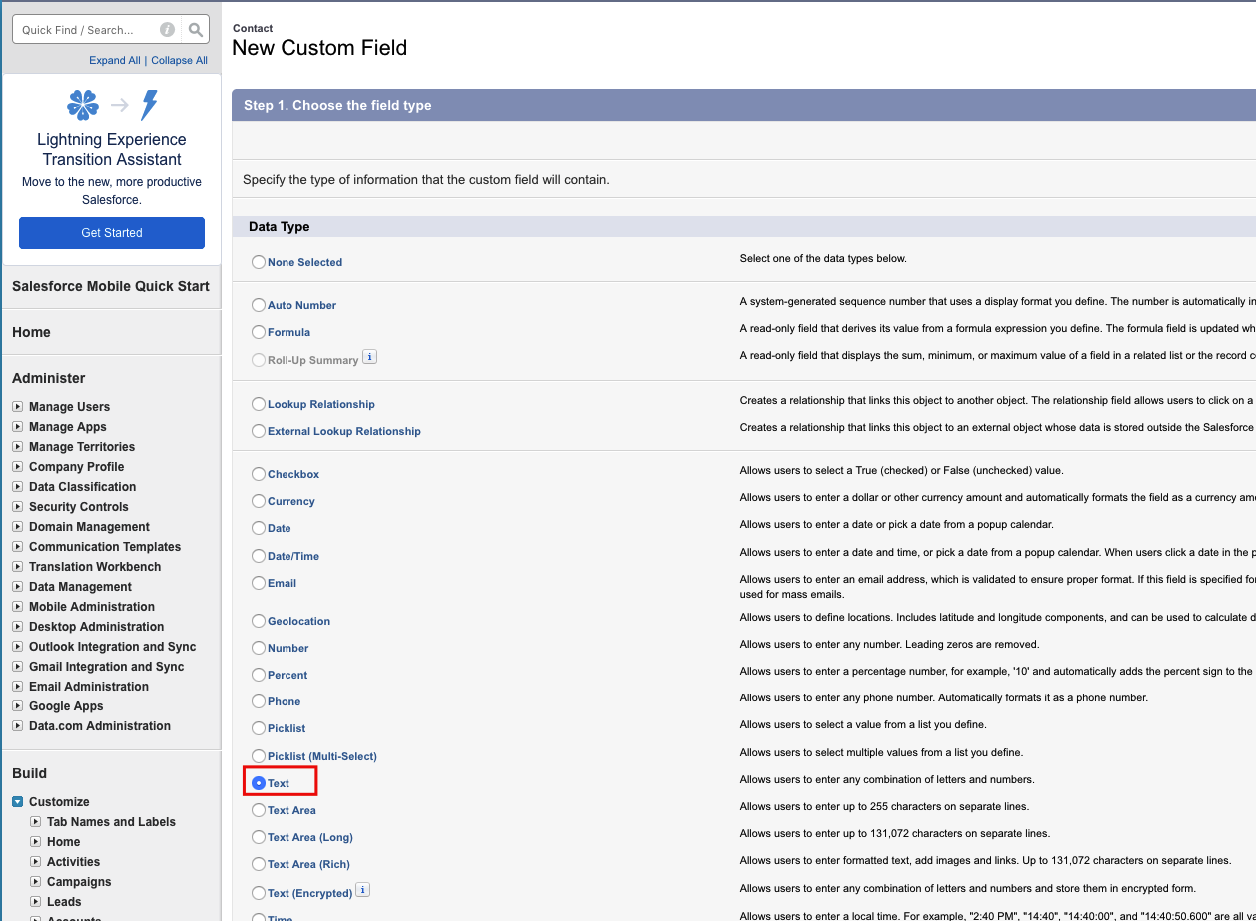
Select the data type of new filed

4.1

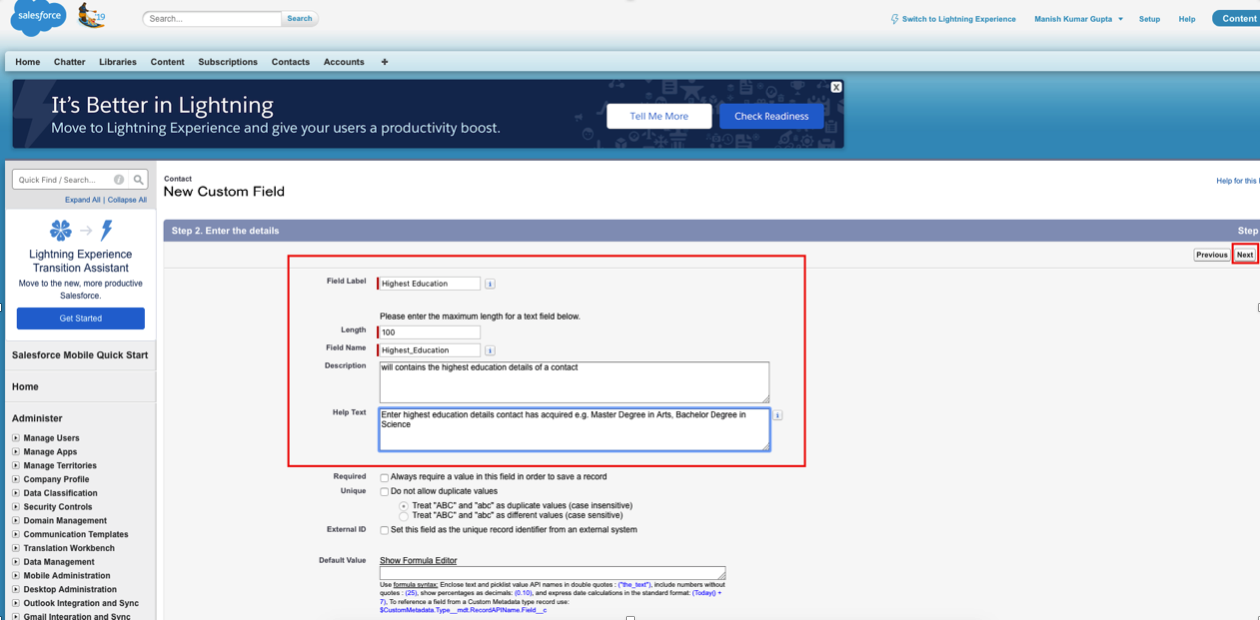
Enter the details of new Custom Fields e.g. Highest Education, length and label etc. and click next.

5

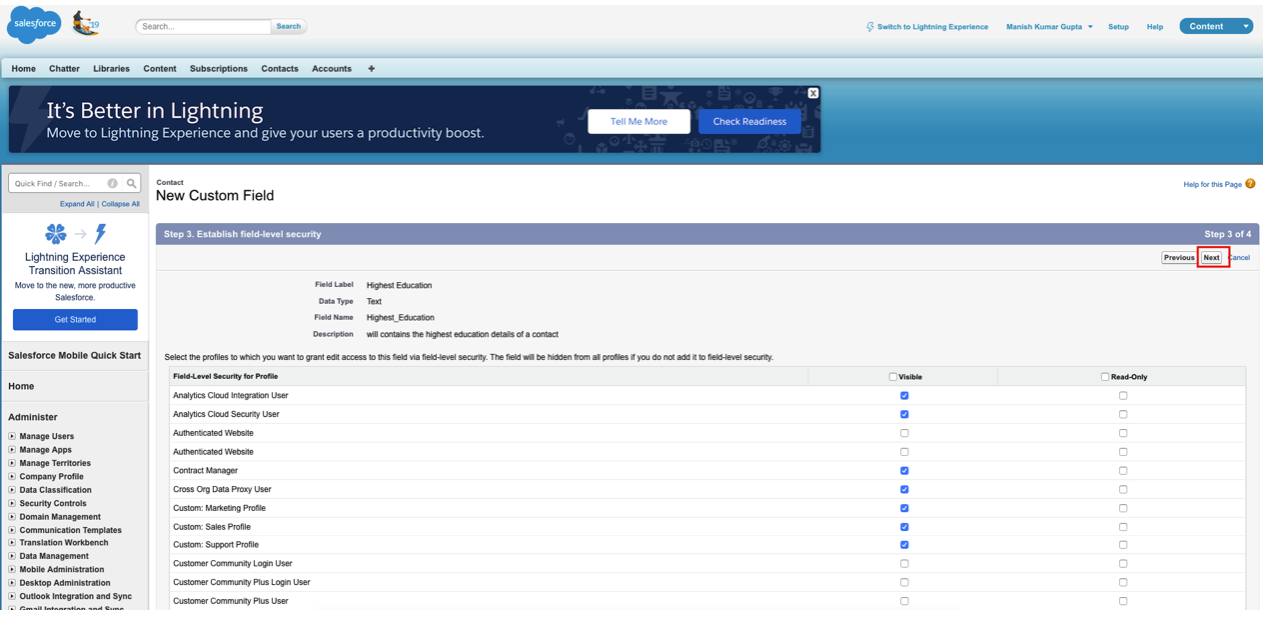
In next screen, you need to select profile who are allowed to access this new filed. I haven't selected anything specific, left default value. If you have any specific requirement then select relevant profile.

6

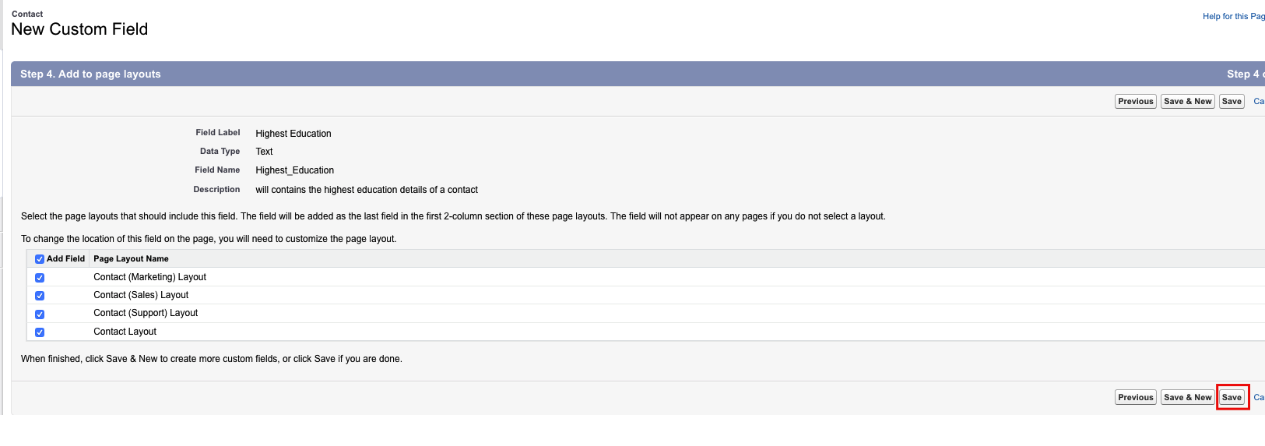
In this screen, page layout needs to selected where this new fields will be appearing, again, I left default value.

7

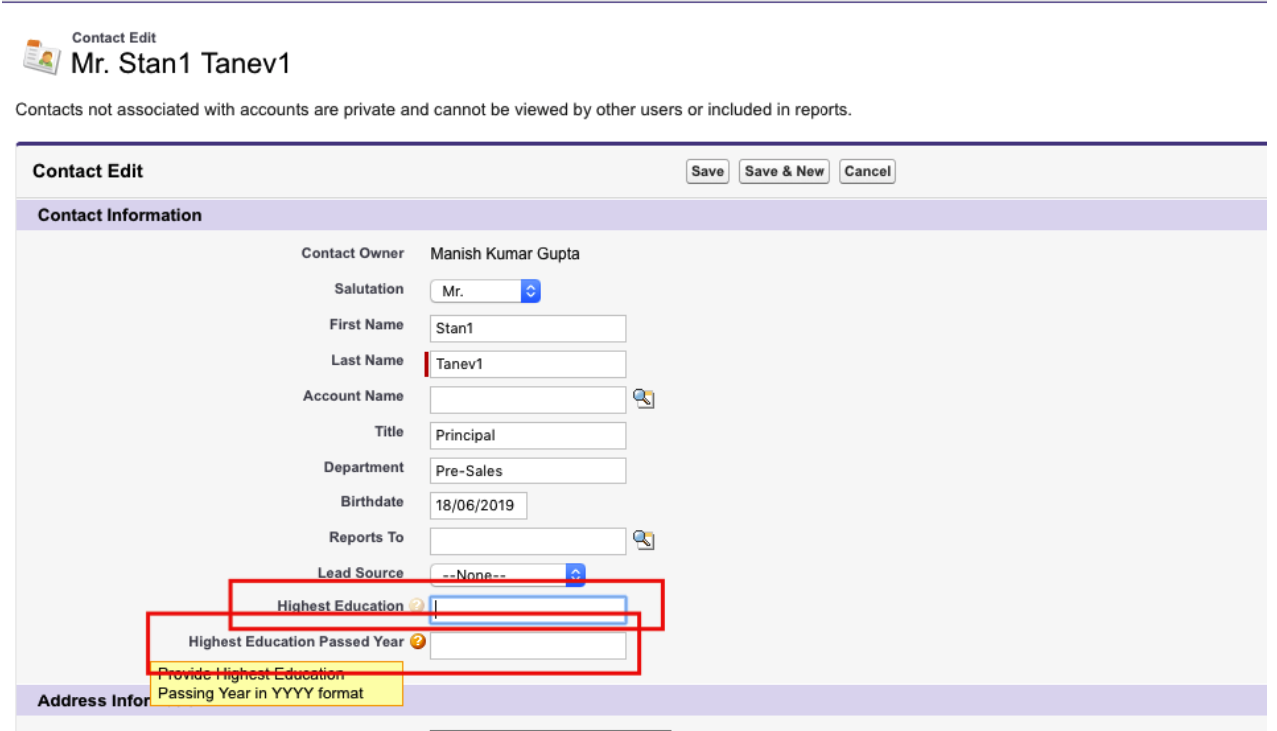
That's it. Now, new custom field "Highest Education" been created. Similarly, create another field "Highest Education Passing Year" as Number filed. Once done both two fields will be look like this -

8

Now, if you edit any existing contact or create new contact, these two fields should be part of Contact Business Object.  Click on any existing contact to verify newly created fields in Salesforce.

9

So, now custom fields creation process is done, next we need to create connection in OIC for Salesforce.

Create/Update Salesforce Connection in OIC

In order to create connection in OIC for Salesforce, user needs Salesforce Enterprise WSDL, Token and username and password. Please refer this blog to get instruction how to get Token and Enterprise WSLD from Salesforce.

Once you get Enterprise WSDL and token, creating Salesforce Connection in OIC is pretty simple process. Login to OIC console, from home page,  navigation to Integration >> Connection >> create >> find and select Salesforce >> specify any valid String as Connection name >> Select Role Trigger and Invoke >> Create >> then configure Connectivity and Security

Configure Security: You need browse Salesforce Enterprise WSDL

Configure Security:  You need to provide your password + Salesforce Token. For example: If your password is mypassword, and your security token is XXXXXXXXXX, then you must enter mypasswordXXXXXXXXXX
And Test the connection, it must show you message "Connection SalesForceXXXX was tested successfully."

10

Now, we are ready with Salesforce Connection. Next Steps to create REST Adapter in OIC.

Create REST Adapter in OIC

In this steps, we need to create a REST Connection in OIC with valid Contact Object JSON Payload having Custom Field as input.

Again, navigate to Connection >> create >> find and select "REST" >> specify any valid String as Connection name >> Select Role Trigger and Invoke >> Create >> then configure Connectivity and Security

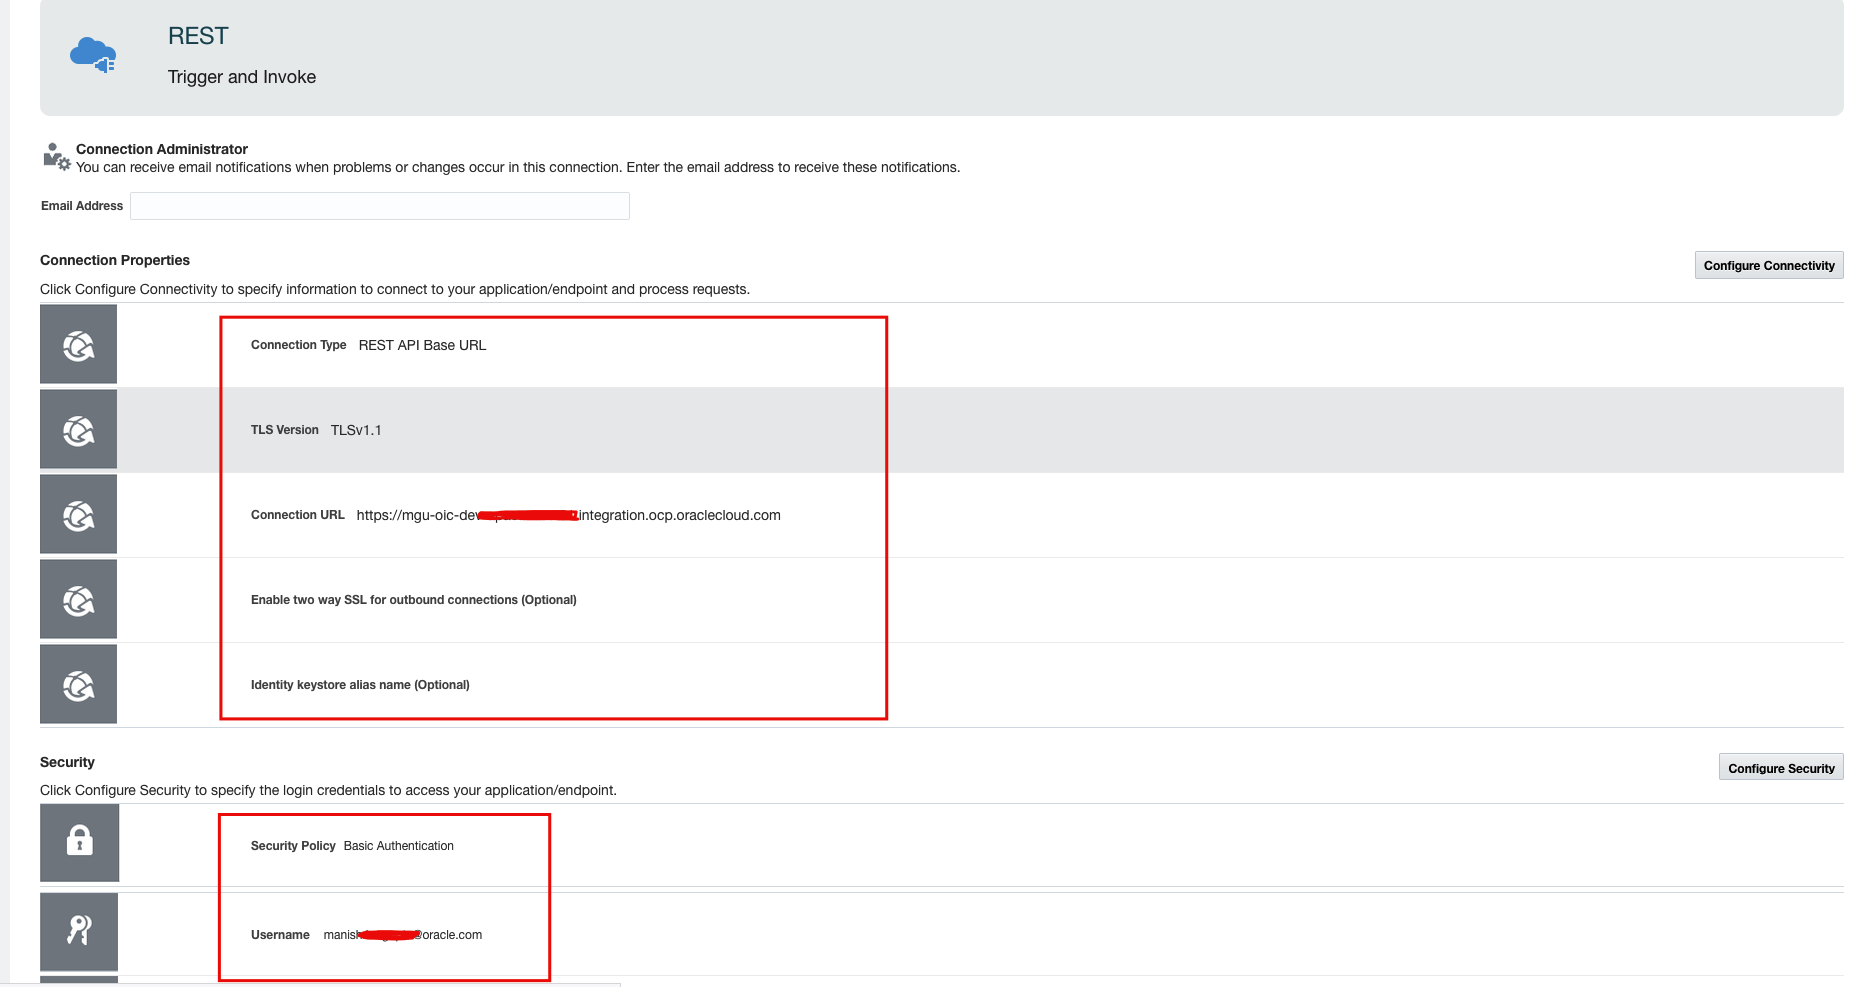
Configure Security: Specify Connection type as "REST API Based URL", TLS Version as "TLSv1.1", Connection URL as "https://mgu-oic-dev-XXXX.integration.ocp.oraclecloud.com" and leave other to default values.

Configure Security:  Provide your OIC username and password to secure this REST Endpoint.
11

Now, we are ready with Rest Adapter. In next steps we will be creating Integration.

Create Integration which maps Contact Object Custom Fields from Postman to Salesforce

In this step we will be creating a new Integration, will use REST Connection as source Connection, and Salesforce Connection as Target Connection and will perform mapping.

Navigate to Integration >> Create >> App Driven Orchestration >> Select >> Provide valid Integration name>>  Click Create

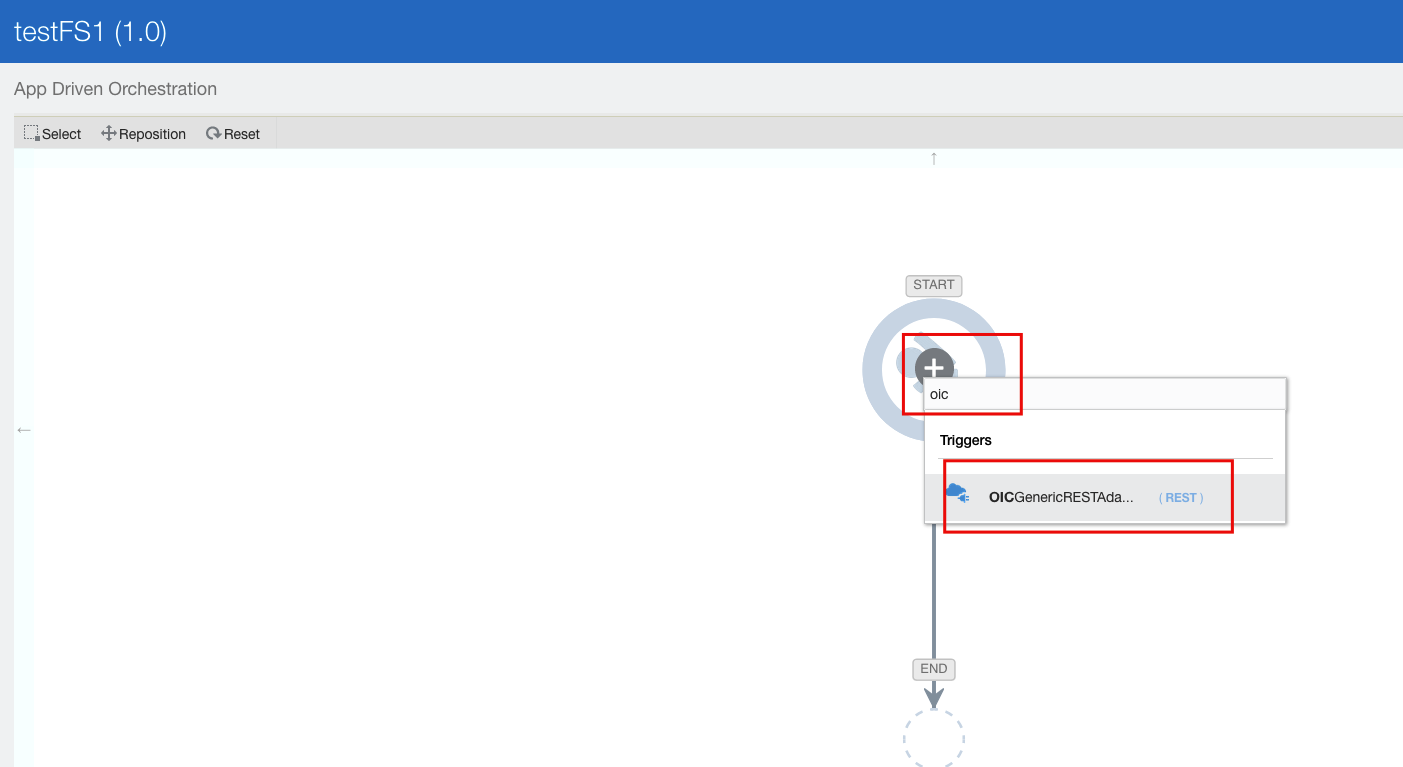
A blank canvas will appear with start option, click on + sign and find out your newly created REST Connection

12

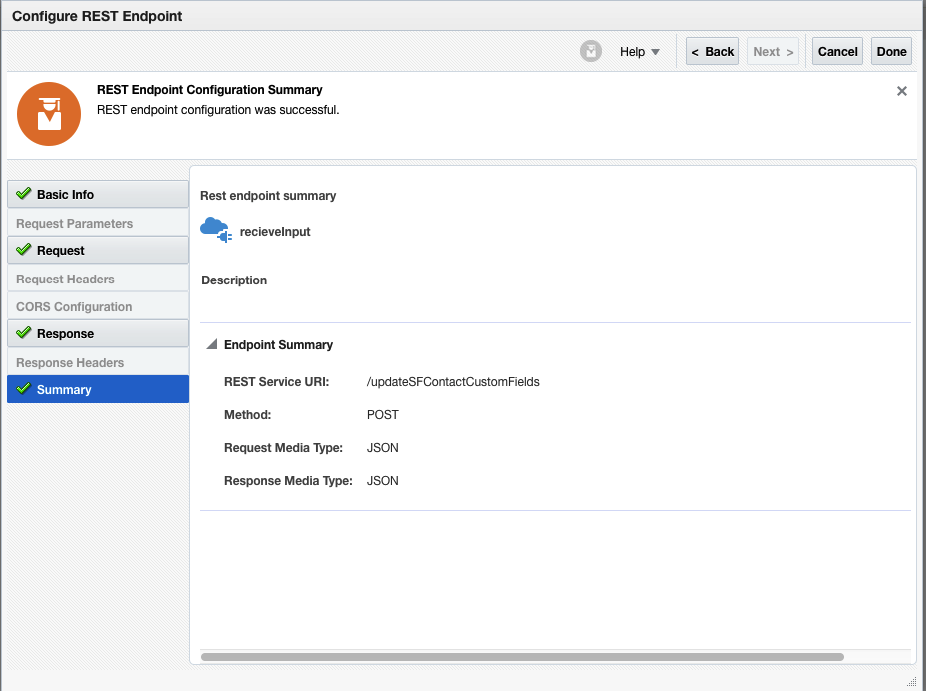
Specify the Endpoint URI e.g. /updateSFContactCustomFields, action as "POST", select "Configure a request payload for this endpoint", click next.

Select "JSON" as Request payload format, provide inline JSON payload as given -
{
"firstName": "manish",
"lastName": "Gupta",
"title": "mr",
"department": "Sales",
"email": "manish.ku.gupta@oracle.com",
"mobile": "090098908",
"AddrStreet": "35 Ethel St",
"AddsCity": "Sydney",
"AddrState": "NSW",
"AddrPIN": "2122",
"AddrCountry": "Australia",
"HighestEdcation": "Master In Science",
"PassedYear": "2002"
}
13.png

Once, that done, you will see something like below -
14

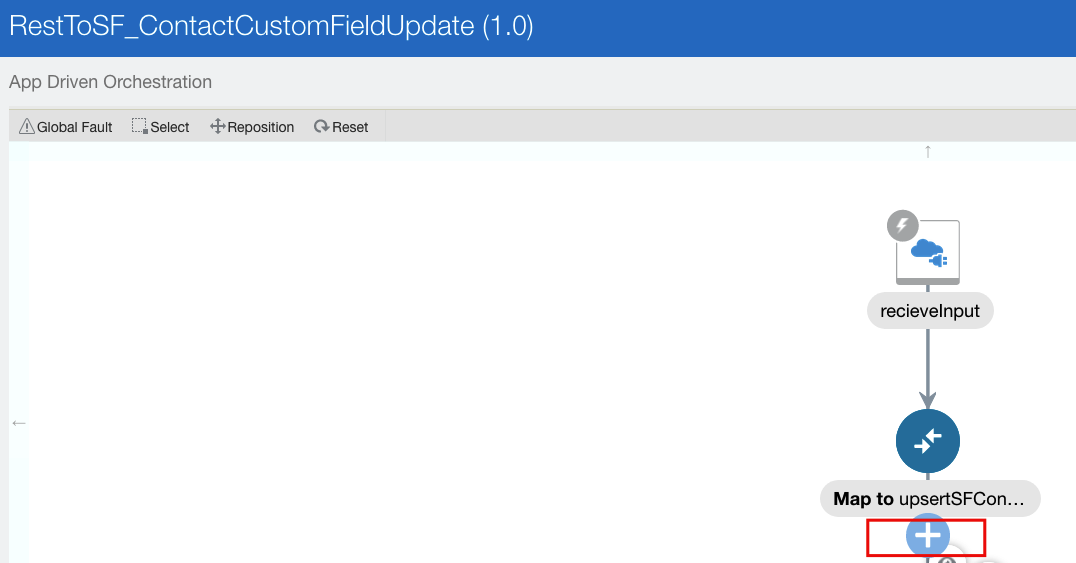
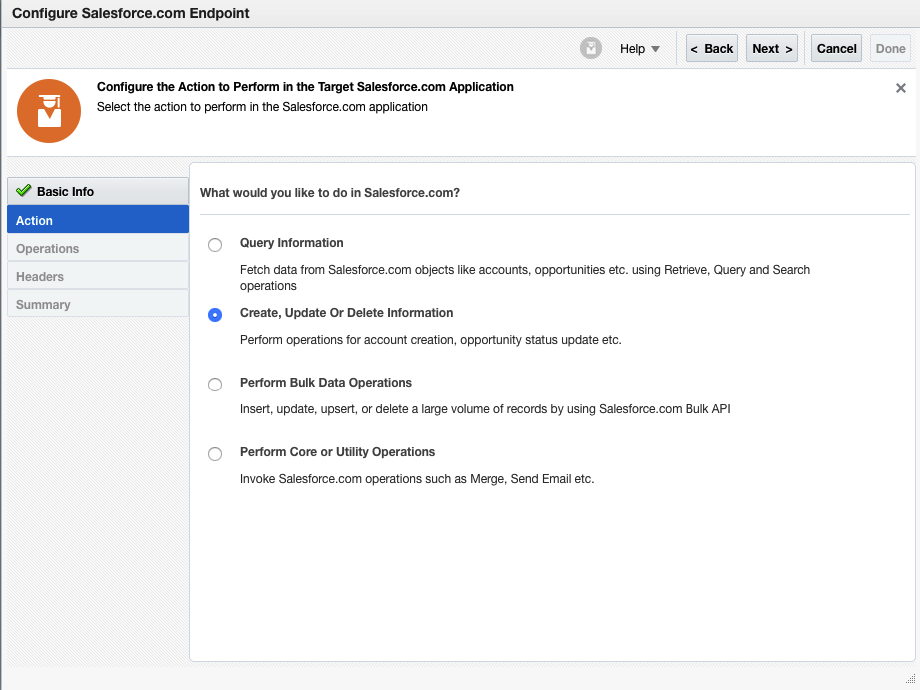
Now, click again + sign to add Salesforce Connection. Once clicked +, you will be able to find out previously created Salesforce Connection, click that and it will open connection wizard.
Provide any valid endpoint name >> select "Create, update and Delete Information", click next.
15

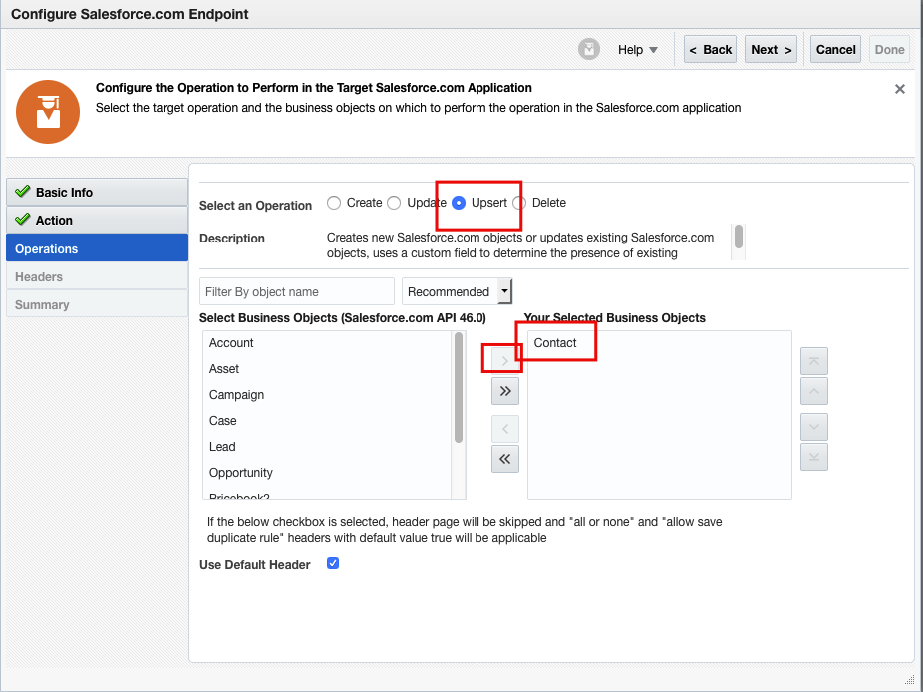
Select "Contact" Business Object from Business Object List, click next and finish the wizard.

16

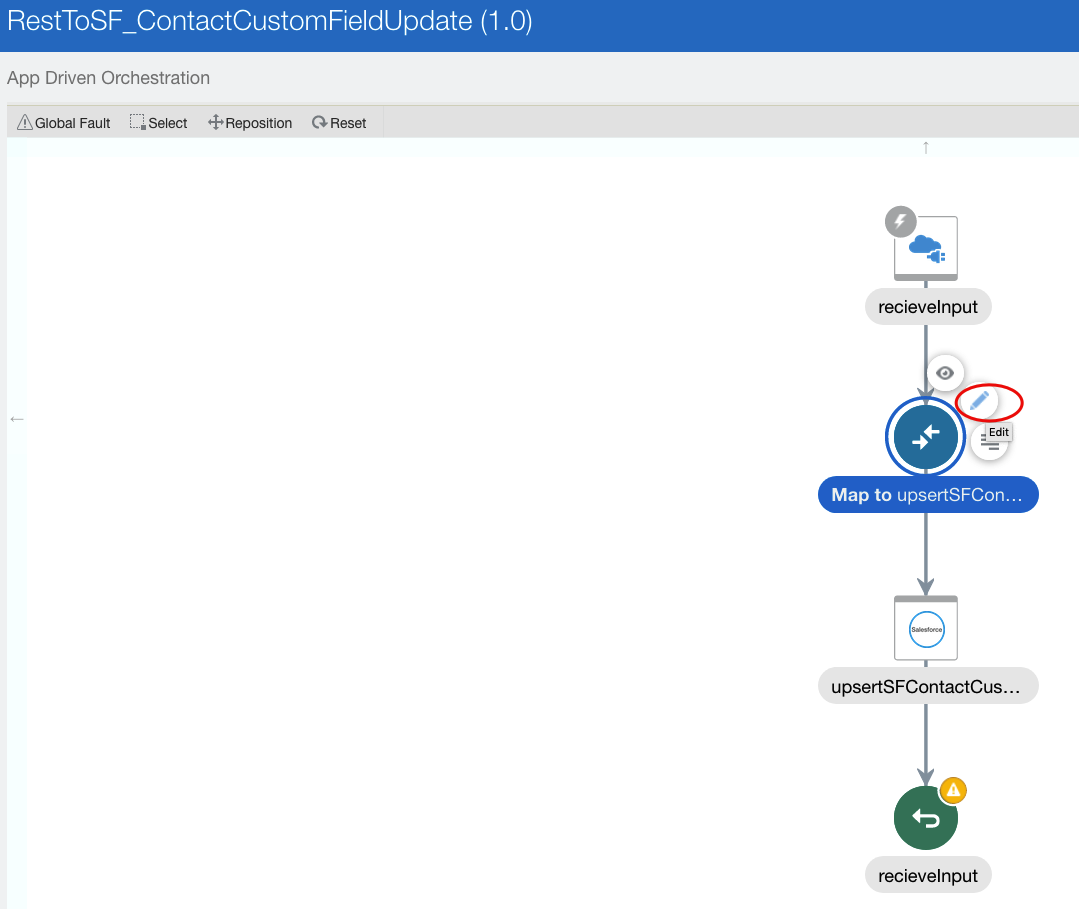
Once above step, done you will see flow something similar to this-

17

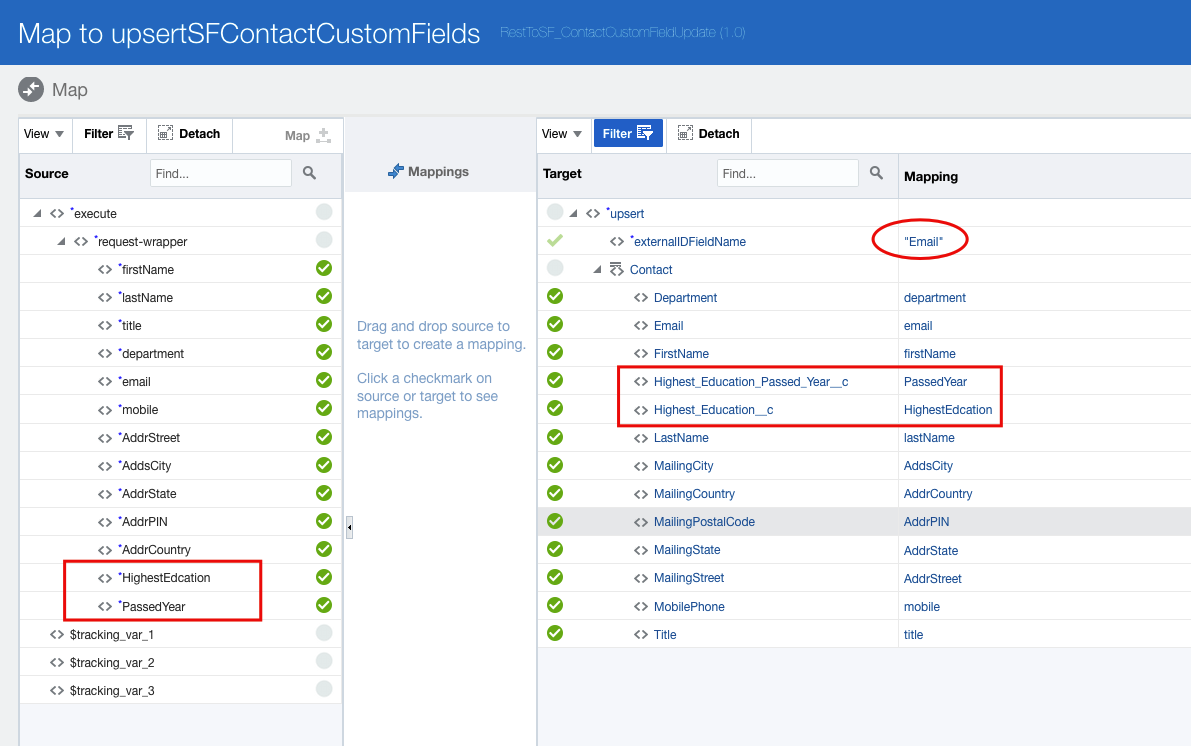
Now, click on Edit option in mapping and perform Source To Target elements mapping and you would be able to see newly added Custom Fields.

Note: Since, I selected Upsert operation, we need to set "externalIDFieldName" to some valid Field name which we can use as Unique key to perform Upsert Operation. In my case I have selected "Email". However, you can use any other fields as well e.g. Mobile number etc.

18

Once mapping done, Set tracking fields to "FirstName" or "Email" etc. Activate the Integration, get the Integration URL and be ready to tests the Integration.

Trigger Integration using POSTMAN tool 

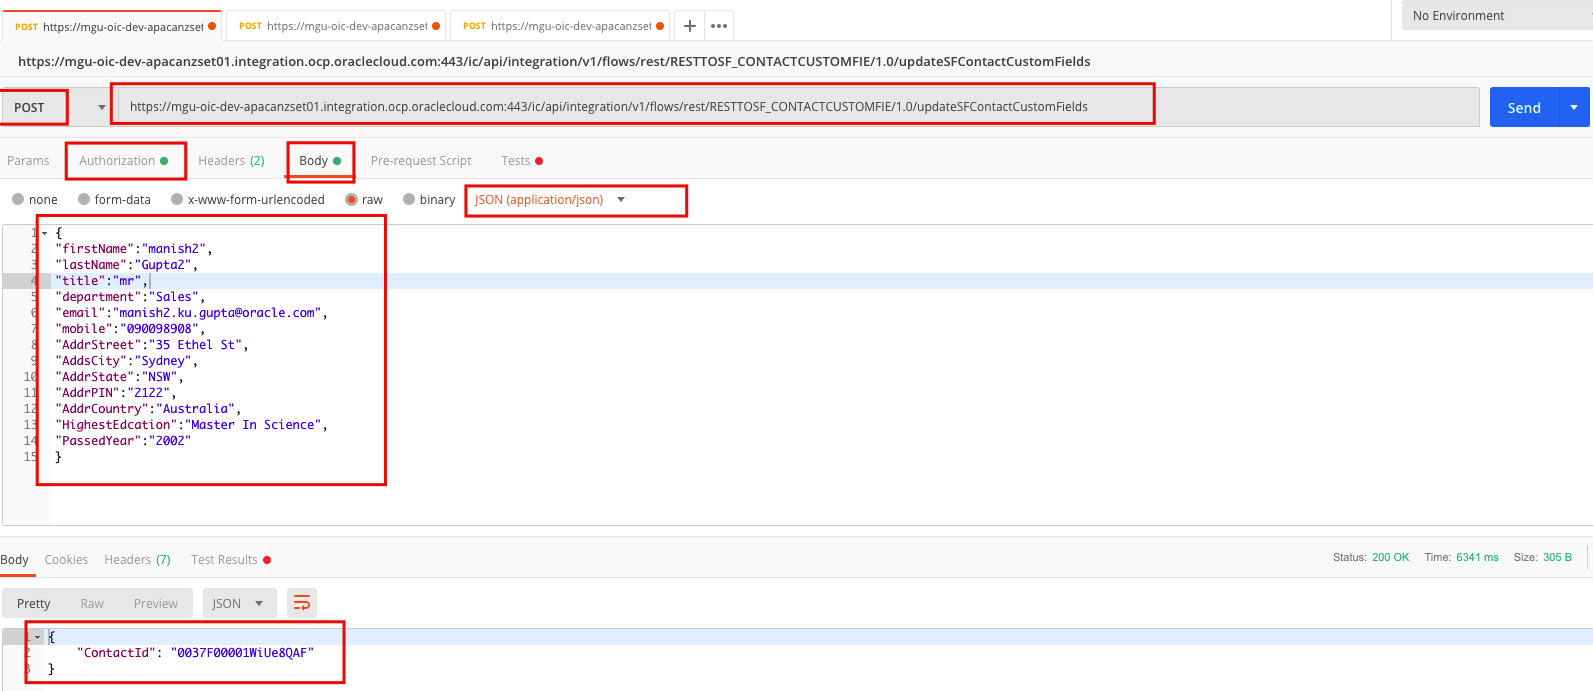
Open the Postman tool, specify this Integration URL there, specify basis authentication, set body type as "JSON(application/json), action as "POST" and click send button to trigger the transaction-
Use below payload body -
{
"firstName":"manish2",
"lastName":"Gupta2",
"title":"mr",
"department":"Sales",
"email":"manish2.ku.gupta@oracle.com",
"mobile":"090098908",
"AddrStreet":"35 Ethel St",
"AddsCity":"Sydney",
"AddrState":"NSW",
"AddrPIN":"2122",
"AddrCountry":"Australia",
"HighestEdcation":"Master In Science",
"PassedYear":"2002"
}
 
19.png

Verify Result In Salesforce

Once transaction executed successfully, you will contact id in response body.
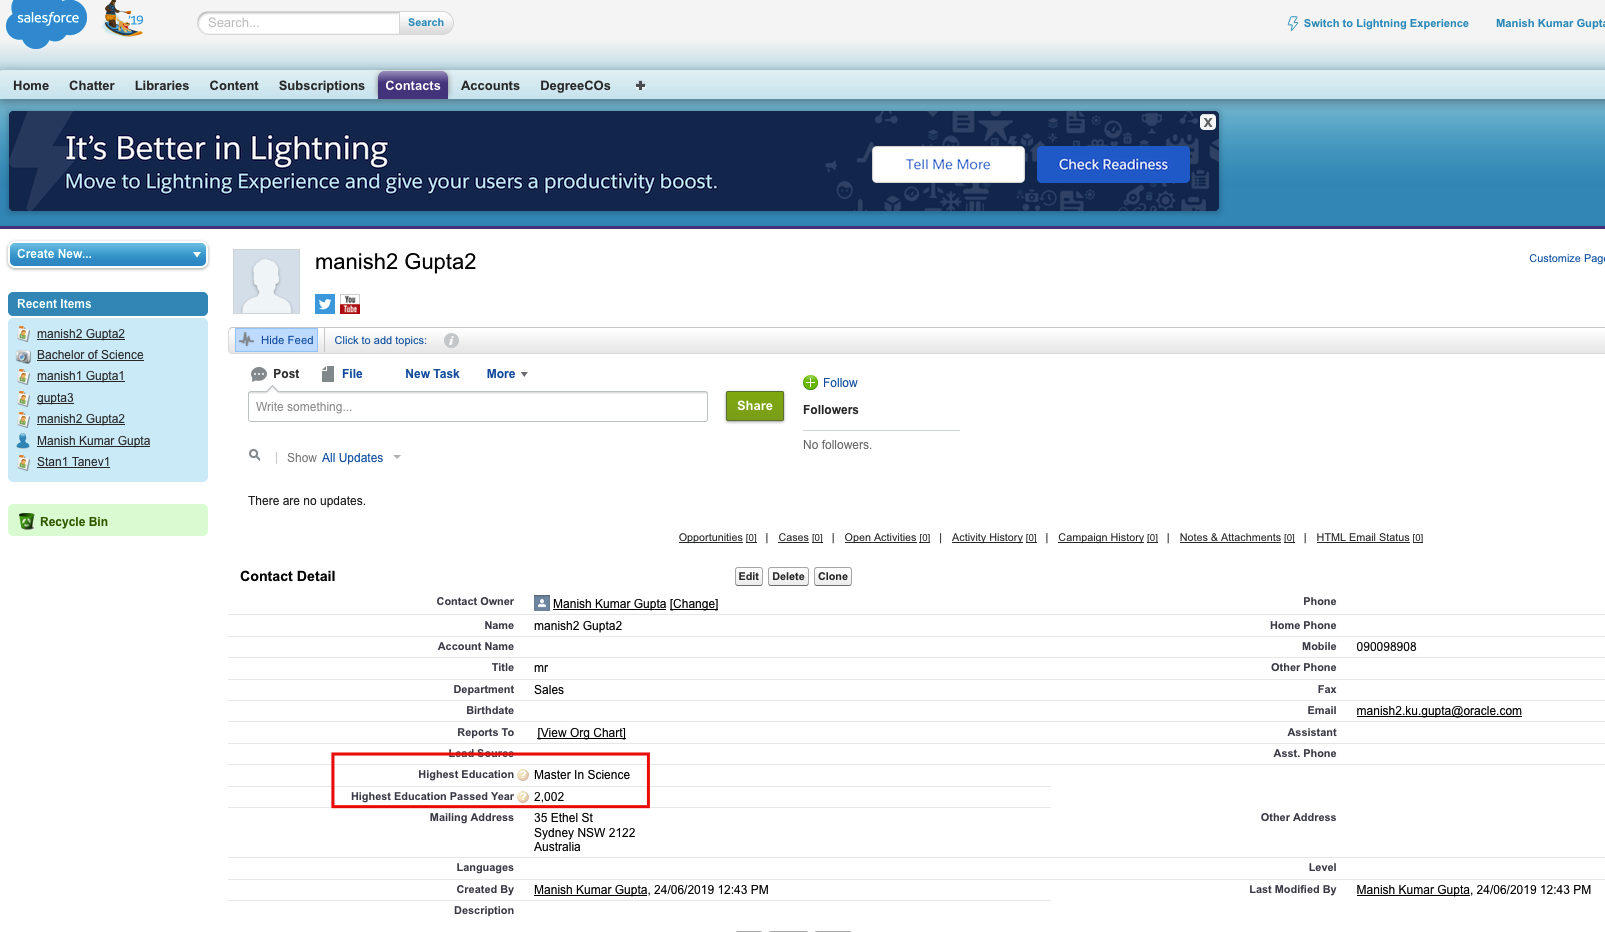
Login to Salesforce and verify newly created Contact and Custom Fields.

20

That's it, as you can witness that the newly created Contact has newly created Custom Fields visible in Salesforce.

I hope, this blog will help you to understand how easily and simply we can add new  Custom Fields in Salesforce and can perform create/update operation using Oracle Integration Salesforce Adapter.

Soon, I will be publishing another blog for creating a new Custom Object in Salesforce and control the same using Oracle Integration Cloud Salesforce Adapter. So, stay tuned !!!

Happy Blogging :)